

Oh my gosh, you guys, if you’ve ever been burned by the sad, rubbery disappointment that is a batch of oven-baked wings, I totally get it. I used to think that real, shatteringly crisp wings were only possible if you hauled out the deep fryer—but trust me, that mess just isn’t worth it most nights!
I spent what felt like months testing temperatures, seasonings, and drying techniques so you don’t have to. After what felt like a wing marathon in my own kitchen, I finally cracked the code for truly crispy baked chicken wings every single time, and zero frying is involved. I promise, these are genuinely crunchy outside and ridiculously juicy inside. This simple method is now my go-to for game day, snack spreads, or just when that craving hits hard. You are going to be amazed that you made these in the oven!
Serving up fantastic appetizers and snacks is what we are all about here at DelishCraze, and I think this wings recipe is probably my biggest home-cook win this year. For all my tested recipes and reliable game-day fare, check out my page on appetizers and party snacks!
- Why This is the Best Recipe for Crispy Baked Chicken Wings (No Frying)
- Ingredients for Perfect Crispy Baked Chicken Wings
- Essential Equipment for Crispy Baked Chicken Wings
- How to Prepare Crispy Baked Chicken Wings Step-by-Step
- Tips for Success with Your Crispy Baked Wings Recipe
- Variations: Saucing Your Crispy Baked Chicken Wings
- Storage and Reheating Instructions for Crispy Baked Chicken Wings
- Frequently Asked Questions About Crispy Baked Chicken Wings
- Serving Suggestions for Your Easy Game Day Chicken Wings
Why This is the Best Recipe for Crispy Baked Chicken Wings (No Frying)
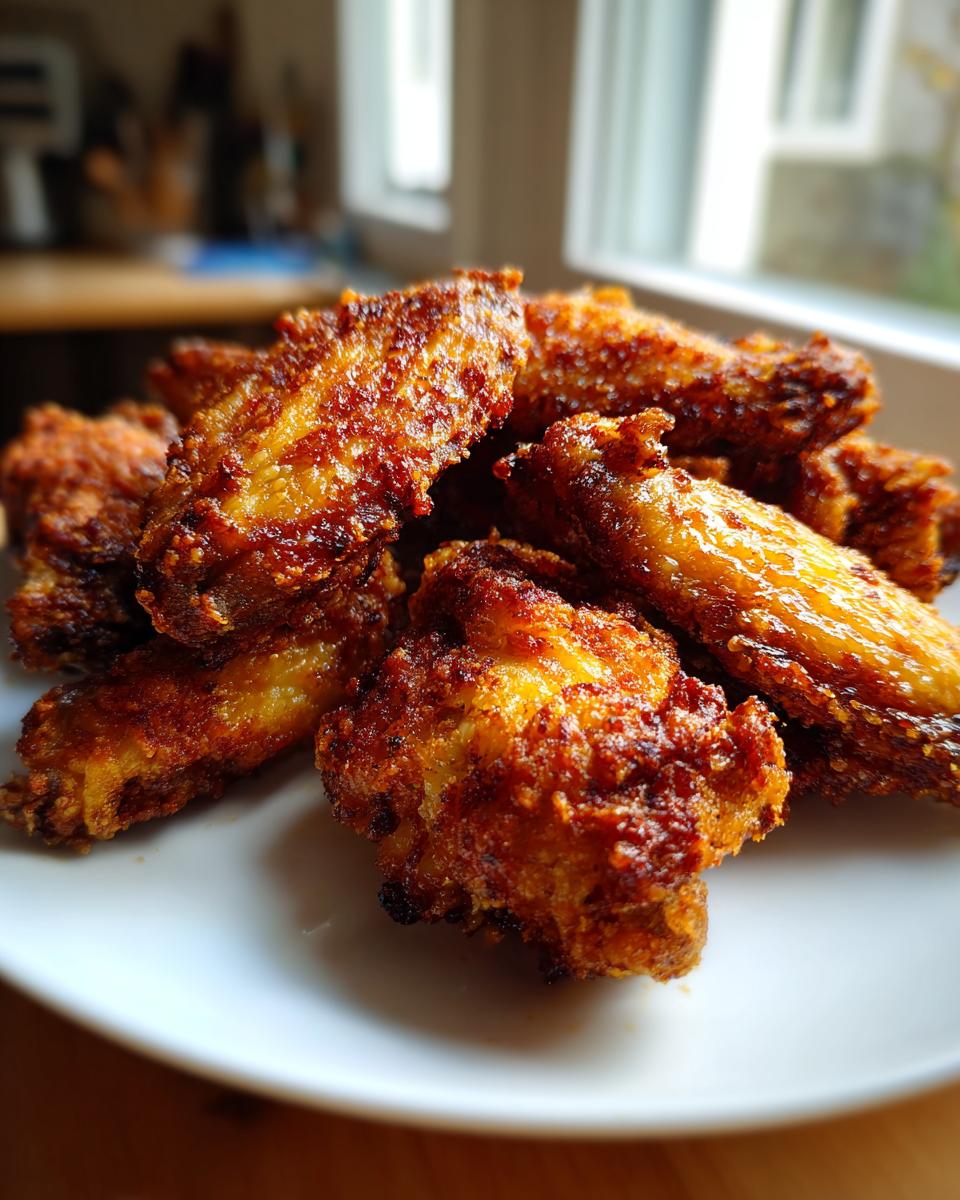
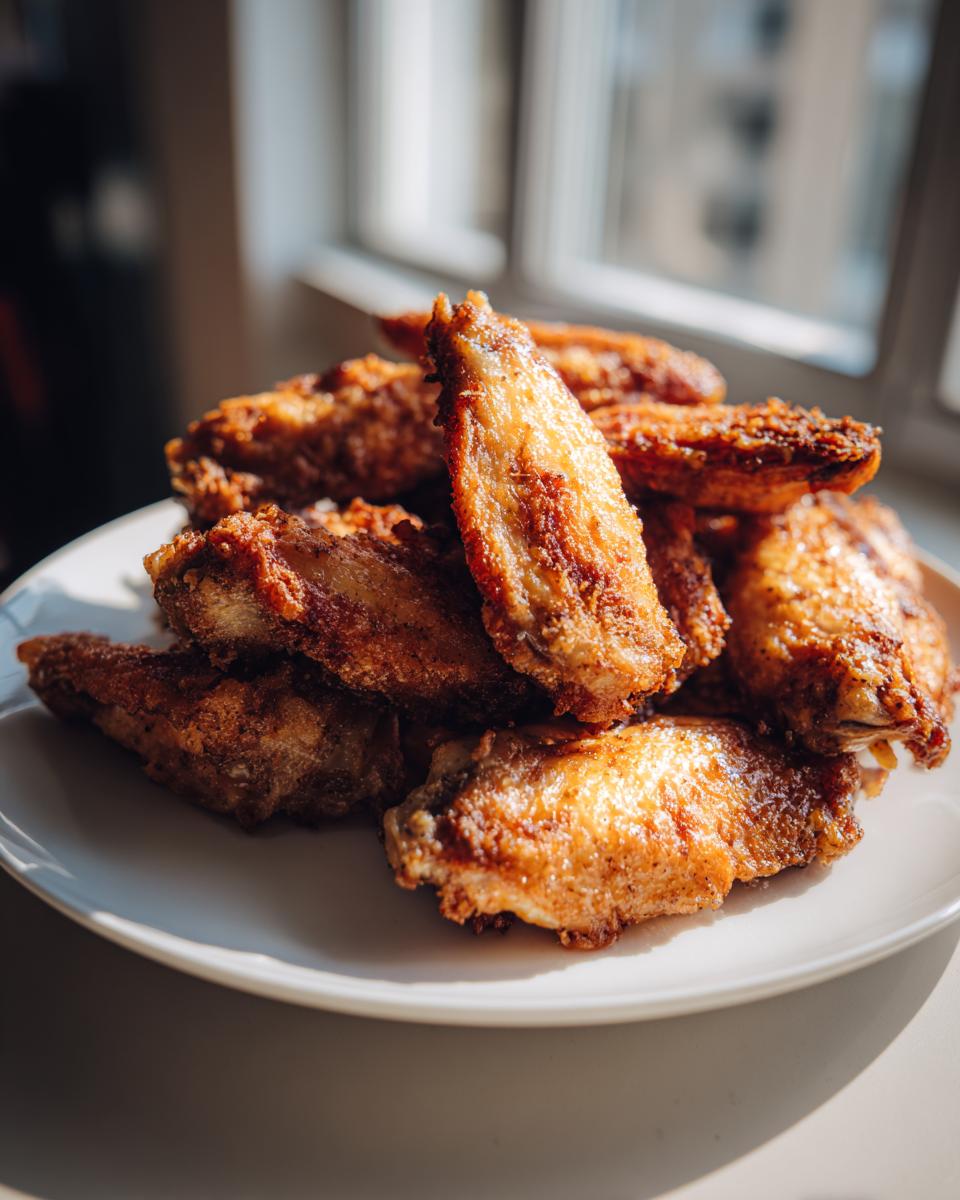
Okay, stop everything. The reason these oven baked chicken wings crispy results happen without oil and without sinking into a sad, soggy mess is all thanks to one humble ingredient: baking powder. Seriously, I know it sounds wild, but it’s the absolute game-changer here!
We are aiming for that perfect contrast—the holy grail of chicken wings—juicy inside crispy outside wings. The baking powder works magic by slightly altering the skin’s surface chemistry. It dries out the skin just enough so that when it hits the high oven heat, it puffs up and turns perfectly crunchy, mimicking that deep-fried texture without any of the fuss. It’s how we make what I call the ultimate no fry chicken wings recipe!
Achieving Ultimate Crispiness with the Baking Powder Trick for Crispy Chicken Wings
So, what is the science behind this little wonder? Baking powder is alkaline, which means it helps raise the pH level of the chicken skin when you mix it on. This chemical reaction speeds up the Browning process and helps draw out the surface moisture better than salt alone can do. It essentially preps your skin to get super dry and crackly in the oven. This simple application of the baking powder trick for crispy chicken wings means you get that satisfying crunch you never thought possible without dunking them in hot oil!
Ingredients for Perfect Crispy Baked Chicken Wings
You don’t need a pantry full of fancy stuff for this! The ingredient list is super straightforward, which is why this makes such a great, quick crispy baked wings recipe for any night of the week. Remember to look for aluminum-free baking powder if you can find it; it just gives a cleaner taste, though regular works fine too!
- 2 lbs chicken wings (make sure you separate all those flats and drumettes!)
- 1 tablespoon baking powder (aluminum-free preferred, please!)
- 1 teaspoon salt
- 1/2 teaspoon black pepper
- 1/2 teaspoon garlic powder
- 1/2 teaspoon paprika
- 1 tablespoon olive oil (I only use this if I want a little shine after they are fully cooked, it is honestly optional for crispiness!)
Essential Equipment for Crispy Baked Chicken Wings
Listen, if you skip the equipment setup, you risk doom. I’m serious! We are trying to achieve those beautiful, healthy baked chicken wings that taste fried, and that means we need to fight humidity at every turn. The setup below ensures hot air can circulate all around the wing, which is the secret weapon for truly crispy skin chicken wings.
You only need a few things, but choosing the right ones makes all the difference between crispy and pathetic:
- Sturdy Baking Sheet: Needs to be large enough that you aren’t stacking your wings. Overcrowding equals steam, steam equals soggy skin. We don’t want that!
- A Wire Cooling Rack: This is non-negotiable for any oven fried chicken wings recipe. It lifts the wings up off the pan so that fat drips away and the hot air completely surrounds them. Don’t use a cooling rack that’s too flimsy; you need one that can handle the heat.
- **Aluminum Foil:** Not for crispiness, but for your sanity! Lining the baking sheet under the rack with foil makes cleanup ridiculously fast. Since we are using spices, cleanup is usually the worst part of making these appetizer chicken wings oven treats!
- Large Mixing Bowl: You need room to toss those wings thoroughly with the baking powder mixture so every surface is coated beautifully.
Get this gear ready before you do anything else. Trust me, once that oven is hot, you want zero scrambling!
How to Prepare Crispy Baked Chicken Wings Step-by-Step
Now that we have our glorious setup and our secret weapon (the baking powder mix!), it’s time to actually cook these beautiful crispy baked chicken wings. This process isn’t hard at all, but you have to follow the sequence exactly, especially when it comes to the heat. We’re aiming for that perfect 45-minute total bake time to lock in the moisture while making the outside crackly!
First, make sure that 425°F (220°C) is roaring in your oven. This high initial heat is key! If you need a little extra flavor boost later on, remember you can always whip up a quick garlic butter spread to toss them in after they come out of the oven, but let’s focus on the crisp first!
Prepping and Coating for Maximum Crunch on Your Crispy Baked Chicken Wings
This is where most people mess up when they try to make oven baked chicken wings crispy. You absolutely must pat your wings completely dry with paper towels. I mean, go nuts! Any surface moisture will turn to steam in the oven, and steam is the enemy of crunch. Once they are bone dry, toss them immediately into the bowl with that spice and baking powder blend. Stir everything around—use your hands if you need to—until you can see a light, even dusting of white powder clinging to every single piece. That light coating is what sets you up for success!
The Two-Stage Baking Technique for Juicy Inside Crispy Outside Wings
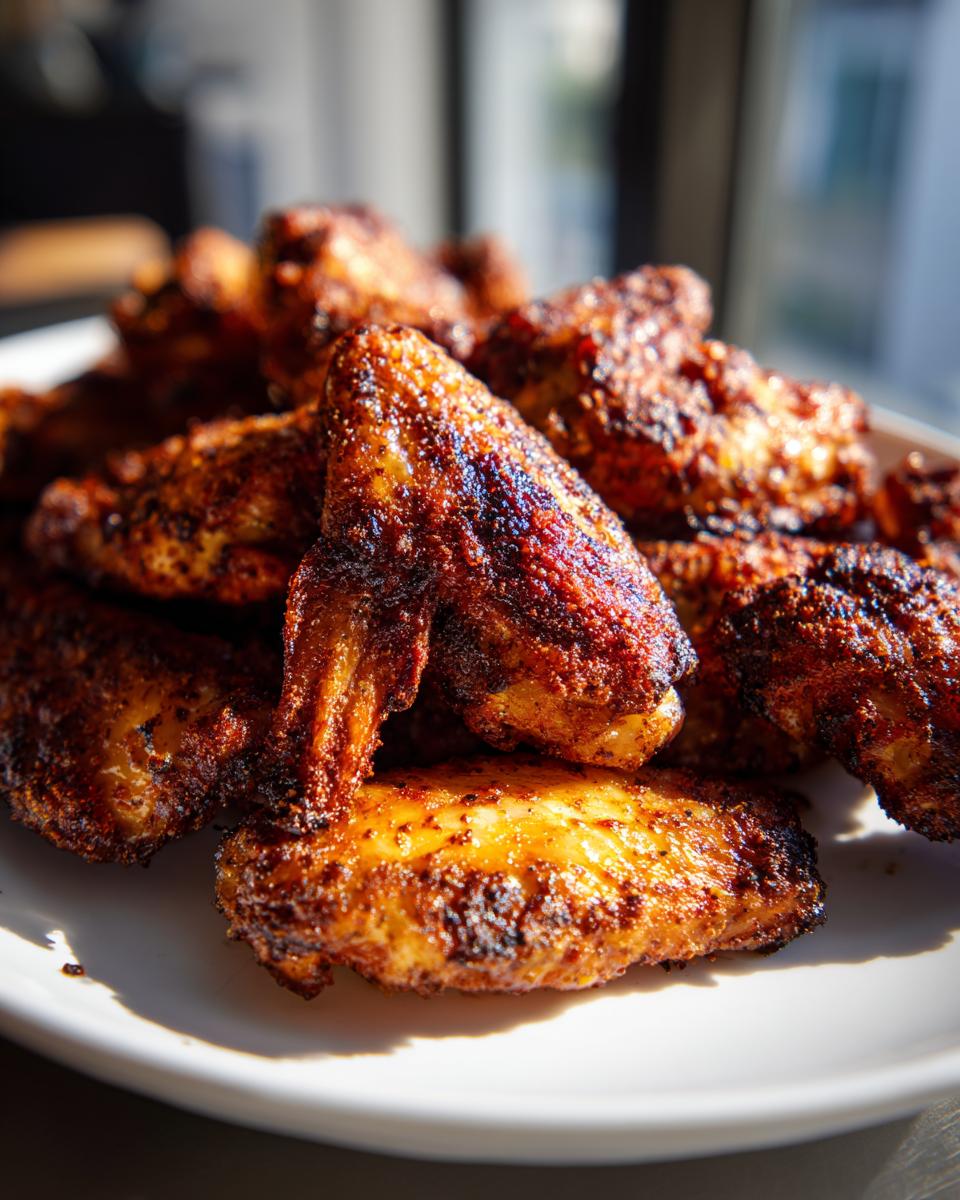
The magic happens in two phases! First, put those wings on the wire rack and bake them at that initial high heat—425°F—for a solid 20 minutes. This blast of heat starts rendering out the fat and setting that outer layer. After 20 minutes, pull them out, and you need to flip every single wing over. Don’t skip flipping them! Now, reduce your heat down to 400°F (200°C) and pop them back in for another 20 to 25 minutes. This lower temp finishes cooking the inside perfectly while letting that skin get deeply golden and shatteringly crisp. That’s how you guarantee juicy inside crispy outside wings!
Tips for Success with Your Crispy Baked Wings Recipe
I want every single batch of these wings you make to be jaw-droppingly crispy, so here are the final things I always double-check before serving. Remember, we talked about the importance of the wire rack—it’s the barrier between heaven and a soggy wing disaster!
If you are serving them dry, you can actually hit them with the broiler for the last minute or two. Keep your eyes glued to the oven, though, because they go from golden brown to totally burnt in about five seconds flat! This little trick gives you that restaurant char. If you plan on saucing them—maybe with my homemade Honey BBQ sauce—you must, absolutely must, toss them right when they come out of the oven. The residual heat helps the sauce adhere perfectly and keeps the skin from softening too quickly. For more great tips on getting things right the first time, I always suggest checking out advice from blogs like The Women Home!
Variations: Saucing Your Crispy Baked Chicken Wings
The beauty of this dry-rub base is twofold: they are fantastic served exactly as they are, or you can dress them up! If you’re keeping them as a dry rub setup, add a little cayenne or smoked paprika to your initial seasoning mix—it really amps up the flavor profile and helps build that crust. That’s usually my go-to for a great chicken wing seasoning for crispiness.
But if you need sticky wings, wait until they come out of the oven, toss them immediately in Buffalo, or try my Cajun copycat sauce. The key is getting the sauce on while they are piping hot so they soak up the flavor without losing all that beautiful, hard-earned crunch.
Storage and Reheating Instructions for Crispy Baked Chicken Wings
What happens when you have leftovers? Because, let’s be honest, that rarely happens with this recipe, but when it does, we need a plan! Don’t even think about microwaving them; that’s instant sogginess, and we worked way too hard for that!
For storage, let the wings cool completely before sealing them in an airtight container. The best way to bring back that crunch is the oven or an air fryer. Pop them back in a 375°F oven for about 8 to 10 minutes, or use your air fryer at 350°F for about 4 minutes. Quick blast of dry heat wakes up that awesome crust!
Frequently Asked Questions About Crispy Baked Chicken Wings
I get so many messages asking for just a little more clarification on a few things when people try this recipe for the first time. It’s all about nailing those little details to ensure you get the absolute best flavor and texture for your easy game day chicken wings!
If you are planning your weeknight meal schedule, remember that this recipe is actually quite fast, fitting right into my category for Quick & Easy Weeknight Dinners because the prep is just 10 minutes!
Can I make these healthy baked chicken wings without any oil?
Yes, you absolutely can! That’s what I love about this recipe—it’s designed to rely on the baking powder to dry out the skin, not added fat. If you are aiming for guilt free crispy wings, skip the optional tablespoon of olive oil completely. The skin will still get wonderfully golden and crispy because the baking powder does all the heavy lifting. You’ll get a fantastic low-fat option that still tastes amazing!
What is the best temperature for oven fried chicken wings recipe results?
To get that signature crunch associated with an oven fried chicken wings recipe, you need a two-step approach that I outlined in the main instructions. We start screaming hot at 425°F for 20 minutes to set the skin, and then we drop it down to 400°F to finish cooking through without burning. And don’t forget that wire rack positioning—it’s just as important as the temp a! If you are seeing soggy bottoms, it usually means the rack wasn’t used or you crowded the pan, leading to steam buildup. For more advice on getting that perfect crunch, check out this great resource from Chef Savvy!
Why are my baked wings still soggy when I bake them?
Nine times out of ten, sogginess comes down to moisture management. Did you pat those wings *super* dry? I mean, remove every speck of water. Second, were they touching each other on the pan? They need breathing room. If they are touching, they steam instead of crisping. Also, make sure you are using the wire rack so the drainage is perfect. Moisture is our sworn enemy when going for that crunchy finish!
Can I use regular baking powder instead of aluminum-free?
Yes, you can, but I highly recommend aluminum-free if you have it on hand. Standard baking powder sometimes leaves a very slight metallic aftertaste, especially when used heavily in a dry rub like this. Since the baking powder is the absolute star for creating crispy oven baked chicken wings, you want the cleanest flavor profile possible, but commercially available regular baking powder will work just fine in a pinch!
Serving Suggestions for Your Easy Game Day Chicken Wings
The best part about having perfectly crispy baked chicken wings is that they fit into any kind of meal plan! If you’re hosting the game day crew, you have to set out big bowls of cool, creamy ranch or blue cheese dressing—it’s mandatory. And celery and carrot sticks for dipping texture are a wonderful, light addition.
But honestly, these are filling enough to be a whole dinner too! They go surprisingly well over a bed of coconut rice if you are feeling adventurous, or just serve them alongside a big, crisp Caesar salad. If you want a dipping sauce that’s a little different but still cool and creamy, try my recipe for Tzatziki sauce—it’s surprisingly good with spicy wings!
PrintUltimate Crispy Baked Chicken Wings (No Frying Needed)

Make truly crispy chicken wings in your oven. This simple technique uses baking powder to achieve a crunchy exterior and a juicy interior without deep frying.
- Prep Time: 10 min
- Cook Time: 45 min
- Total Time: 55 min
- Yield: 4 servings 1x
- Category: Appetizer
- Method: Baking
- Cuisine: American
- Diet: Low Fat
Ingredients
- 2 lbs chicken wings (flats and drumettes separated)
- 1 tablespoon baking powder (aluminum-free preferred)
- 1 teaspoon salt
- 1/2 teaspoon black pepper
- 1/2 teaspoon garlic powder
- 1/2 teaspoon paprika
- 1 tablespoon olive oil (optional, for tossing after baking)
Instructions
- Preheat your oven to 425 degrees Fahrenheit (220 degrees Celsius). Line a baking sheet with aluminum foil for easy cleanup. Place a wire cooling rack on top of the prepared baking sheet.
- Pat the chicken wings completely dry using paper towels. This step is crucial for crispiness.
- In a large bowl, combine the baking powder, salt, pepper, garlic powder, and paprika.
- Add the dried chicken wings to the bowl. Toss thoroughly until every piece is lightly and evenly coated with the dry mixture.
- Arrange the coated wings in a single layer on the wire rack, ensuring there is space between each wing for air circulation. Do not overcrowd the pan.
- Bake for 20 minutes.
- Flip each wing over. Reduce the oven temperature to 400 degrees Fahrenheit (200 degrees Celsius).
- Bake for another 20 to 25 minutes, or until the skin is deeply golden brown and very crisp.
- Remove the wings from the oven. If you plan to sauce them, toss them immediately in a bowl with your favorite sauce (like Buffalo or BBQ). If serving dry, you can lightly toss them with a small amount of olive oil for shine.
- Serve immediately while hot and crunchy.
Notes
- Using a wire rack allows heat to circulate completely around the wings, preventing the bottoms from becoming soggy.
- For extra crispiness, you can place the wings under the broiler for the last 1-2 minutes, watching closely to prevent burning.
- If you prefer sauced wings, toss them immediately after they come out of the oven while they are hot.
Nutrition
- Serving Size: 4 wings
- Calories: 250
- Sugar: 0
- Sodium: 350
- Fat: 15
- Saturated Fat: 4
- Unsaturated Fat: 11
- Trans Fat: 0
- Carbohydrates: 1
- Fiber: 0
- Protein: 26
- Cholesterol: 90