

Oh, you know that feeling? You make a fantastic, slow-simmered curry or a rich butter chicken, and you reach for the takeout bag hoping for puffy, soft bread? It never seems quite right, does it? I remember that struggle perfectly before I developed this specific recipe. Forget complex tandoors or endless waiting; this is my promise to you: this is the easiest skillet homemade naan bread recipe you will ever use. It guarantees results that are soft, chewy, and wonderfully fluffy—restaurant quality right on your stovetop. This approach lines up exactly with the DelishCraze philosophy Olivia Rosewood established: great food shouldn’t be complicated; it needs to weave seamlessly into your busy life. You can do this!
- Why This Skillet Naan Bread Recipe Delivers Soft Chewy Naan at Home
- Essential Ingredients for Perfect Homemade Naan Bread
- Step-by-Step Instructions for Easy Skillet Naan Bread
- Creating Buttery Naan Bread with Garlic Butter Topping
- Tips for the Best Naan Recipe Results
- Storing and Reheating Your Homemade Naan Bread
- Serving Suggestions for Dinner Flatbread Ideas
- Frequently Asked Questions About Making Naan Bread
- Estimated Nutrition for This Naan Bread Recipe
Why This Skillet Naan Bread Recipe Delivers Soft Chewy Naan at Home
If you’ve been relying on store-bought flatbreads, get ready for a game-changer. The whole point of this recipe is proving you don’t need a 900-degree tandoor oven to get that incredible, pillowy texture. We rely on a few simple tricks baked right into the dough preparation to make this the best naan bread you’ve made at home.
- We use Greek yogurt! It tenderizes the gluten perfectly, giving you that signature chewiness without being tough.
- The combination of yeast and baking powder ensures we get those marvelous bubbles popping up fast, mimicking the high heat char.
- You’ll be cooking these one at a time in a screaming hot skillet, which is the best substitute for that professional oven environment.
This method guarantees you get truly soft, fluffy Indian bread every single time, ready in under two hours total.
Essential Ingredients for Perfect Homemade Naan Bread
Okay, let’s talk about what goes into achieving this soft, chewy perfection. Unlike store-bought versions or recipes claiming to be ‘quick fixes,’ my recipe focuses on building flavor and structure using real, pantry-friendly ingredients. The secret sauce, honestly, is using good quality Greek yogurt. Don’t skimp here; that yogurt tang is crucial for tenderness and making this taste infinitely better than plain flour and water dough. When you see the ingredients for this naan bread, notice how they are all simple—no fancy stabilizers needed. We use yeast for traditional rise, but I’ve got a great shortcut if you’re really pressed for time, which you’ll see below!
Here is exactly what you’ll need to have on hand. Measuring accurately in baking is so important, even for something as relaxed as flatbread!
- 1 teaspoon active dry yeast
- 1 teaspoon sugar
- 1 cup warm water (Keep that thermometer handy, folks! We need it between 105–115°F.)
- 3 cups all-purpose flour, plus extra for dusting
- 1 teaspoon salt
- 1 teaspoon baking powder
- 1 cup plain Greek yogurt
- 2 tablespoons olive oil, plus more for brushing the dough balls
- 4 tablespoons unsalted butter, melted (for brushing the finished bread)
- 2 cloves garlic, finely minced (for topping)
- 1 tablespoon fresh cilantro, chopped (if you’re making the garlic version!)
Ingredient Notes and Simple Yogurt Bread Substitutions
Let’s dive into a couple of these notes, because knowing *why* we use certain things boosts your confidence. First, that water temperature for the yeast? It has to be warm, not hot. If it’s too cool, your yeast sleeps. If it’s too hot (over 120°F), you kill your yeast, and your dough won’t rise. That’s why I stress checking it! Now, for those days when you are just desperate for a warm flatbread—this recipe works beautifully even if you venture into the realm of a simple yogurt bread variation. You can actually skip the yeast, sugar, baking powder, and warm water entirely. Just mix the 3 cups of flour directly with the Greek yogurt until you get a soft dough. You still need to knead and let it rest, but it bypasses the whole yeast step. It’s a lifesaver!
Step-by-Step Instructions for Easy Skillet Naan Bread
This is where the magic really happens, and trust me, it’s so much easier than you think. When you start baking this dough, you’ll feel like a real pro! We are going to break this down into the dough work and then the cooking phase, which keeps things super organized. The timing here is key—give the yeast and the dough the time they need to relax and develop that amazing structure we want for our naan bread.
Making and Resting the Soft Chewy Naan Dough
First, wake up that yeast! Mix your warm water, sugar, and yeast together in a small bowl. Don’t rush this—you need a good, healthy foam after about 5 to 10 minutes. That foam tells you everything is ready to go!
Next, in your big bowl, whisk the flour, salt, and baking powder. Then, dump in the foamy yeast mixture, the Greek yogurt, and the 2 tablespoons of olive oil. Get your hands in there and mix it until it looks like a shaggy mess. Now, turn it onto your floured counter. Knead that dough with some happy enthusiasm for about 5 to 7 minutes until it feels smooth and springs back a little when you poke it. Pop it in an oiled bowl, cover it, and let it hang out somewhere warm for about an hour to an hour and a half until it doubles in size. Don’t cheat the rise time!
Once it’s big and bouncy, punch it down gently. Divide that gorgeous dough into 8 equal pieces. Roll each one into a small ball, cover them loosely again, and let them just chill out for 15 minutes. This rest is crucial! It relaxes the gluten, making the rolling process so much simpler for truly soft chewy naan dough.
Cooking Your Fluffy Indian Bread on the Stovetop
Time to heat things up! You need a good, heavy skillet—cast iron is my absolute favorite for this job. Get it on medium-high heat. I mean *hot*. And here’s the trick for a true no tandoor bread recipe: don’t add any oil or fat to the pan yet!
Take one dough ball and roll it out on your floured surface into a nice oval or teardrop shape, about 1/8 of an inch thick. Lay that flatbread right onto the screaming hot, dry skillet. You should almost immediately start seeing those beautiful bubbles forming. Cook it for about 1 to 2 minutes until the bottom has those dark golden-brown spots we love.
Flip it over and cook the second side for just about a minute. As it cooks, you might get a few massive bubbles that refuse to flatten. Don’t panic! Just take your spatula and gently press down lightly where those big bubbles are. This forces the heat around evenly and helps it puff up beautifully all over. Keep repeating until all your fluffy Indian bread is done.
Creating Buttery Naan Bread with Garlic Butter Topping
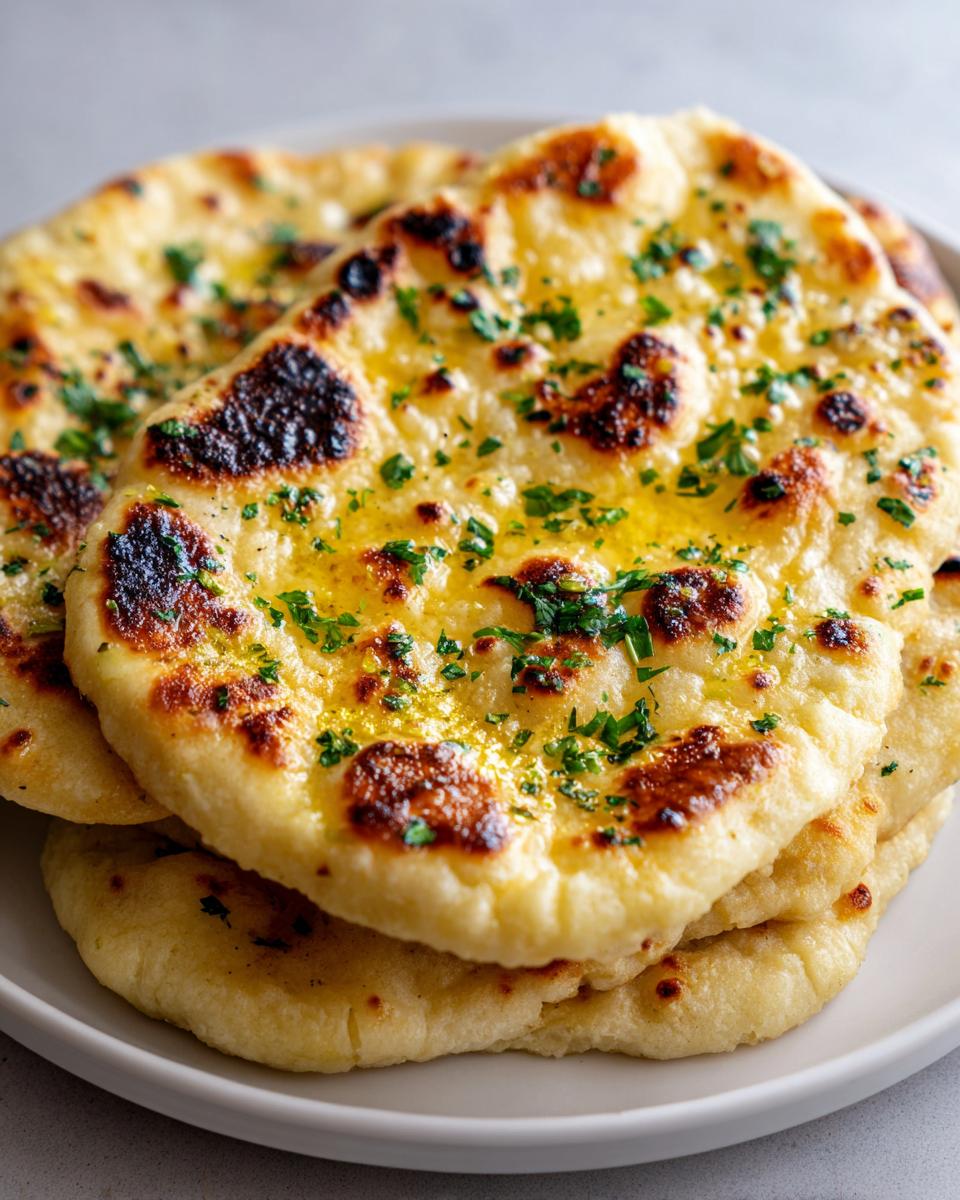
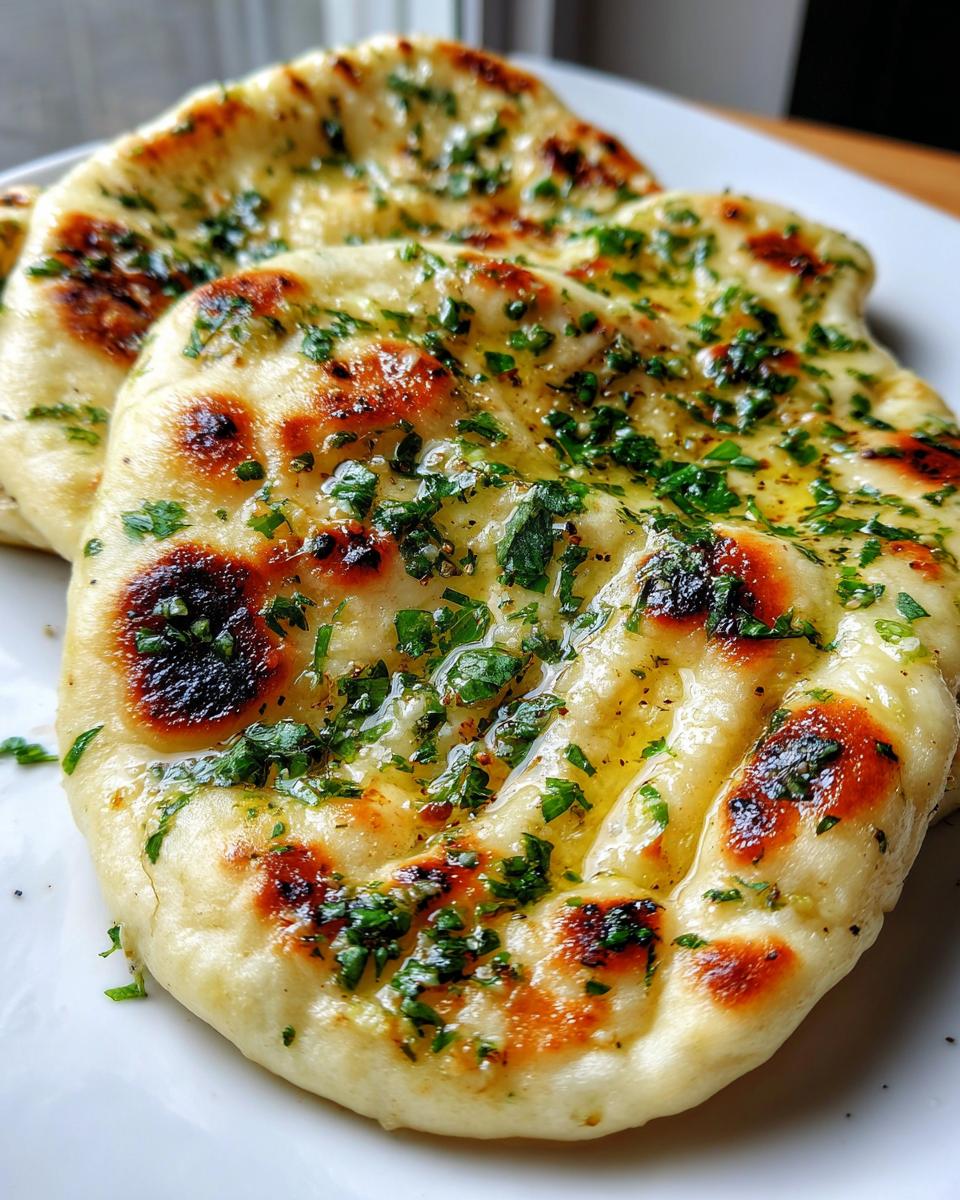
Alright, you’ve successfully cooked your flatbreads, and they are puffed and spotty—fantastic! But we aren’t finished yet! The final step, the one that takes this from ‘homemade’ to ‘I’m pretty sure I’m eating at my favorite Indian restaurant,’ is applying that glorious butter topping. This is where we hit those secondary keywords like buttery naan bread and the famous garlic naan recipe.

You need to move quickly here. As soon as that naan comes off the hot skillet, it needs to go straight onto your plate, and you need to brush it immediately. If you wait even a minute, the surface cools too much, and the butter just sits there like a greasy film instead of melting in and softening the whole piece.
For that restaurant-style garlic flavor, it’s super easy. Just take your 4 tablespoons of melted butter, stir in those minced garlic cloves, and mix in your chopped fresh cilantro. Give the first piece a generous slathering right away. Watching that butter melt into those little charred craters is honestly one of the best parts of this whole process!

Now, a little secret from Olivia’s kitchen that really elevates this: If you happen to have ghee, try using that instead of plain butter for brushing. Ghee has a higher smoke point and a deeper, nuttier flavor that just pairs unbelievably well with the fermented tang from the yogurt dough. It truly deepens the whole flavor profile of the homemade naan bread. But if butter is what you have, use butter! It’s still world-class.
Tips for the Best Naan Recipe Results
Even with a super simple recipe like this, there are always little hurdles, right? Trust me, I’ve been there, wrestling with dough that keeps sticking or flat pancakes instead of puffy bread. The absolute number one thing you must remember for amazing results is that skillet heat. It cannot be stressed enough: your skillet needs to be scorching hot before that dough touches it! A medium heat just won’t get the rapid expansion needed for those big bubbles.
If your dough is being stubborn and won’t roll thin enough, it just means your dough balls need a few more minutes of that rest period we talked about. Don’t fight it; cover them back up! Also, if you find your finished naan bread seems a little stiff after cooling, brush it lightly with a tiny bit more oil or melted butter while it’s still warm—that locks in flexibility.
Storing and Reheating Your Homemade Naan Bread
Now, this bread is, without a doubt, best enjoyed straight off the skillet when it’s still warm and glistening with garlic butter. That puffiness starts to settle as soon as it hits room temperature, but don’t worry! Unlike some breads, this homemade naan holds up really well if you need to make it ahead of time. My main goal when storing it is preserving that soft, chewy texture we worked so hard for.
For short-term storage, say, the day after you make it, just stack the naan pieces up and wrap them tightly in a zip-top bag or an airtight container. Keep them on the counter at room temperature. They should stay perfectly pliable for a full 24 hours. If you try to keep them much longer than that, I find the texture starts to get a little stiff, so if you’re planning further ahead, the fridge or freezer is the way to go.
If you use the fridge, make sure the container is truly sealed, or they dry out fast. For reheating, stay away from the microwave if you can! The microwave makes them rubbery, and that’s never what we want for our homemade naan bread.
The absolute best way to bring them back to life is hitting them again with dry, medium-high heat. Pop the cooled naan straight back into your dry skillet—no oil needed this time—for about 30 seconds per side. Just enough time to warm through and get a few lovely little crispy spots back. If you want to do a whole batch, you can warm them on a baking sheet in a 350°F oven for about five minutes, but always watch them!
For freezing, stack them with a small piece of parchment paper between each one before bagging them up. They freeze beautifully for up to three months. When you’re ready to eat, you can thaw them on the counter and then revive them in that hot skillet exactly as I described above. Easy peasy!
Serving Suggestions for Dinner Flatbread Ideas
I know most people reach for this recipe because they are making rich Indian curries, and yes, that’s our number one priority! Scooping up a thick lentil dal or some creamy paneer is exactly what this pillowy bread was made for. But honestly, you shouldn’t limit your wonderful homemade naan bread to just one type of cuisine. Think about how versatile flatbread truly is for simple, delicious weeknight meals. It instantly elevates anything you eat it with!
Because we brush this with garlic butter, it has such a robust flavor profile that pairs wonderfully with classic American flavors too. Forget boring dinner rolls!
- The Wrap Factor: Slice one of these open while it’s still warm and use it as a base for a light lunch wrap. Add sliced roast turkey, some sharp cheddar, and crunchy lettuce. It makes a far superior wrap to any tortilla I’ve ever tried.
- Dipping Power: These are perfect for dipping into stews or hearty soups. If you make a thick, smoky chili on a chilly evening, use this buttery flatbread instead of crackers or cornbread—it really soaks up all the flavor pools at the bottom of the bowl.
- As a Side Dish Star: If you’re having roasted meats, this works brilliantly! It’s such an easy side dish that feels fancy. It goes perfectly alongside something like my garlic parmesan chicken and potatoes. The soft bread soaks up all those savory pan drippings, and nobody will complain!
Keep these ideas tucked away for when you need a quick, satisfying dinner flatbread idea that comes together faster than you’d expect!
Frequently Asked Questions About Making Naan Bread
I get asked the same few questions all the time about this recipe, usually because people are trying to figure out how to make their first batch of homemade naan bread perfectly. Don’t worry about small tweaks; baking is forgiving if you know the rules! Here are the things I hear most often from folks trying to master their own easy flatbread recipe.
What if I don’t have Greek yogurt? Can the recipe still work?
Honestly, I think the whole recipe hinges on that Greek yogurt because the acidity really helps tenderize everything and gives us that delightful subtle flavor. But life happens! If you absolutely must substitute, plain whole-milk yogurt is the next best bet. Make sure it’s thick, though! If your regular yogurt is too runny, you might need to drain it in a sieve lined with cheesecloth for an hour or two to get some of the whey out. If you skip the yogurt entirely and just use milk, you are missing out on the chewiness and are heading toward a texture more like a soft pita bread, not true pillowy bread recipe. Stick with the yogurt if you can!
How long does the dough really need to rise for fluffy naan?
This causes a lot of anxiety for people eager to eat their quick homemade bread! The recipe calls for 1 to 1.5 hours. The key indicator isn’t the clock; it’s the volume. You are looking for it to double in size. If your kitchen is cold—maybe you’re making this in the winter—it might take nearly two hours. That’s fine! If your kitchen is super warm, it might only take 45 minutes. Just watch the dough; don’t watch the timer. If it passes the poke test (you poke it lightly and the dent stays but doesn’t deflate completely), you are good to proceed to the dough dividing step.
Can I make this dough ahead of time and keep it overnight?
Yes, you absolutely can! This is one of my favorite tricks for busy weeknights when I want fresh soft chewy naan at home but don’t have time to start it in the afternoon. Once you finish kneading (Step 4 in the instructions), cover the bowl tightly with plastic wrap and put it in the refrigerator. The cold temperature slows the yeast way down. It can hang out in there for up to 24 hours. When you’re ready to cook, take the whole bowl out and let it warm up on the counter for about 30 to 45 minutes before you punch it down and divide it. It comes out fluffier than ever because the flavor develops more slowly!
Why aren’t my naan pieces puffing up much in the skillet?
This is almost always one of two things, and thankfully, both are usually easy fixes! First, is the skillet hot enough? I mean blisteringly hot! If you put the dough in and nothing happens after 20 seconds, pull it out, crank the heat up for a few minutes, and try again. Second, if you’re aiming for that wonderful lift we want in a homemade naan bread, make sure you rolled the dough thinly enough—about 1/8 inch thick is perfect. If it’s too thick, it cooks through before the steam has a chance to trap itself and puff the bread up. Go thin or go home for that classic bubble!
Estimated Nutrition for This Naan Bread Recipe
I know for some home cooks, knowing what we’re digging into nutrition-wise is just as important as how delicious it tastes. Since this is a baked good brushed with butter and garlic, it definitely falls into that wonderfully comforting category, so enjoy it guilt-free!
Based on the standard recipe yielding 8 pieces, here is the breakdown per serving. Remember, since we’re making this from scratch, the final numbers really depend on the exact brands of yogurt and oil you choose, so treat these as a great guideline for your homemade bread.
| Nutrient | Amount Per Serving (1 piece) |
|---|---|
| Calories | 240 |
| Fat | 7g |
| Saturated Fat | 4g |
| Carbohydrates | 39g |
| Fiber | 2g |
| Sugar | 2g |
| Protein | 7g |
| Sodium | 350mg |
| Cholesterol | 15mg |
Please keep in mind that these values are estimates. If you decide to skip the garlic butter topping (maybe sticking to just a light oil brush), you’ll definitely shave off some of the saturated fat! But hey, if you’re making this easy flatbread recipe, you deserve that buttery goodness!
PrintEasy Skillet Homemade Naan Bread with Garlic Butter

Make soft, chewy, and fluffy naan bread at home using only a skillet. This simple recipe uses common ingredients and yields restaurant-quality flatbread perfect for curries or dipping.
- Prep Time: 25 min
- Cook Time: 15 min
- Total Time: 1 hour 40 min
- Yield: 8 servings 1x
- Category: Side Dish
- Method: Stovetop Skillet
- Cuisine: Indian
- Diet: Vegetarian
Ingredients
- 1 teaspoon active dry yeast
- 1 teaspoon sugar
- 1 cup warm water (about 105-115°F)
- 3 cups all-purpose flour, plus more for dusting
- 1 teaspoon salt
- 1 teaspoon baking powder
- 1 cup plain Greek yogurt
- 2 tablespoons olive oil, plus more for brushing
- 4 tablespoons unsalted butter, melted (for brushing)
- 2 cloves garlic, minced (for topping)
- 1 tablespoon fresh cilantro, chopped (for topping)
Instructions
- Activate the yeast: In a small bowl, combine the warm water, sugar, and yeast. Let it sit for 5 to 10 minutes until foamy.
- Combine dry ingredients: In a large bowl, whisk together the flour, salt, and baking powder.
- Mix the dough: Add the foamy yeast mixture, Greek yogurt, and 2 tablespoons of olive oil to the dry ingredients. Mix until a shaggy dough forms.
- Knead: Turn the dough out onto a lightly floured surface. Knead for 5 to 7 minutes until the dough is smooth and elastic.
- First rise: Place the dough in a lightly oiled bowl, turning to coat. Cover the bowl with plastic wrap or a damp towel and let it rise in a warm place for 1 to 1.5 hours, or until doubled in size.
- Divide and rest: Punch down the dough gently. Divide it into 8 equal pieces. Roll each piece into a ball, cover them, and let them rest for 15 minutes.
- Prepare the skillet: Heat a heavy-bottomed skillet (cast iron works well) over medium-high heat. Do not add oil yet.
- Roll the naan: On a lightly floured surface, roll one dough ball into an oval or teardrop shape, about 1/8 inch thick.
- Cook the naan: Place one rolled naan into the hot, dry skillet. Cook for 1 to 2 minutes until bubbles form on the surface and the underside has golden-brown spots.
- Flip and finish: Flip the naan and cook the other side for about 1 minute until cooked through and slightly charred in spots. The bubbles should puff up.
- Prepare garlic butter: While the naan cooks, mix the melted butter with minced garlic and chopped cilantro.
- Brush: Immediately transfer the cooked naan to a plate and brush generously with the garlic butter mixture.
- Repeat: Continue with the remaining dough pieces, cooking them one at a time.
Notes
- For a two-ingredient variation, omit the yeast, sugar, baking powder, and warm water. Mix 3 cups of flour with 1.5 cups of Greek yogurt until a soft dough forms, then proceed with kneading and rising.
- If you do not want garlic naan, simply brush the cooked bread with plain melted butter or ghee.
- If you see large, stubborn bubbles, gently press them down with a spatula to help the bread cook evenly.
Nutrition
- Serving Size: 1 piece
- Calories: 240
- Sugar: 2
- Sodium: 350
- Fat: 7
- Saturated Fat: 4
- Unsaturated Fat: 3
- Trans Fat: 0
- Carbohydrates: 39
- Fiber: 2
- Protein: 7
- Cholesterol: 15