
Sometimes you just need a dessert that screams ‘celebration’ without screaming ‘all-day baking marathon,’ am I right? We’ve all been there—you want that showstopper, that rich, decadent thing you see in the bakery window, but you need it to happen between school pickup and dinner. That’s exactly why I developed this caramel crunch cake recipe. I truly believe impressive desserts should be accessible, which is the core of what I do here at DelishCraze. This cake gives you unbelievable texture contrast and deep caramel flavor, proving that amazing homemade cakes don’t need to be complicated. I put all my passion into making sure this recipe works perfectly for you! For the sauce component, I always rely on my trusted easy caramel sauce recipe to build that foundational flavor.
- Why This Caramel Crunch Cake is Your Next Showstopper Celebration Cake
- Gathering Ingredients for the Ultimate Caramel Crunch Cake Recipe
- Step-by-Step Instructions for Your Caramel Crunch Cake
- Tips for Success Making This Easy Caramel Crunch Bake
- Ingredient Notes and Substitutions for Your Caramel Toffee Crunch Recipe
- Storage and Reheating Instructions for Your Caramel Crunch Cake
- Frequently Asked Questions About This Indulgent Homemade Cake
- Estimated Nutritional Data for the Best Caramel Dessert Ever
- Share Your Weekend Baking Project
Why This Caramel Crunch Cake is Your Next Showstopper Celebration Cake
When I look at this cake, I see pure indulgence, but the best part is how simple it really is to pull off. You don’t need professional pastry skills to make something that looks like it came from a high-end shop! It hits all the right notes, which is why it’s become my go-to for birthdays and special get-togethers. You’ll want to bookmark this page because you’ll be coming back to it again and again.
- This is truly a Decadent Caramel Cake Recipe that focuses its energy where it counts: deep, cooked flavor in the sauce and a supremely moist cake base.
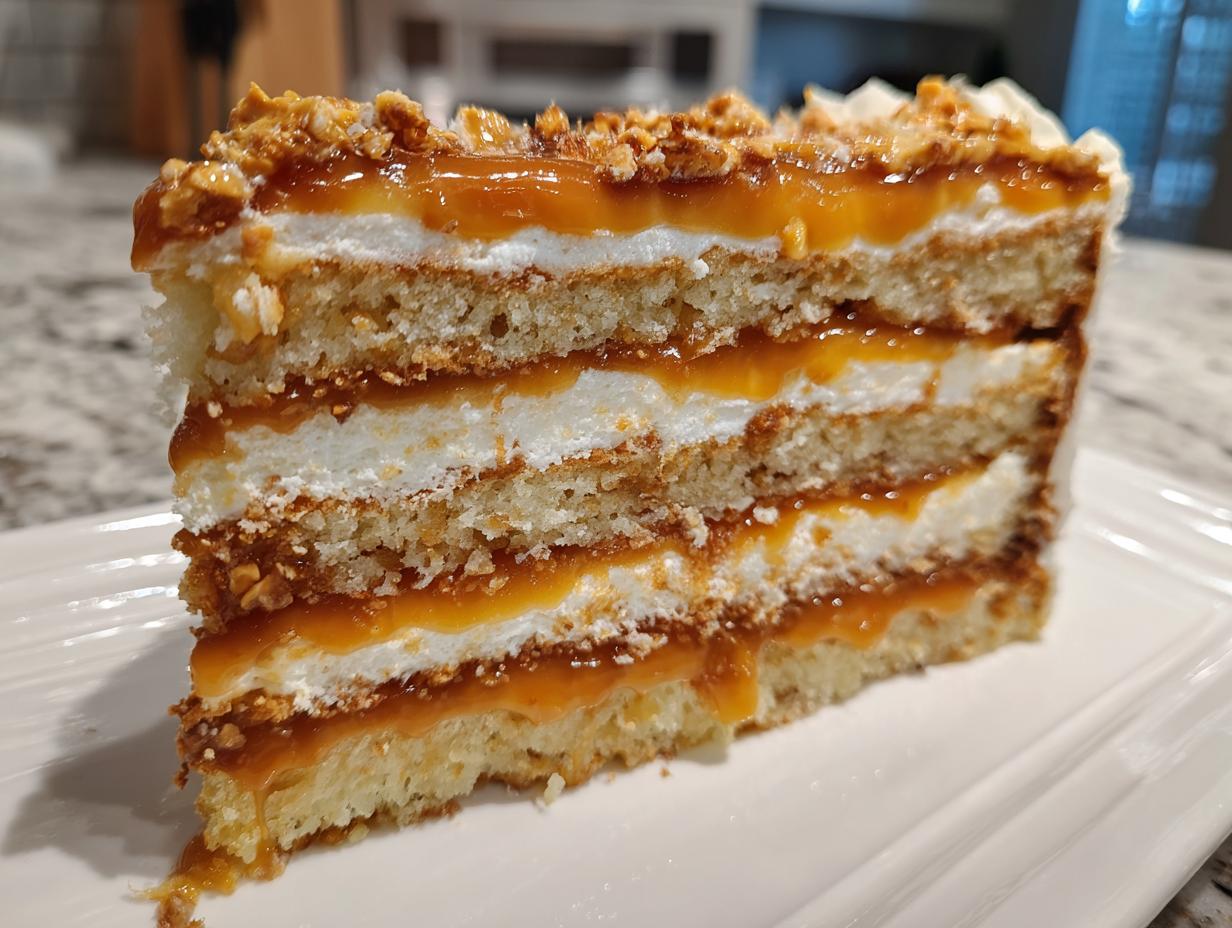
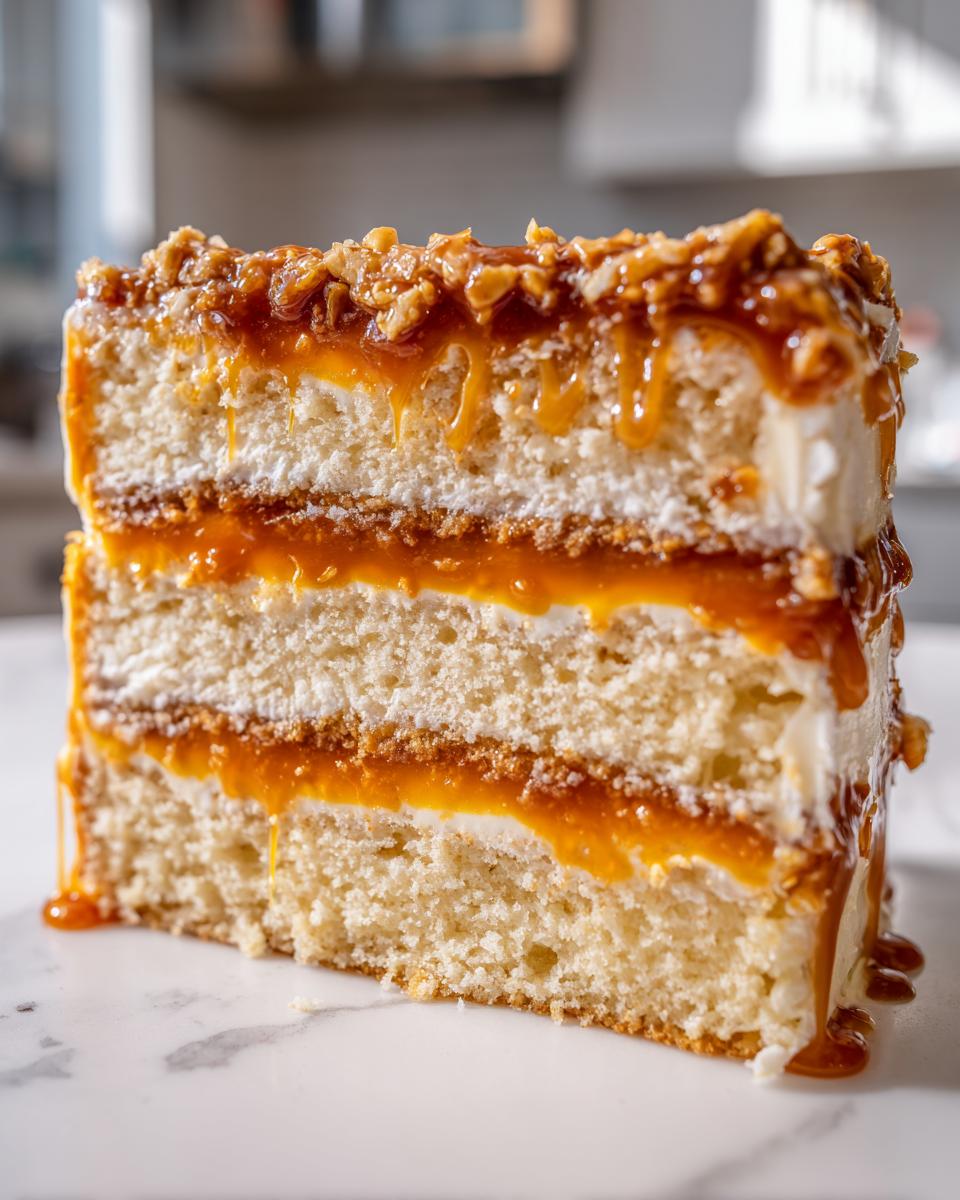
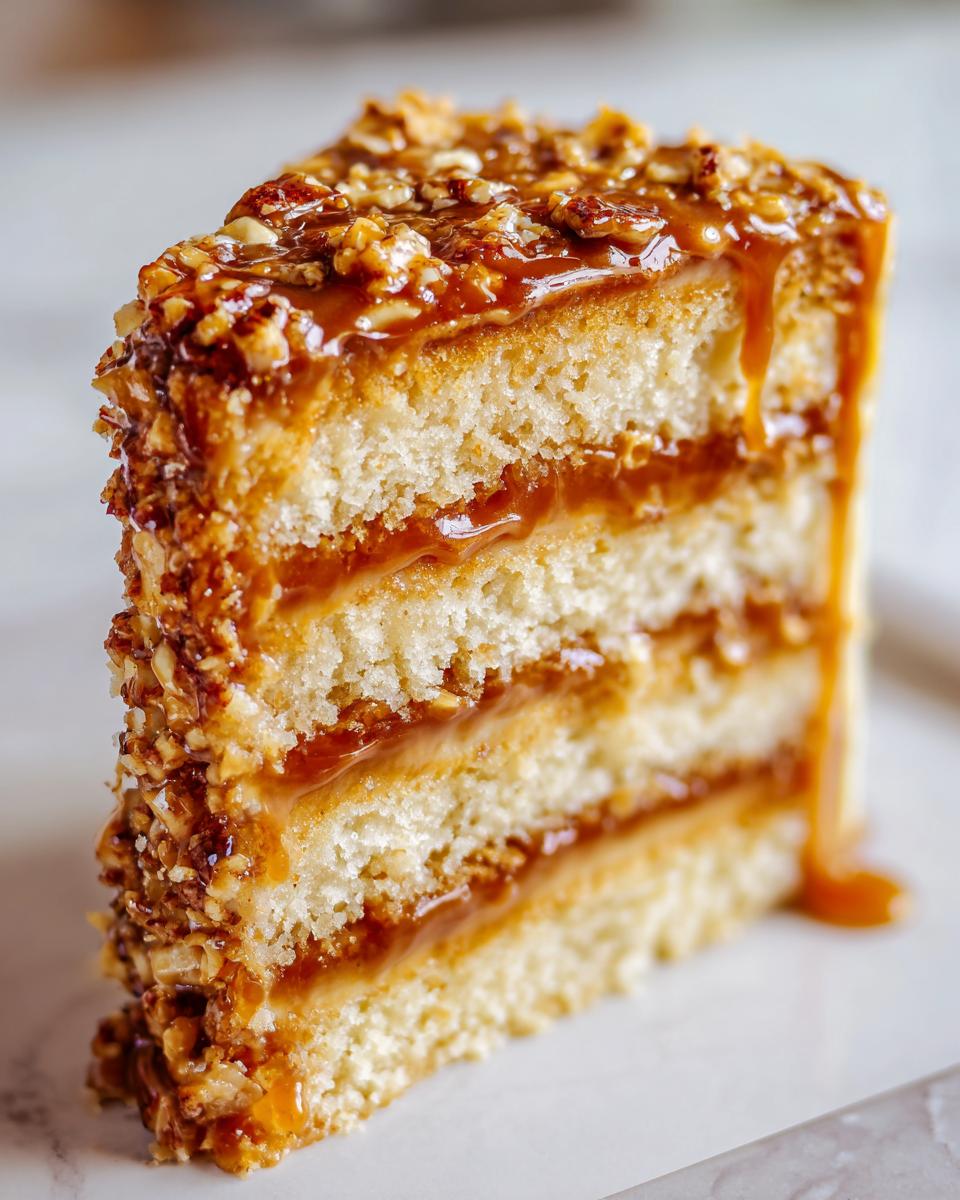
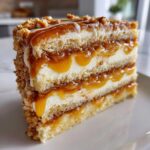
- The star is definitely the Texture Contrast Cake experience—that lush, soft vanilla layer sinking into thick caramel, suddenly interrupted by a satisfying snap from the toffee bits.
- It creates an incredible presentation! People always assume making a layer cake like this is extremely difficult, but the caramel acts as a built-in frosting and filling, cutting down on fussy piping work.
- We use simple, buttery cake layers as the perfect, neutral vehicle for that big caramel punch. You don’t need vanilla extract in spades; the caramel does most of the heavy lifting!
- You get that satisfying crunch by topping it off with homemade crunch topping—or, in a pinch, whatever store-bought toffee bits you grab.
- It’s an unbelievably rich experience, perfect for when you need an Indulgent Homemade Cake that feels worth the effort.
Gathering Ingredients for the Ultimate Caramel Crunch Cake Recipe
Okay, let’s get down to business. The secret to a fantastic Caramel Crunch Cake isn’t some fancy technique; it’s using the right stuff for each job. Because this cake has so many wonderful components—the fluffy cake part, the gooey caramel, and the snappy crunch—we need to keep everything organized. Trust me, nothing derails a baking project faster than realizing you’re out of heavy cream halfway through making the sauce!
For the Moist Vanilla Cake Layers
We want these layers tender, buttery, and strong enough to hold up all that caramel goodness. Here is what you’ll need for the cake itself. Remember, room temperature is key for the butter!
- 1 1/2 cups unsalted butter, softened
- 3 cups granulated sugar
- 4 large eggs
- 1 tablespoon vanilla extract
- 3 cups all-purpose flour
- 1 tablespoon baking powder
- 1/2 teaspoon salt
- 1 1/2 cups whole milk
For the Rich Homemade Caramel Sauce Cake Filling
This is where we concentrate that gorgeous, deep flavor. The heavy cream makes it silky smooth, and the brown sugar brings that molasses depth that makes any Decadent Caramel Cake Recipe sing. Don’t substitute the brown sugar here if you can help it; that’s your main flavor driver for the filling!
- 1 cup heavy cream
- 1 cup packed light brown sugar
- 1/2 cup granulated sugar
- 1/2 cup unsalted butter
For the Homemade Crunch Topping Dessert
We are keeping this part super simple so you can focus on getting that amazing texture contrast without spending hours making candy. This small addition makes the whole cake!
- 1/2 cup chopped toffee bits
Using those store-bought toffee bits is honest work! They are already perfectly crunchy, and when you nestle them between the layers and sprinkle them on top, you get that incredible textural pop that makes this whole Homemade Crunch Topping Dessert experience so satisfying.
Step-by-Step Instructions for Your Caramel Crunch Cake
Alright, let’s conquer this beast! Making a showstopper like this requires focus, but honestly, it breaks down into three very manageable chunks: baking the cakes, making the sauce, and then putting it all together. I’ve learned over the years that the key to a great Caramel Crunch Cake is making sure you don’t rush the cooling process—especially with the sauce! I highly recommend browsing my full collection of baking dessert recipes if you want practice before you dive in.
Baking the Buttery Cake Layers Dessert
First things first, preheat that oven to 350°F (175°C). Get your three 8-inch round pans greased up and floured. A little flour dusting goes a long way to prevent sticking!
In your big mixing bowl, cream that softened butter and the 3 cups of granulated sugar until it looks light and fluffy—it should pale out beautifully. Then, add those four eggs one at a time, mixing well after each one. Don’t forget your vanilla!
In a separate bowl, whisk your dry things: the flour, baking powder, and salt. Now, it’s time for the alternating trick. Add a little bit of your flour mix, then a little bit of the milk, starting and ending with the flour. This keeps everything smooth. Seriously, mix until it’s *just* combined. Overmixing develops gluten, and we want a soft, Moist Vanilla Cake with Caramel base, not a chewy brick!
Divide that batter evenly among your three pans. They should bake for about 28 to 32 minutes. You’ll know they’re ready when a toothpick you poke right in the center comes out clean. Let them cool in the pans for about 10 minutes before you gently turn them out onto a wire rack. They need to be totally cool before we add that warm caramel!
Creating the Rich Caramel Sauce Cake Ideas
While those layers are cooling down, we make magic in a saucepan. We’re building that incredible flavor that separates this cake from everything else. This is the core of the Rich Caramel Sauce Cake Ideas!
Get your heavy cream, brown sugar, granulated sugar, and butter all into a medium saucepan over medium heat. You have to stir this constantly at first, just stirring until all that sugar dissolves completely. Don’t let it sit on the bottom unstirred, or you’ll get stubborn grainy spots!
Once it’s bubbling smoothly, lower the heat slightly and let it simmer for about 8 to 10 minutes. You’ll notice it starts to thicken up just a bit. Crucially, take it off the heat then! It thickens up so much more as it cools down. A simmer that looks perfect on the stove might be too thick once it hits that cake layer.
Assembling Your Layer Cake with Caramel Filling
Now for the fun part—building this beautiful tower! This is where we lock in that spectacular Texture Contrast Cake everyone raves about. Grab your first cooled layer and plop it onto your serving plate.
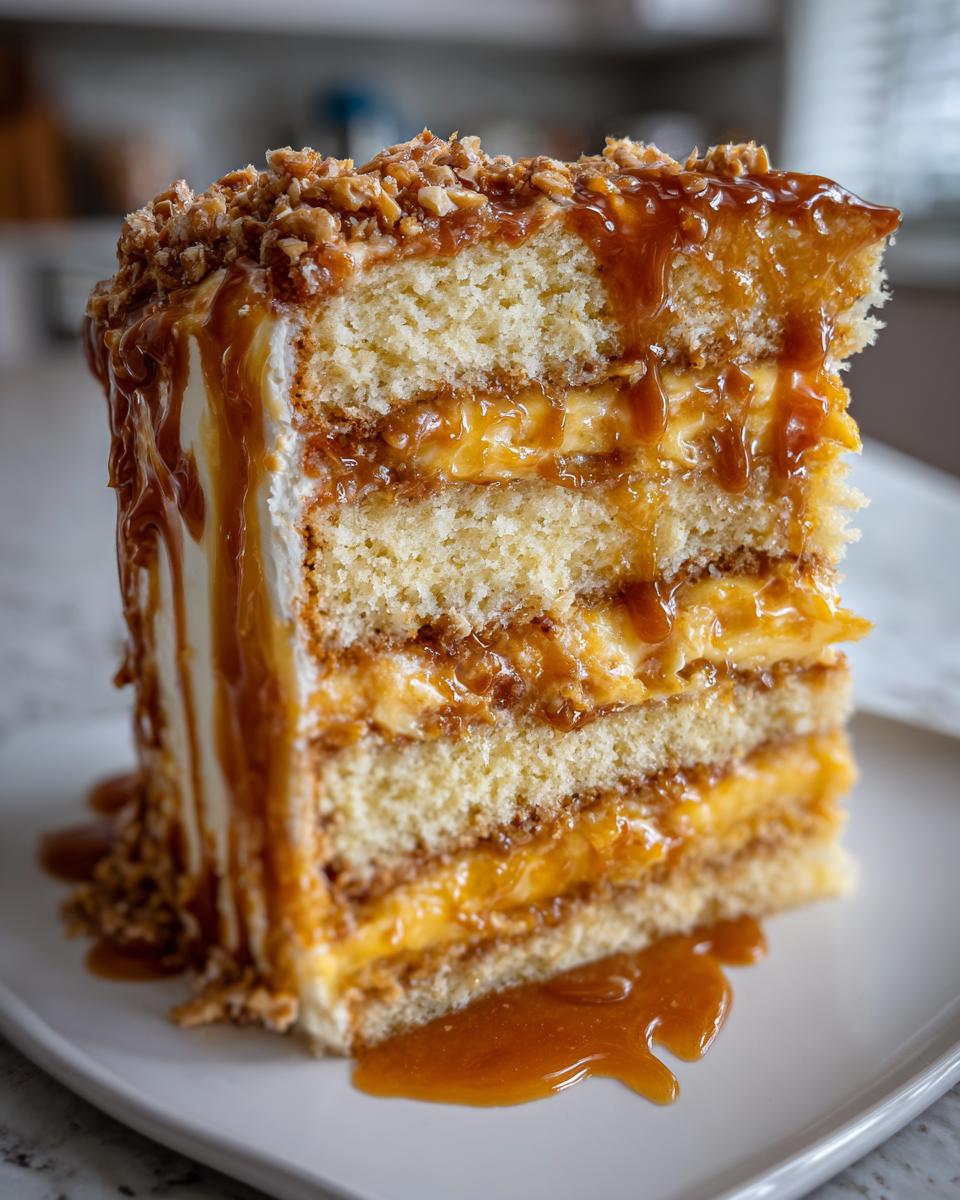
Drizzle a generous layer of that cooled caramel sauce over the top. Then, sprinkle maybe a third of your toffee bits right over that caramel. They’ll stick perfectly.
Carefully place the next cake layer on top and repeat the process: more caramel, more toffee bits. Once you put the final layer on, you can use any remaining caramel to coat the top and sides, or use a simple vanilla buttercream if you prefer (though I think the caramel coating is more fun!). Then, sprinkle the rest of your toffee bits all around the top and press a few gently into the sides for that final crunch.
Tips for Success Making This Easy Caramel Crunch Bake
Even though this is an Easy Caramel Crunch Bake, a few veteran secrets will take it from great to absolutely unforgettable. Olivia Rosewood here, and when I started making layered desserts, my biggest headache was always keeping things moist while still getting that awesome crunch. It seems like a contradiction, but trust me, you can master it!
My number one rule that I pull directly from my notes is all about timing the crunch factor. If you’re making this ahead of time for a big party, do NOT drown all your toffee bits in caramel the day before. The moisture from the sauce is going to soften those crunchy bits, and while they are still tasty, they won’t have that aggressive snap you want.
You should aim to keep the sauce and the toffee bits separate until maybe 12 hours before serving. If you are assembling your Texture Contrast Cake the night before, just put one layer of crunch between the layers, and then scatter the remaining bits right before you bring it to the table. That way, you guarantee that signature crackle with every slice!
Another quick tip that helps with moisture retention relates to serving: these cakes are better slightly warmer than fridge-cold. If you refrigerate it, make sure you pull it out about an hour before serving. That little bit of warmth softens up the cake crumb perfectly, making it feel even more tender and luxurious. It’s one of my favorite baking tips for layer cakes.
Also, when you are making that caramel sauce, pay close attention to the heat. If you crank it up too high, you risk burning the sugars before the butter and cream are fully incorporated, leading to a grainy sauce that separates. Medium heat is your best friend here, making sure everything melts together slowly and creates that smooth, rich caramel we’ve been dreaming about.
Ingredient Notes and Substitutions for Your Caramel Toffee Crunch Recipe
Listen, I know sometimes you open the pantry and realize you’re missing just one thing. Baking often means improvisation, but with this Caramel Crunch Cake, some ingredients are non-negotiable if you want that exact texture and flavor profile. However, there are a few easy swaps we can make without compromising the integrity of the final product.
First off, let’s talk about that caramel sauce. I really stressed using light brown sugar, but if you want that truly deep, almost smoky caramel flavor—the kind that tastes like it simmered for hours—go ahead and substitute the light brown sugar for dark brown sugar. It has more molasses, which means a much richer color and taste. If you want to practice making your own crunchy element, check out my guide on easy homemade toffee recipe; it’s an amazing base for the crunch topping!
For the cake layers, we use whole milk, and I stand by that. Whole milk has a higher fat content than 2% or skim, which contributes directly to the tenderness and richness of the crumb. Don’t swap it for water—that will make the cake tougher, defeating the purpose of a truly luscious cake.
And what about the leavening? We use 1 tablespoon of baking powder, and you should keep that ratio the same. Because this is such a dense cake recipe overall, that baking powder is working hard to give us those beautiful, slightly airy pockets. Skipping it or guessing the amount leads to a result that’s too heavy. If you’re out of baking powder entirely, you could maybe try a combination of baking soda and an acid (like a teaspoon of vinegar), but honestly, for this specific recipe, run to the store first! This is one of those moments where sticking close to the written recipe really pays off.
Finally, that vanilla extract. While it seems like filler, it’s crucial for rounding out the sweetness of the sugar and caramel. If you happen to have vanilla bean paste, use just a touch less than you would the extract, as the paste is much more potent. But if you only have store-bought vanilla? Use it generously!
Storage and Reheating Instructions for Your Caramel Crunch Cake
Now that you’ve gone and made the absolute best Caramel Crunch Cake ever, you need to know how to keep it fresh! Leftovers are a gift, but only if they taste as good the next day as they did the moment you sliced into it. I learned the hard way that proper storage makes all the difference, especially when dealing with a gooey sauce and a crispy topping.
The good news is that because of all that sugar in the caramel, this cake is pretty sturdy! According to my notes, this indulgent treat is best stored covered right there on the counter at room temperature for up to two days. Yes, you read that right—counter storage! This is key for keeping those vanilla cake layers soft and tender.
If you absolutely must keep it longer—say, you’re saving it for a special event later in the week—you can refrigerate it for up to four days. But here is the absolute, number one, most important thing you must do before you serve those leftovers:
Bring it back to life
You never want to serve this cake straight out of the fridge! When the caramel sauce chills, it firms up, and that gorgeous, buttery crumb turns hard. It completely ruins the experience of that perfect Texture Contrast Cake we worked so hard for!
So, here’s the rule: if it’s been chilling in the fridge, pull it out about an hour before you plan to serve it. Seriously, set a timer. That hour on the counter lets the cake layers soften up just right, making the caramel gooey again, and ensures every bite is luscious, not stiff. It truly takes it from “okay leftover” to “wow, is this fresh?”
If you decided you *did* follow my advice and left it on the counter, you still want to check it before slicing. Tap the top gently. If it feels cool to the touch, give it a quick 15 minutes on the counter just to take the chill off. That little bit of warmth really showcases what a fantastic Easy Caramel Crunch Bake this turns out to be!

Dealing with the Crunch Topping
I mentioned this briefly before, but it’s worth repeating here in the storage section: the toffee bits are your weakest link when it comes to shelf life. If you totally covered the cake in toffee bits on Day One, they might start getting a little sad and soft by Day Two, even at room temperature.
For the absolute best results, try to save half of your toffee bits. Use just enough to stick to the filling between the layers, and then sprinkle the rest on right before you serve it on Day Two or Three. That way, you always guarantee that beautiful, crisp crunch that makes this the Best Caramel Dessert Ever. It’s worth the extra 30 seconds of sprinkling, trust me!
Frequently Asked Questions About This Indulgent Homemade Cake
I know that jumping into a big recipe always brings a few questions to mind, so I wanted to address some of the things I hear most often about perfecting this Indulgent Homemade Cake. If you’ve got a slightly different plan for your baking day, these answers should help you adjust without losing that wonderful caramel flavor!
Can I use store-bought caramel sauce instead of making it from scratch?
You absolutely can! This is your kitchen, and sometimes you just need to speed things up. If you use store-bought caramel, remember that most commercial sauces aren’t cooked down to the same thickness as ours. They might be runnier, which means more drips down the side of your cake—which isn’t always a bad thing, but it’s good to be prepared! If your store-bought sauce seems really thin, try simmering it gently on the stove (just watch it like a hawk!) until it coats the back of a spoon. That will give you a better, more stable rich caramel sauce cake idea for filling.
What happens if I skip the toffee crunch topping entirely?
If you skip the toffee bits, you are skipping the “Crunch” part of the Caramel Crunch Cake! The whole point of this recipe is that amazing temperature and texture contrast between the soft cake, the gooey sauce, and the hard, snappy crunch. If you omit the toffee, you will end up with a lovely, decadent caramel layer cake, but it won’t deliver the signature experience. If you have a nut allergy or just hate toffee, you could try pulsing up some plain pretzels or even some crispy rice cereal with a tablespoon of melted butter and baking them for five minutes to dry them out first. But honestly, the toffee is where the magic is!
Can I bake this as a single, large sheet cake instead of layers?
Yes, I’ve done this for easier transport to potlucks! If you want an Easy Caramel Crunch Bake that’s less fiddly, you can convert this recipe into a single 9×13 inch pan or one large sheet pan. The important thing is the timing! Because the heat source is hitting the entire cake from the bottom, it will bake faster than three individual layers. Start checking it around 30 minutes. You’ll still want to bake it fully, but you’ll need to adjust your assembly so you just pour the caramel over the top instead of trying to layer it. It makes a fantastic, almost blondie-like texture once cooled.
Why is the butter for the cake layers specified as ‘softened’ and not ‘melted’?
This is crucial for the structure of our cake! When you cream softened butter with sugar, you are physically forcing tiny pockets of air into the fat. These air pockets expand in the oven, which gives you that light-yet-sturdy crumb. If you use melted butter, you lose all that air structure, and the cake ends up dense, greasy, and heavy—which is the opposite of what we want for this luxurious Layer Cake with Caramel Filling. Always take the time to let the butter come to room temperature before you start!
Estimated Nutritional Data for the Best Caramel Dessert Ever
Okay, let’s talk about the fuel we’re putting in our bodies while devouring this spectacular Caramel Crunch Cake. Look, I’m Olivia, not a certified nutritionist, so please take these numbers with a grain of salt—or maybe a grain of toffee bit!
I calculated the estimates based on serving 12 equal slices of this Best Caramel Dessert Ever recipe, but remember that precise numbers depend hugely on the exact brands of butter, sugar, and heavy cream you decide to use. This is a rich, celebratory dessert, so we expect the numbers to be high, but oh boy, is it worth it!
Here is the current estimate showing just how indulgent we’re getting:
- Serving Size: 1 slice
- Calories: 480
- Fat: 28g (with 17g of that being saturated fat—it’s all that butter and cream!)
- Carbohydrates: 58g
- Sugar: 55g (Yes, it’s a lot, but this is Caramel Crunch Cake; sugar is our friend here!)
- Protein: 5g
My biggest piece of advice? Don’t stress the numbers too much when you’re making something this special for your family. If we worried about calories every time we baked, we’d miss out on all the joy! Enjoy that slice, know exactly what went into it because you made it yourself, and feel good about serving such a beautiful, homemade treat. This cake is made primarily for happiness, not optimization, right?
Share Your Weekend Baking Project
Whew! We made it through the whole process of creating this absolutely stunning Caramel Crunch Cake. I’m so excited for you to try this recipe. Baking is always better when you share the results, and I truly want to see how your creation turns out on your table!
It would absolutely make my day if you took a minute after you’ve served it up to let me know how it went. Did you find the caramel sauce came together easily? Did your family devour theirs as fast as mine does? Head down to the comments section below and leave a star rating—five stars gets the biggest cheer from me!
If you snapped a photo of your finished cake—maybe it’s glimmering under the lights for a birthday or sitting proudly on a cooling rack—please tag me on social media! Use the hashtag #DelishCrazeBakes so I can see all that gooey caramel and crunchy goodness you created. It’s inspiring to see how different kitchens bring my recipes to life.
Getting this Family Favorite Caramel Treat onto your baking schedule is a treat for me, and I can’t wait to read your feedback. Don’t forget, if you loved the sauce, my general guide on making a family favorite caramel treat has even more ideas for using up leftovers!
And hey, if you want to see what others have made, I always love checking out the results and discussions over at their original pin page too. Happy baking, everyone!
PrintDecadent Caramel Crunch Layer Cake
Make this showstopper Caramel Crunch Cake featuring moist vanilla layers, rich homemade caramel sauce, and a satisfying toffee crunch topping. This indulgent homemade cake is perfect for celebrations.
- Prep Time: 35 min
- Cook Time: 35 min
- Total Time: 70 min
- Yield: 12 servings 1x
- Category: Dessert
- Method: Baking
- Cuisine: American
- Diet: Vegetarian
Ingredients
- 1 1/2 cups unsalted butter, softened
- 3 cups granulated sugar
- 4 large eggs
- 1 tablespoon vanilla extract
- 3 cups all-purpose flour
- 1 tablespoon baking powder
- 1/2 teaspoon salt
- 1 1/2 cups whole milk
- 1 cup heavy cream (for caramel sauce)
- 1 cup packed light brown sugar (for caramel sauce)
- 1/2 cup granulated sugar (for caramel sauce)
- 1/2 cup unsalted butter (for caramel sauce)
- 1/2 cup chopped toffee bits (for crunch topping)
Instructions
- Preheat your oven to 350°F (175°C). Grease and flour three 8-inch round cake pans.
- In a large bowl, cream together the softened butter and granulated sugar until light and fluffy.
- Beat in the eggs one at a time, mixing well after each addition. Stir in the vanilla extract.
- In a separate bowl, whisk together the flour, baking powder, and salt.
- Gradually add the dry ingredients to the wet ingredients, alternating with the milk, beginning and ending with the flour mixture. Mix until just combined. Do not overmix.
- Divide the batter evenly among the prepared cake pans. Bake for 28 to 32 minutes, or until a toothpick inserted into the center comes out clean.
- Let the cakes cool in the pans for 10 minutes before inverting them onto a wire rack to cool completely.
- Make the caramel sauce: Combine the heavy cream, brown sugar, granulated sugar, and butter in a medium saucepan over medium heat. Stir constantly until the sugar dissolves.
- Bring the mixture to a boil, then reduce heat and simmer for 8 to 10 minutes, stirring occasionally, until the sauce thickens slightly. Remove from heat and let cool. The sauce will thicken more as it cools.
- Assemble the cake: Place one cake layer on a serving plate. Spread a layer of cooled caramel sauce over the top. Sprinkle lightly with toffee bits.
- Place the second cake layer on top and repeat the caramel sauce and toffee bit layer.
- Top with the final cake layer. Frost the entire cake with remaining caramel sauce or your preferred vanilla buttercream (not included in ingredient list). Sprinkle the top and sides with the remaining toffee bits for the ultimate texture contrast.
Notes
- For the best texture contrast, ensure your toffee bits are added just before serving or placed between layers where they are protected from moisture.
- If you want a richer caramel flavor, use dark brown sugar in the sauce.
- This cake is best stored covered at room temperature for up to two days, or refrigerated for up to four days. Bring to room temperature before serving for the softest cake layers.
Nutrition
- Serving Size: 1 slice
- Calories: 480
- Sugar: 55g
- Sodium: 250mg
- Fat: 28g
- Saturated Fat: 17g
- Unsaturated Fat: 11g
- Trans Fat: 0.5g
- Carbohydrates: 58g
- Fiber: 1g
- Protein: 5g
- Cholesterol: 110mg