
There is truly nothing that signals pure comfort quite like the warm, spiced aroma of baked apples filling your kitchen. If you’re anything like me, Olivia Rosewood, you believe comfort food should be a joy, not a task. That’s why I worked hard to perfect this Ultimate Foolproof Apple Crisp. It’s simple, it’s deeply flavorful, and that crunchy oat topping gets an extra special boost from browned butter. Forget complicated baking; this classic American comfort dessert delivers incredible results every single time you make an apple crisp.
- Why This is the Best Apple Crisp Recipe You Will Make
- Gathering Ingredients for Your Apple Crisp
- Simple Steps to Prepare Your Easy Apple Crisp
- Tips for Success with Your apple crisp
- Variations on the Classic apple crisp
- Serving Suggestions for Your Warm Dessert Recipe
- Storing and Reheating Leftover apple crisp
- Frequently Asked Questions About apple crisp
- Share Your Cozy Apple Dessert Experience
Why This is the Best Apple Crisp Recipe You Will Make
I know, I know, everyone claims they have the “Best Apple Crisp Recipe,” but hear me out! When I set out to make this recipe consistently perfect for my own family, I focused on removing the usual pitfalls. This isn’t just an Easy Apple Crisp; it’s engineered for success. It’s truly a Family Favorite Apple Recipe around here, especially when paired with something cold. You can see how much I love using fruit in baked goods, like in my moist apple cake!
- It’s truly foolproof—the prep actually takes less than 15 minutes, making it a perfect Quick Apple Dessert.
- We skip plain melted butter in the topping. Why? Because we’re using brown butter, which adds this incredible, nutty depth you just don’t get otherwise.
- It hits that sweet spot: tender, spiced apples that aren’t mushy underneath a wildly crisp topping.
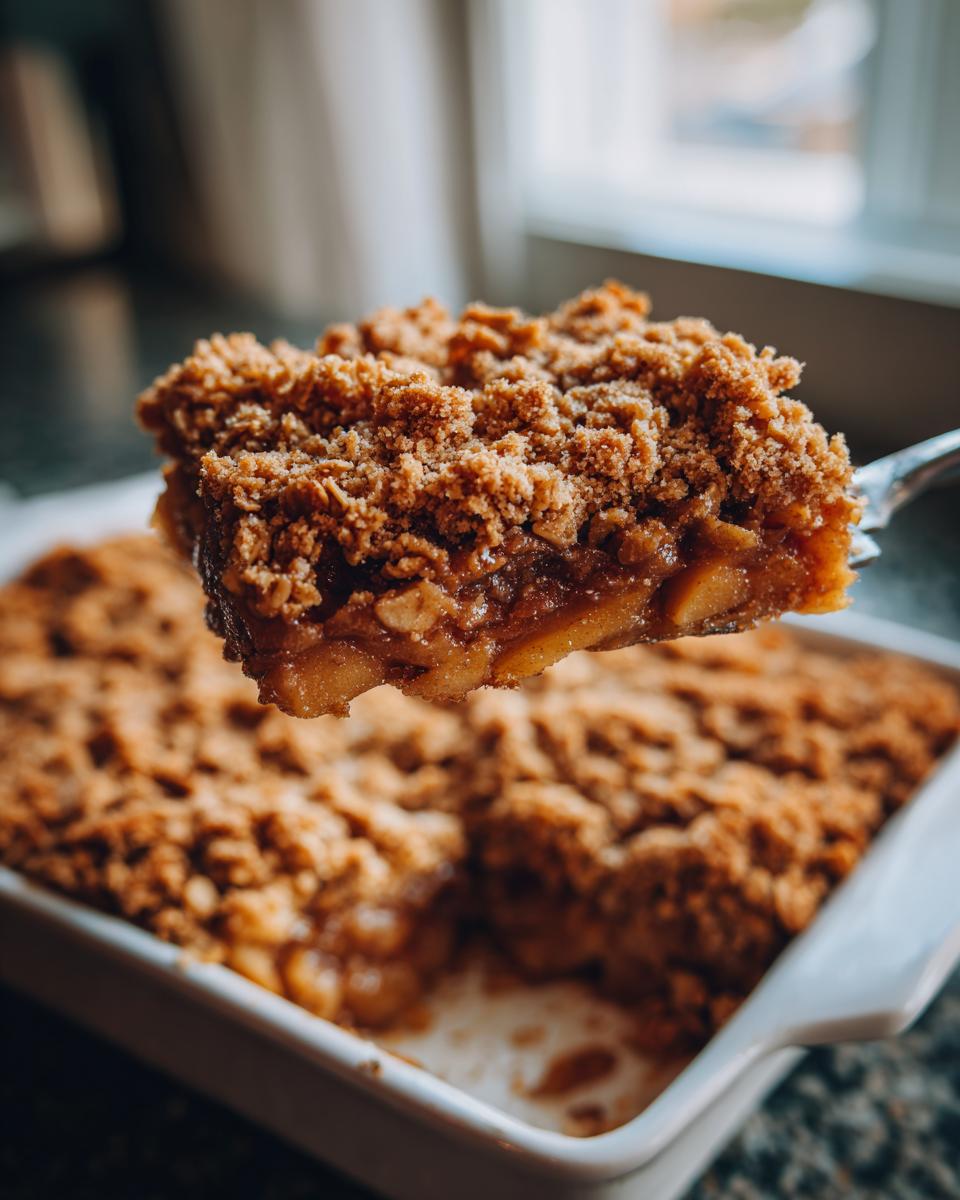
Achieving the Perfect Crunchy Oat Topping
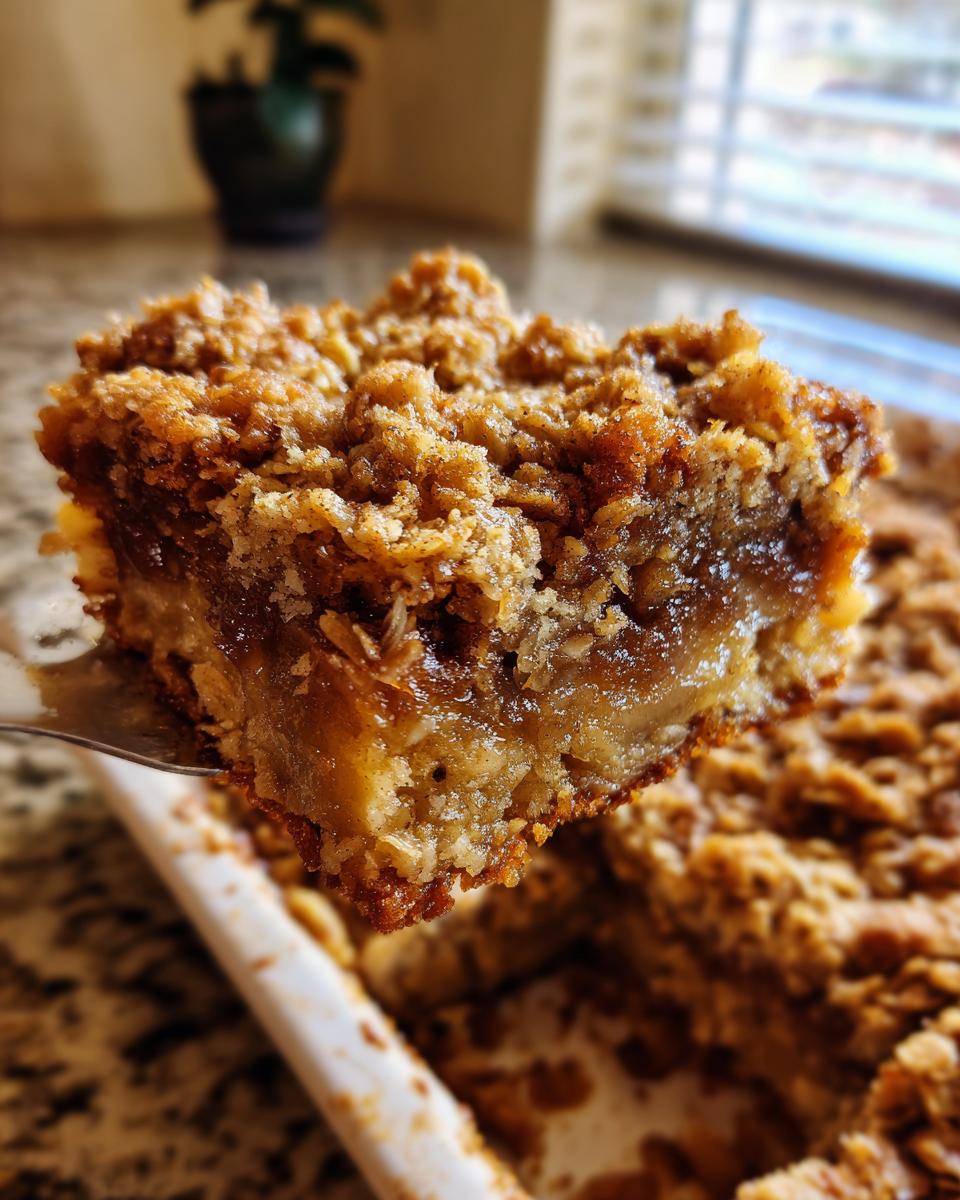
This is where the magic happens, honestly. Most recipes just tell you to toss some butter in there, right? Boring! When you brown the butter first (it’s easy, I promise!), those milk solids toast up and bring a rich, almost caramel flavor right into the oats. That little extra step turns a decent topping into the Buttery Crisp Topping everyone will be talking about. Trust me, once you try this version, the standard crumble just won’t cut it anymore.
Gathering Ingredients for Your Apple Crisp
Okay, let’s get real about what goes into this masterpiece. The great thing about an apple crisp is that it relies on simple, pantry-friendly items. We aren’t digging around for anything weird! However, the quality of those simple things really does matter, especially with the apples. Remember, this is all about that cozy, home-cooked feeling—just like when I bake my moist pumpkin bread.
For the best results as a true Fall Dessert, you need two main groups of ingredients. Make sure you read the prep notes next to the apples—that little bit of effort makes a huge difference in the final texture!
Here’s what you need to pull together for this Classic Fruit Crisp:
- For the Apples and the Filling:
- 6 large baking apples (I really prefer using a mix of tart Granny Smith and sweet Honeycrisp—that balance is key!). Make sure they are peeled, cored, and sliced evenly. We want tender apples, not mush!
- 1/4 cup granulated sugar.
- 1 tablespoon all-purpose flour (just to help thicken up those apple juices).
- 1 teaspoon ground cinnamon. Yes, a full teaspoon!
- 1/4 teaspoon ground nutmeg. Don’t skip this; it really brings the warmth.
- 1 tablespoon fresh lemon juice (This keeps the apples bright and stops them from browning while you work on the topping).
- For the Brown Butter Oat Topping:
- 1/2 cup (that’s one whole stick) unsalted butter. You’ll be browning this, so have fun watching it transform!
- 1 cup old-fashioned rolled oats. Make sure these are old-fashioned, not the instant kind, for the right chewiness.
- 1/2 cup packed light brown sugar. Packing it in gives you that beautiful molasses flavor.
- 1/2 cup all-purpose flour.
- 1/4 teaspoon salt (even sweet toppings need a pinch of salt to taste complex!).
Once you have all these pieces ready to go, assembling this Simple Baked Apples dessert is surprisingly fast. It’s truly one of the easiest things you can pull together when you need a Comfort Food Dessert fast.
Simple Steps to Prepare Your Easy Apple Crisp
This is truly where we shine on the “Easy” front! Since all the chopping is done, getting this apple crisp into the oven is a breeze. First things first: get your oven warming up to 375 degrees Fahrenheit, and give that 8×8 inch baking dish a quick rubdown with butter or spray—we don’t want sticking! Remember, the faster you get it prepped, the faster that amazing smell starts filling your house.
Preparing the Spiced Apple Filling
Grab that big bowl where you mixed your spices and apples earlier. Now, you just need to gently toss everything together one last time. You want those apple slices coated evenly in cinnamon and sugar, but please, be gentle! We are making a crisp, not applesauce. Once they look happy and coated, pour them right into your prepared baking dish and spread them out so they are relatively level.
Making the Brown Butter Buttery Crisp Topping
This step takes concentration, but it’s worth every second! Melt that stick of butter in a small saucepan over medium heat. You’ll see it foam up, and then, keep stirring! Watch closely until you see little brown specks forming at the bottom and you catch that amazing nutty aroma. Pull it right off the heat immediately! Now, toss that warm, beautiful butter into your bowl holding the oats, flour, brown sugar, and salt. Use a fork to combine it until it looks like coarse, wonderfully scented crumbs. No need to overmix!
Baking and Resting the apple crisp
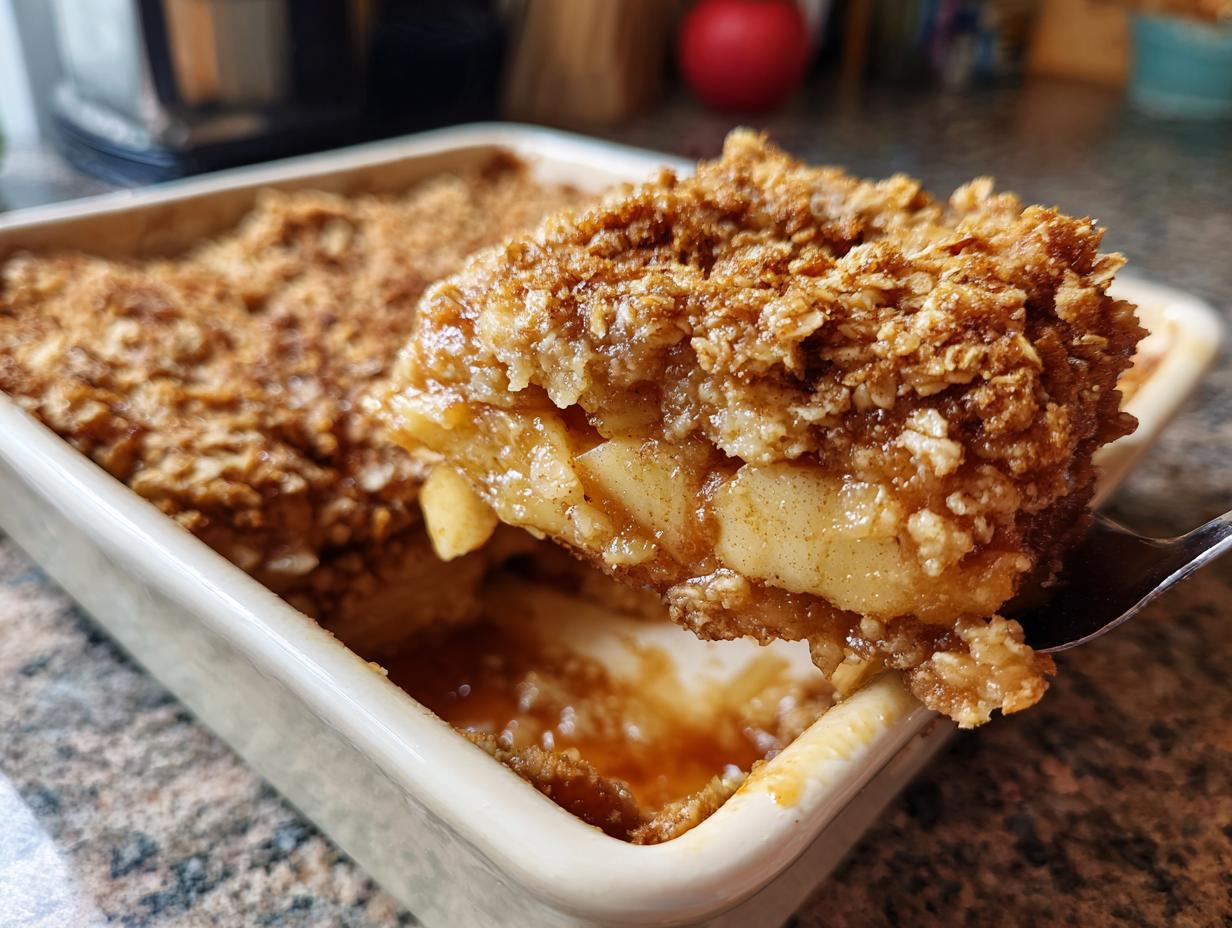
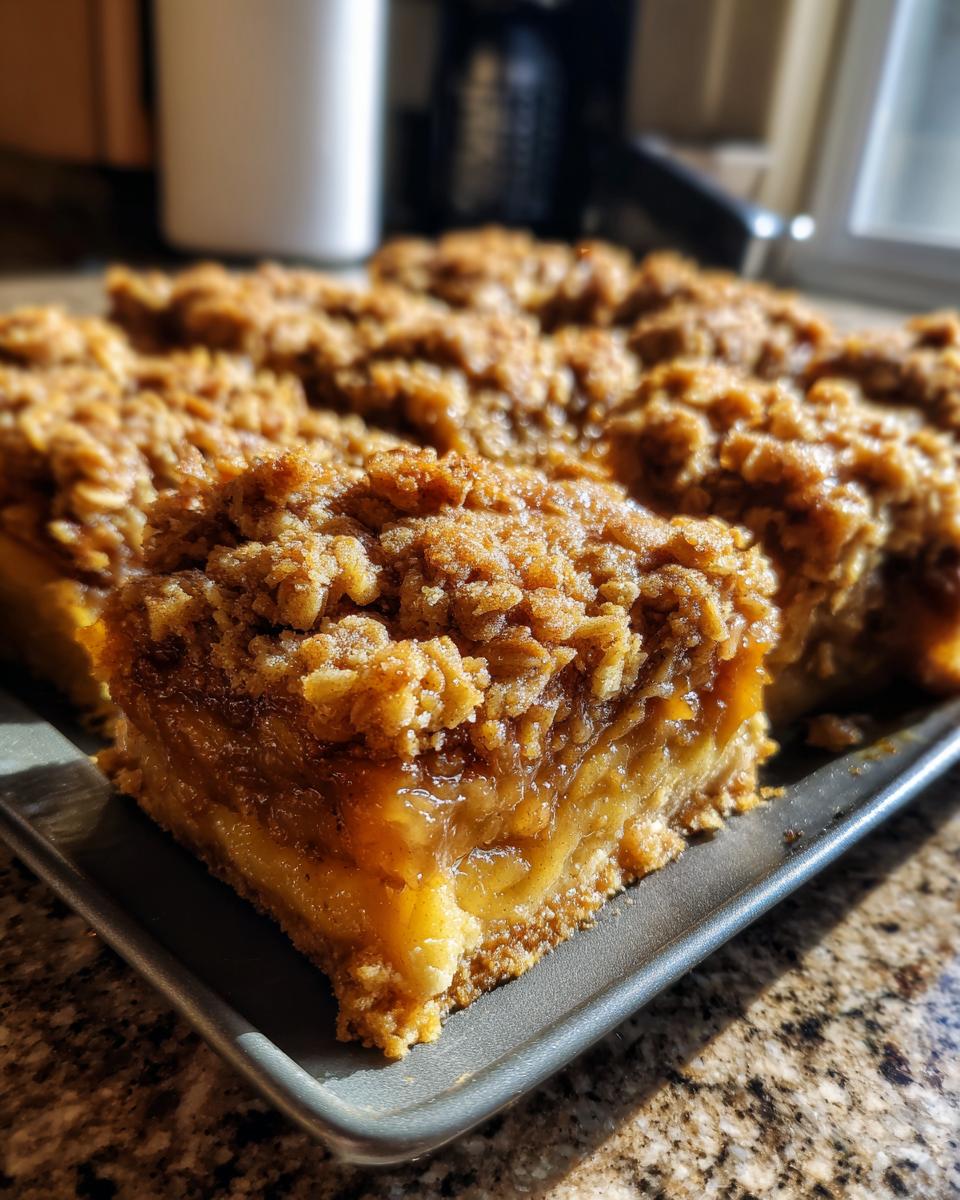
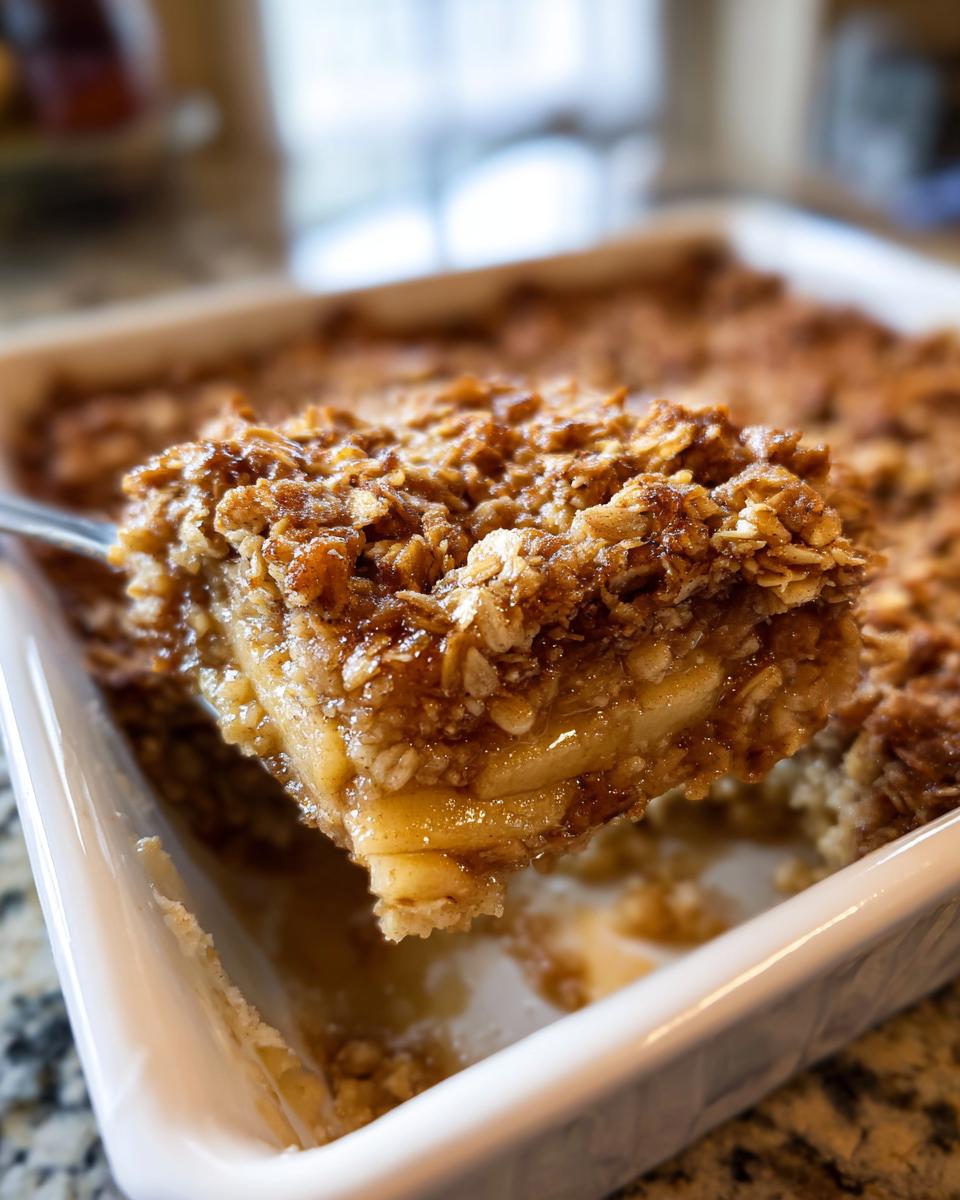
Spread that golden topping over your apples. Pop it in the preheated oven and let it bake for about 40 to 45 minutes. You’ll know it’s done when the top is visibly golden brown and you can see the apple juices bubbling up thick around the edges. This is the hardest part: you *must* let that apple crisp sit out on the counter for at least 15 minutes after it comes out. If you cut into it right away, all that lovely juice runs everywhere! Patience pays off, especially when you’re anticipating a treat like my soft applesauce cookies.
Tips for Success with Your apple crisp
Even though I call this the Ultimate Foolproof apple crisp, I still have a few little secrets I use every time I bake it—especially when company is coming over! These aren’t mandatory, but they take this already delicious Fall Dessert and elevate it to true showstopper status. I learned quickly in my own kitchen journey that paying attention to small details makes the biggest difference in your final product.
You already know I love that brown butter topping, but what if you’re in a huge rush? No problem! If you simply don’t have the time (or patience!) to brown the butter, you can absolutely use melted unsalted butter instead. Just melt it gently on the stove or in the microwave. It won’t give you that deep, nutty flavor, but you’ll still get a wonderfully crisp, buttery oat layer. It’s a great fallback for a weeknight treat.
Speaking of the apples—this is vital for any Cinnamon Apple Bake. Don’t rely on just one type! If you use only sweet apples, the whole thing tastes a little flat, and if you use only Granny Smith, it can be too sharp. The secret is the mix! I always aim for a 2:1 ratio of tart apples (like Granny Smith, which hold their shape beautifully) to sweet apples (like Honeycrisp or Gala). That blend gives you layers of flavor and textural contrast. For more apple baking inspiration, check out my recipe for moist and chewy apple brownies; they are just as addictive!
And one last quick tip for that perfect bake: make sure your apples are spread in a single layer in the dish. If you leave one big apple mound in the center, that area will stay undercooked while the edges turn dark. We want even cooking across the board so every scoop comes out perfect, hot, and bubbling.
Variations on the Classic apple crisp
While I truly believe this brown butter version is already the peak of apple crisp perfection, I know we all love switching things up based on what we have in the pantry or what mood strikes us! This recipe is so sturdy and reliable—it’s perfect for trying out little twists if you’re bored with the standard Old Fashioned Apple Crisp.
The beauty of a crisp is that the topping is essentially a blank canvas for texture and complementary spice. Don’t be afraid to experiment a little bit between batches. I always keep a few ideas handy whenever I’m planning my Autumn Baking Ideas rotation.
Here are a few simple ways you can play around with this recipe:
- Add Some Nutty Crunch: This is super easy! If you have nuts sitting around, just chop up about a half cup of pecans or walnuts and mix them right in with the dry oat topping ingredients. They toast up beautifully during baking and add a wonderful textural contrast to the oats. It works so well alongside that brown butter flavor!
- Spice It Up Differently: Cinnamon and nutmeg are classic for a reason, but if you want a slightly more sophisticated feel for a cozy gathering, try swapping out a quarter teaspoon of the cinnamon for ground cardamom. Cardamom and apple are just divine together. For an extra layer of warmth, a tiny pinch of ground ginger really complements the robust flavor of the brown sugar.
- A Brighter Apple Layer: If you want to lean into a less sweet filling and make your apples tarter, just increase that lemon juice up to two tablespoons. It cuts through the richness of the topping beautifully. You can also try adding a teaspoon of finely chopped fresh rosemary to the apple mixture—it sounds odd, but trust me, the herbal note is amazing with fall fruit!
If you’re looking for another amazingly simple fruit bake that uses apples in a slightly different format, you absolutely have to try my sprinkle-covered applesauce cookies. They scratch that same fall itch!
Serving Suggestions for Your Warm Dessert Recipe
Alright, we have labored over this beautiful apple crisp—the apples are tender, the topping is golden, and the entire kitchen smells like pure autumn heaven. Now comes the best part: enjoying it! This, my friends, is the quintessential Comfort Food Dessert, but how you serve it can take it from “great” to “absolutely unforgettable.”
Since this recipe takes about an hour total, you want to milk that warm, cozy feeling when you finally sit down to eat it. My number one, non-negotiable serving suggestion—and this is what everyone in the family demands—is a generous scoop of good quality vanilla ice cream melting slowly over the top. That hot/cold dynamic is unbeatable. When that cold, creamy ice cream meets the warm, spiced apples, it’s just pure magic!
If you happen to be feeling extra fancy, or if it’s a holiday gathering, a drizzle of homemade caramel sauce takes things to the next level. Seriously, making your own caramel sauce is shockingly easy, and if you’re ready to level up your dessert game, you should check out my recipe for easy to make caramel sauce. It takes maybe ten minutes, and suddenly your apple crisp looks like it came from a fancy bakery!
Another wonderful option is whipped cream, maybe lightly sweetened with a touch of maple syrup if you want to keep that autumn flavor going. Honestly, the best part about this dessert is that it’s flexible. Whether you eat it straight out of the pan standing over the sink (don’t judge me!) or you plate it up nicely, it’s always delicious. Even if you skip all the toppings, serving it slightly warm makes all the difference for that perfect Warm Dessert Recipe experience.
Storing and Reheating Leftover apple crisp
Now, I hope you don’t have too many leftovers because this apple crisp disappears fast at my house! But life happens, and sometimes you need to save some for lunch the next day—or at least until tomorrow’s dessert, right? Storing this properly is key to making sure that beautiful texture you worked so hard on doesn’t turn soggy overnight.
Once the crisp has cooled down to room temperature—and I mean truly cool, not just warm—you need to cover it up tightly. You can use plastic wrap, foil, or transfer leftovers into an airtight container. It keeps really well on the counter for about a day, but if you want to keep it longer, stick it in the refrigerator. It should be good for three, maybe four days tucked away in there. If you used a pie dish, just press plastic wrap right over the top!
The Trick to Reheating for Maximum Crunch
Here’s where people often go wrong. If you throw a slice of leftover apple crisp in the microwave, the topping gets soft and chewy, and trust me, that’s just sad. If you aren’t eating it all straight from the fridge, you want the oven involved for reheating. The microwave is great if you are in a major hurry and don’t mind a slightly softer topping, but for that glorious crunch we earned?
Preheat your oven—or even just a toaster oven, if you are only warming up one piece—to about 350 degrees Fahrenheit. Pop your portion right back into a baking dish or onto a small oven-safe plate. Give it just 10 to 15 minutes. That short time is just enough to heat the apples back up until they are bubbling gently and, more importantly, to crisp up that buttery oat topping again. It comes out tasting almost as good as fresh, I promise. This makes saving it completely worthwhile!
Frequently Asked Questions About apple crisp
I collected a few of the questions I get asked most often about this recipe during the busy baking season. It’s amazing how many little things can trip people up when they are trying to achieve the perfect Fall Dessert! I hope clearing these up makes your baking experience smoother, just like making my easy moist pumpkin bread!
Can I make this apple crisp ahead of time?
Oh yes, you absolutely can assemble this ahead of time—and I often do when I know I’ll be busy hosting! You can combine the apple filling and the topping separately, cover them tightly, and keep them in the fridge for up to 24 hours. If you do this, I suggest keeping the topping in a separate container until just before baking. When you are ready to bake, assemble it and add about 5 to 10 minutes to the bake time, because the filling will be colder. Remember what I said about reheating: you always want to use the oven to keep that topping crunchy!
What are the best apples for an apple crisp?
This is such an important question for any apple crisp! My number one rule is: use a mix! If you use only sweet apples, it ends up tasting heavy and flat. If you only use tart apples, it can be too sharp. I swear by a combination of firm, tart apples like Granny Smith—they hold their shape perfectly—and a sweeter, crisp variety like Honeycrisp or Fuji for flavor balance. You want apples that soften beautifully when baked but don’t immediately turn to complete mush. If you want to read about another fantastic, highly-saved apple crisp recipe online, check out the one from Belle of the Kitchen for comparison!
Another question I get all the time is whether this is truly an Easy Apple Crisp. Yes! The easiest baking recipes are the ones where the ingredients do most of the work for you. Because we use simple flour and oats, the topping comes together in seconds with the brown butter. It’s designed to be minimal fuss for maximum cozy reward!
So, if you’re still wondering about using other fruits, know that while this is the Best Apple Crisp Recipe, this method works wonderfully for pears or even plums if you want to try a different Autumn Baking Idea!
Share Your Cozy Apple Dessert Experience
Now that you’ve got this incredible, foolproof apple crisp cooling on the counter, I truly want to see what you create! Honestly, seeing how this simple recipe fits into your own busy life or special holiday spreads is the reason I share every single recipe here at DelishCraze. It’s about building those food memories.
Did you try browning the butter? Did you go classic with vanilla ice cream or decide to drizzle on some caramel sauce from my recipe? Don’t keep the goodness to yourself! Drop a star rating right in the section below—it helps other cooks know this is the real deal for a great Warm Dessert Recipe.
If you snap a picture of your beautiful, bubbling bake, please tag me on social media! I love seeing how my recipes become part of your family’s Autumn Baking Ideas tradition. Maybe this becomes your new favorite for Thanksgiving gatherings, or maybe it’s just your perfect Tuesday night treat. Whatever it is, let me know how it tasted! If you love simple, classic bakes like this, you should definitely check out my recipe for the moist sweet potato cornbread next—it’s another staple in my rotation!
PrintThe Ultimate Foolproof Apple Crisp with Brown Butter Oat Topping

Make this easy apple crisp for a comforting dessert. It features tender, spiced apples beneath a crunchy, buttery brown butter oat topping. This recipe is simple to prepare and perfect for fall gatherings or serving warm with vanilla ice cream.
- Prep Time: 15 min
- Cook Time: 45 min
- Total Time: 60 min
- Yield: 6 servings 1x
- Category: Dessert
- Method: Baking
- Cuisine: American
- Diet: Vegetarian
Ingredients
- 6 large baking apples (like Granny Smith or Honeycrisp), peeled, cored, and sliced
- 1/4 cup granulated sugar
- 1 tablespoon all-purpose flour
- 1 teaspoon ground cinnamon
- 1/4 teaspoon ground nutmeg
- 1 tablespoon lemon juice
- 1/2 cup (1 stick) unsalted butter, browned
- 1 cup old-fashioned rolled oats
- 1/2 cup all-purpose flour
- 1/2 cup packed light brown sugar
- 1/4 teaspoon salt
Instructions
- Preheat your oven to 375 degrees Fahrenheit. Lightly grease an 8×8 inch baking dish.
- In a large bowl, combine the sliced apples, granulated sugar, 1 tablespoon flour, cinnamon, nutmeg, and lemon juice. Toss gently until the apples are evenly coated.
- Spread the spiced apple mixture into the prepared baking dish.
- To make the brown butter oat topping, melt the butter in a small saucepan over medium heat. Continue cooking, stirring often, until the butter foams and brown bits form at the bottom, giving off a nutty aroma. Remove from heat immediately.
- In a separate medium bowl, combine the rolled oats, 1/2 cup flour, brown sugar, and salt. Pour the warm brown butter over the dry ingredients. Mix with a fork until the mixture is crumbly and well combined.
- Sprinkle the oat topping evenly over the apple layer in the baking dish.
- Bake for 40 to 45 minutes, or until the topping is golden brown and the apple filling is bubbly and tender when pierced with a fork.
- Let the apple crisp cool for at least 15 minutes before serving. Serve warm with a scoop of vanilla ice cream or a drizzle of caramel sauce.
Notes
- For the best texture, use a mix of tart and sweet apples.
- If you do not want to brown the butter, you can use melted unsalted butter for a classic topping flavor.
- This dessert is excellent made ahead; cover and refrigerate after baking, then reheat before serving.
Nutrition
- Serving Size: 1 serving
- Calories: 380
- Sugar: 35g
- Sodium: 110mg
- Fat: 20g
- Saturated Fat: 12g
- Unsaturated Fat: 8g
- Trans Fat: 0.5g
- Carbohydrates: 50g
- Fiber: 5g
- Protein: 4g
- Cholesterol: 50mg