
Oh, the aroma! There’s truly nothing that signals ‘home’ quite like the smell of fresh yeast bread baking, and when that smell is decidedly French, it just lifts your whole mood. I spent years feeling like truly authentic, crusty french bread was something only a professional baker could achieve. But friends, I was wrong! Reclaiming my kitchen after long days meant finding bakes that offered big rewards without taking up the whole afternoon, and this classic recipe became one of my absolute favorites. This recipe is my promise to you: we are getting that incredible, crackly crust and those beautiful, airy holes right here at home. To celebrate that perfect warm loaf, you absolutely must have a side dish ready, like my recipe for the best bread dip recipe. Trust me, once you pull this out of the oven, you’ll be inspired to make your next great loaf.
- Why This Classic Crusty French Bread Recipe Works (EEAT Focus)
- Ingredients for Perfect Homemade French Bread
- Step-by-Step Instructions for Your Easy French Baguette Recipe
- Tips for Success with Your Quick French Bread Recipe
- Variations: From Crusty to Soft and Fluffy French Loaf
- Serving Suggestions for Classic French Loaf
- Storage and Reheating Instructions for Homemade French Bread
- Frequently Asked Questions About French Bread
- Nutritional Estimates for This Recipe
Why This Classic Crusty French Bread Recipe Works (EEAT Focus)
It’s easy to follow a recipe, but it’s much better when you know *why* you’re doing what you’re doing, right? That’s how we get that fantastic result every time. My secret to the best homemade French bread lies in respecting two major steps: the yeast and the steam. If your yeast doesn’t foam up beautifully in that warm water, the whole structure suffers—it’s foundational! If you’re still learning the ropes with doughs, you might want to peek at how I handle the easy homemade pita bread recipe first, just to get comfortable with yeast.
Next comes the kneading. Don’t rush it! We need strong gluten development here to trap all those lovely gases the yeast makes. That’s what gives you those big, open pockets inside. We use simple ingredients, but our technique is what pushes this from being ‘just bread’ to being something truly special.
Achieving Bakery Style Bread at Home
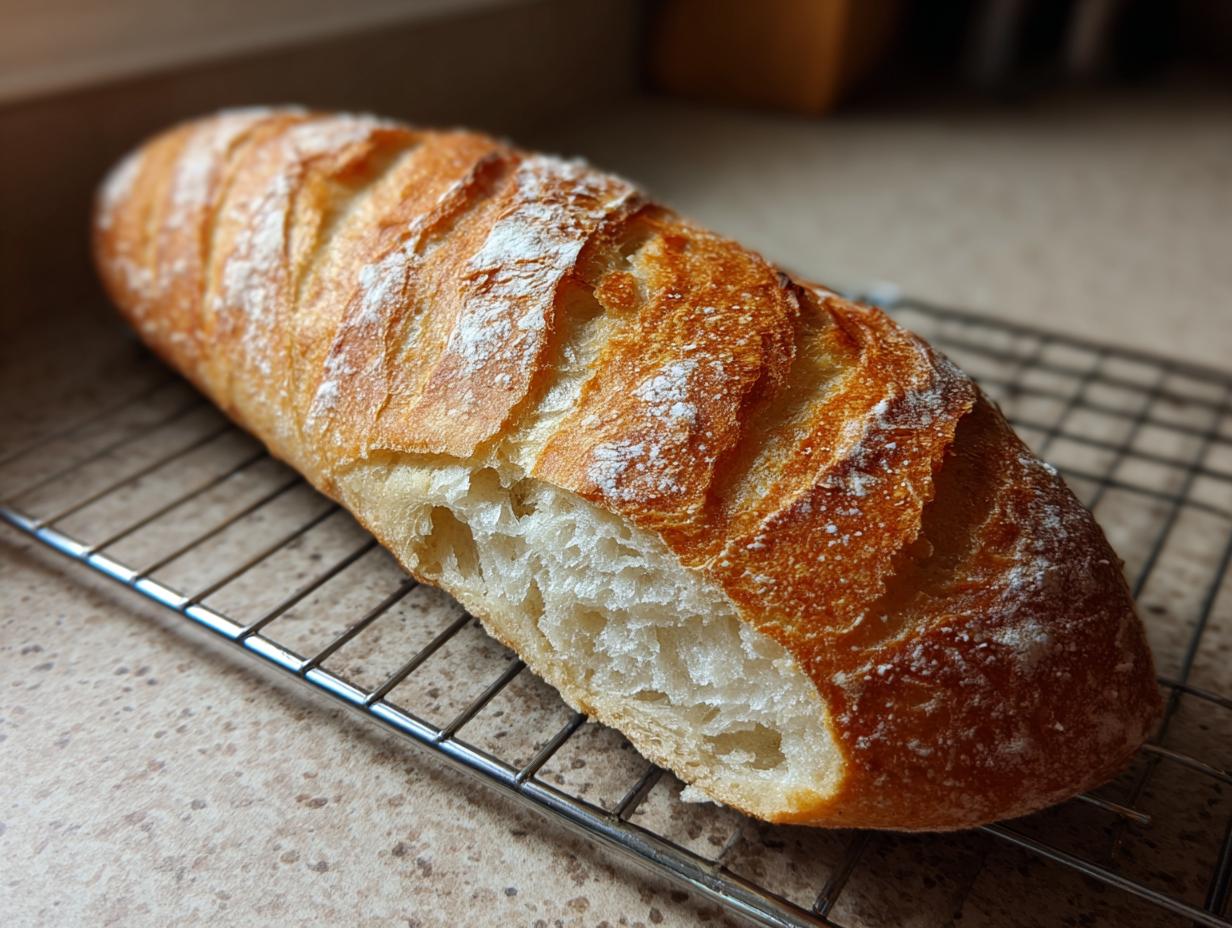
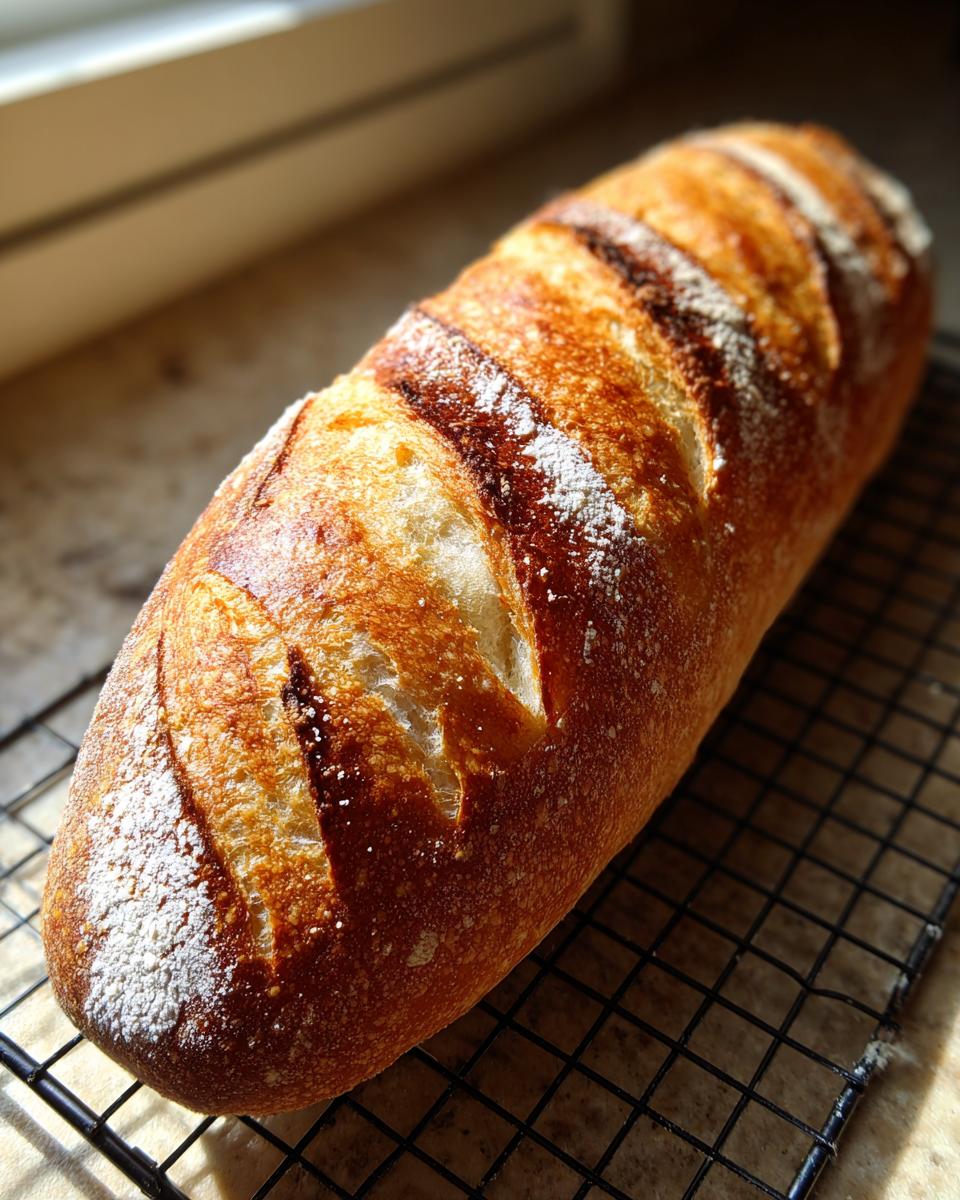
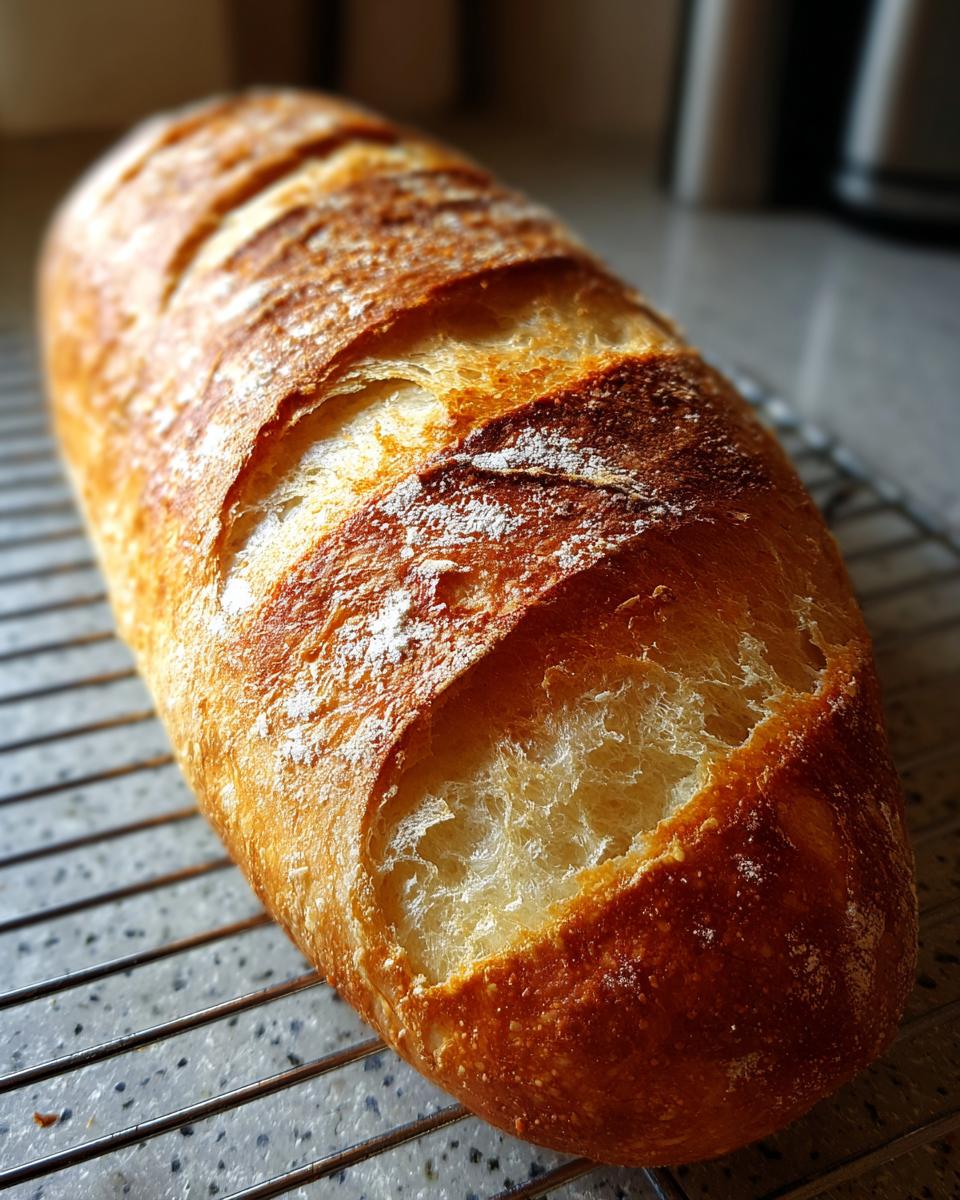
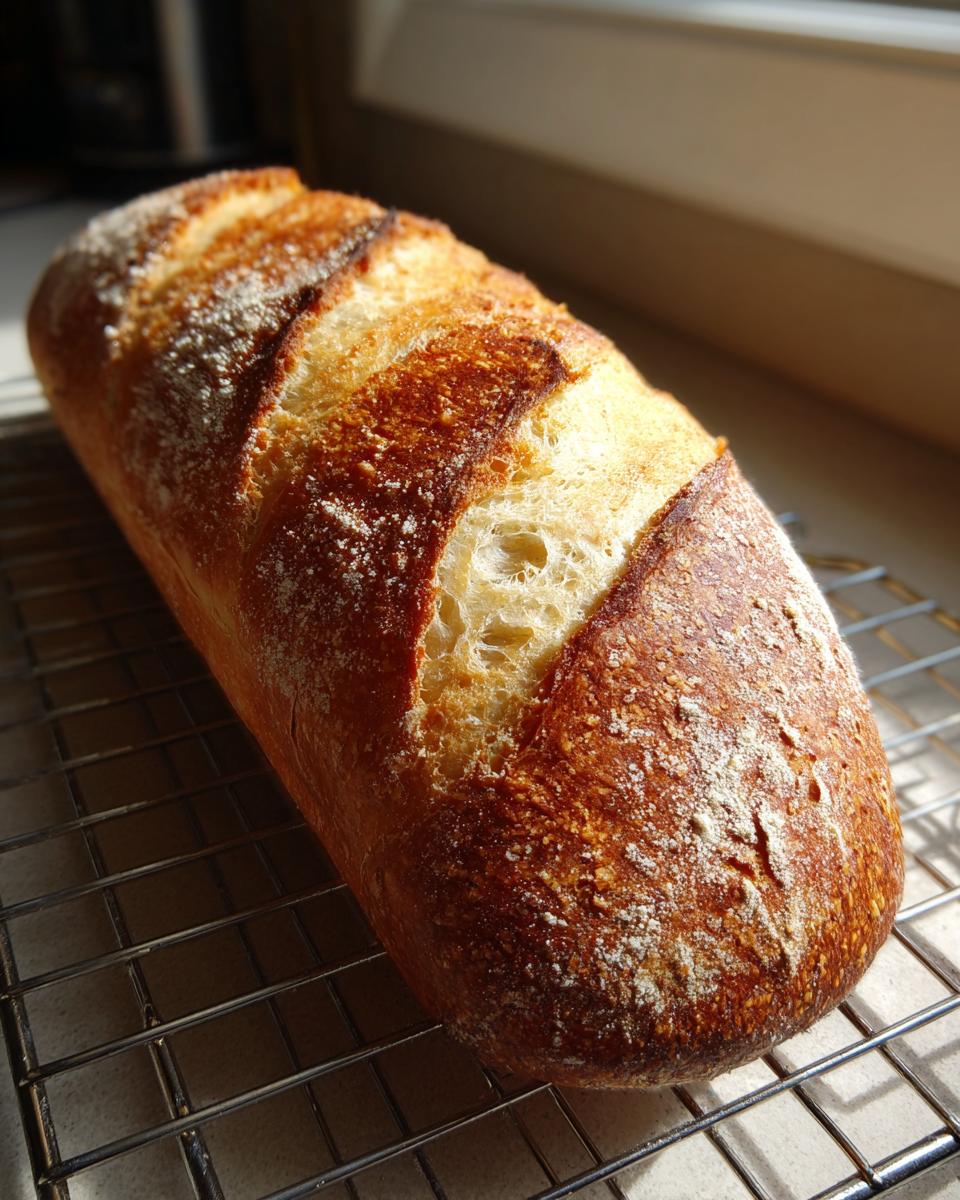
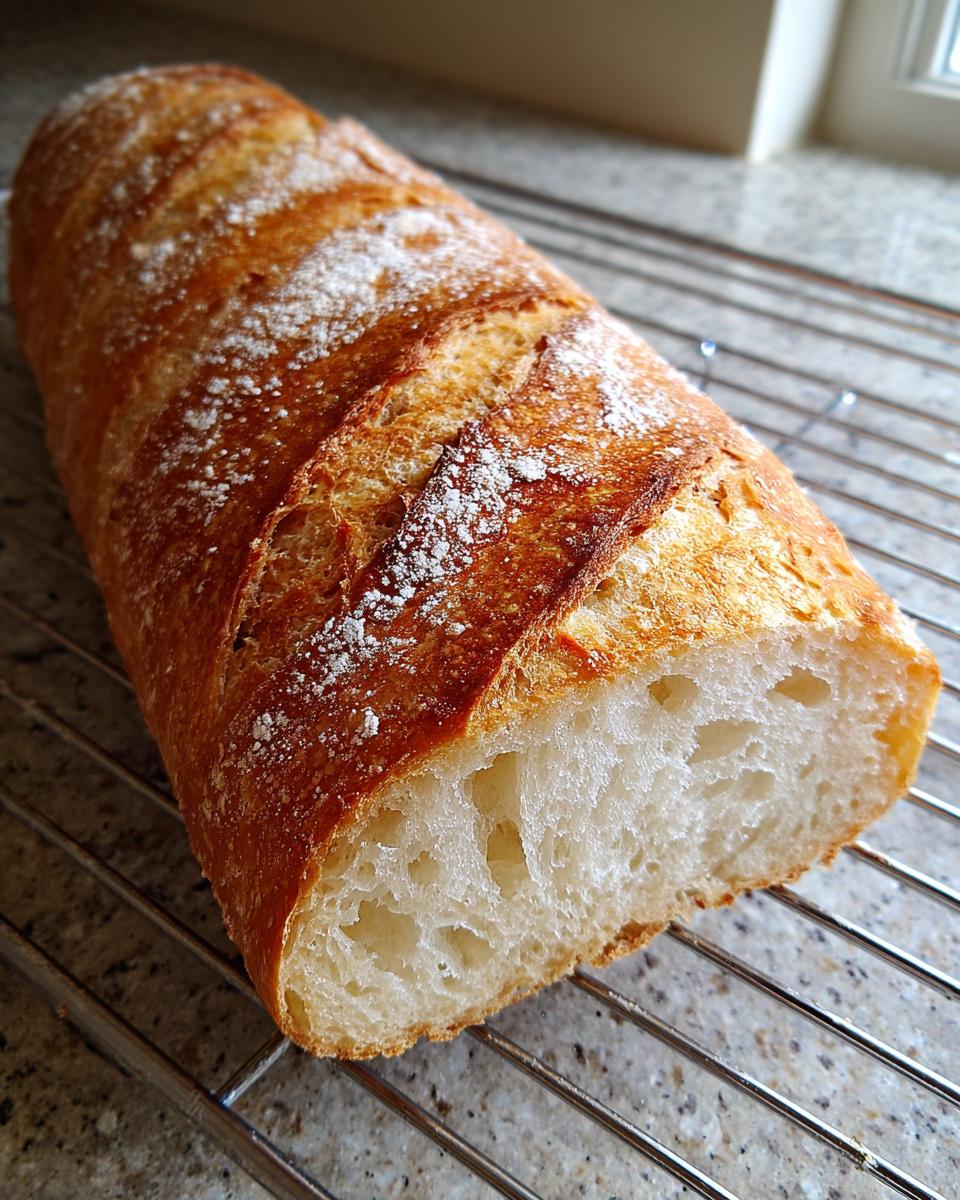
When people ask me how to make bakery style bread at home, I always point to the contrast. A truly great French loaf has that beautiful, brittle, crackly crust that shatters when you slice it, while the inside stays soft and slightly chewy. This recipe is definitely geared toward that artisan texture, unlike some of the fluffier dinner roll versions you might see around.
The final magic trick, which I dive into later, is generating intense steam in your oven right at the start. That humidity keeps the outside of the dough pliable long enough for it to expand fully before that crust sets hard. It’s a game-changer!
Ingredients for Perfect Homemade French Bread
The beauty of a classic french bread recipe is that it relies on just a handful of pantry staples. Seriously, we don’t need much to create something that tastes like we spent all day at a Parisian bakery! This simple ingredient list is what makes this wonderful homemade French bread recipe so achievable for busy weeknights. Remember, this mixture is going to give you exactly two lovely, crusty loaves.
- 3 cups all-purpose flour (we talk about flour types below!)
- 1 1/2 cups warm water (aim for 105°F to 115°F—warm to the touch, not hot!)
- 2 1/4 teaspoons active dry yeast
- 1 1/2 teaspoons salt
- 1 teaspoon sugar
- Water for steaming (this is vital for the crust, so have a cup ready!)
If you’re looking for something a little zestier, you could check out my easy moist lemon loaf recipe for a completely different flavor profile!
Ingredient Notes and Substitutions for French Loaf Recipe Simple Ingredients
Since we are keeping the ingredients so few, what we use matters! I stick to regular all-purpose flour because it results in a softer crumb that contrasts nicely with the crust. If you swap for bread flour, you are building more gluten, which will make the final loaf a bit chewier—though still delicious! That’s why this is often listed as a great option for French loaf recipe simple ingredients beginners!
Now, about the yeast: I wrote this using active dry yeast, which needs that proofing step with the sugar and warm water. If you are using instant yeast, great news! You can skip dissolving it in the water and just mix it right in with the dry ingredients. It saves about 10 minutes, but honestly, watching that yeast bloom is half the fun when you’re learning!
Step-by-Step Instructions for Your Easy French Baguette Recipe
Alright, let’s get our hands dusty! This is where the real transformation happens. We start by making sure that yeast is happy—dissolve the sugar and yeast in your warm water and just wait. Seriously, give it 5 to 10 minutes until it’s foamy. If it’s not bubbly, toss it and start over; there’s no point hiding sad yeast in your french bread! Once it foams, we mix in the salt and alternate the flour additions until we get what I call a “shaggy mass.” Don’t overmix yet!
Now comes the good stuff: kneading. Turn that dough out onto a lightly floured counter. We need to work this dough for a solid 8 to 10 minutes. I know, it sounds like a long time when you’re used to quick mixes, but this builds the structure we need for that perfect airiness. When you’re done, it should feel smooth and elastic, a real pleasure to touch. Pop it into an oiled bowl, cover it up, and let it do its thing in a warm spot for 1 to 1.5 hours—no cheating! We need that full rise for a beautiful loaf.
Once it’s doubled, gently punch it down—it’s very satisfying—and divide it right in half. Shape these pieces into long, skinny loaves. If you need a reminder on getting that gorgeous shape just like the pros bake, check out this great resource on making truly crusty and delicious homemade French bread. After shaping, let them rest for a quick 30 minutes while the oven heats up. If you’re looking for something softer, you can skip these next steps, but for true French bread, steam is your best friend! You can find other great simple baking recipes, like my easy moist zucchini banana bread recipe, when you need a break from yeast.
Mastering the Steam for Crusty Bread Baking
This is it. This is **how to make French bread crusty**! When you preheat your oven to 450°F, make sure you put a shallow metal pan on the bottom rack while it heats up—get that baby scorching hot. Right before you slide your loaves in, carefully pour about a cup of very hot water into that pan and slam the door shut quickly! That blast of steam is crucial. It keeps the surface of the dough moist so it can expand quickly, giving you that phenomenal oven spring and the signature shatteringly crisp crust.
For an extra boost, I sometimes grab my spray bottle and give the oven walls a quick spritz or two during the first ten minutes of baking. It just reinforces that steamy environment. Don’t linger with the door open, though; you’ll lose all that build-up!
Shaping and Scoring Your French Bread
Shaping is mostly about gently coaxing the dough. After your second 30-minute rest, you’ll take each piece and gently stretch it out lengthwise until it’s the desired size for your baking sheet. Don’t tear the dough, just guide it!
Scoring—or slashing—needs a very sharp blade, like a razor or a baker’s lame. You want quick, decisive diagonal cuts about a half-inch deep across the top of the loaf, spaced maybe two inches apart. These aren’t just pretty marks; these slashes give the expanding dough controlled places to burst open. If you cut too shallowly, the dough will just rip open randomly elsewhere!
Tips for Success with Your Quick French Bread Recipe
Okay, so you’ve got your dough kneaded, it’s risen beautifully, and you’ve created a steamy microclimate in your oven. Wonderful! To make sure this batch of french bread is your best one yet, a few extra little tricks really nail that bakery quality. Beginners often worry about the dough being too sticky during shaping, but remember: a little stickiness means a wetter dough, and wetter dough means a better interior crumb!
If you happen to have a baking stone or even a heavy-duty pizza steel, use it! Preheat that baby inside the oven for a full hour before you even think about putting the bread in. Placing the loaves directly onto that searing hot surface right after you add the steam gives them an immediate, intense heat transfer from underneath. That’s what gives you that ultimate golden crust on the bottom.
Another thing—don’t overthink the shape if you’re aiming for a free-form loaf instead of a precise baguette. If it looks rustic, it’s perfect! It just means it’s homemade, which is what we love! If you’re chasing speed over that perfect texture, you might try looking into an easy 90-minute French bread option, but for this classic method, patience pays off.
And one last tip related to serving: if you’re planning on dipping this bread in something delicious, like my recipe for best fluffy pancakes—wait, wrong recipe, ha! But seriously, dip it in soup or salad greens!—make sure you let the bread cool for at least 20 minutes before slicing. Cutting into it too soon will smash that lovely airy structure we worked so hard to create.
Variations: From Crusty to Soft and Fluffy French Loaf
Now, I know most of you are here for that shatteringly crisp crust we just talked about, but let’s be real—sometimes you just need a bread that’s tender for dipping into soup or making a soft sandwich. If you’re looking for that soft and fluffy French loaf texture, you don’t need a totally different recipe; you just need to tweak this one slightly!
The biggest change you need to make is ditching the steam. Remember how we used that pan of hot water to bake the crusty version? For soft bread, that steam is the enemy. Skip the hot water pan entirely, and maybe even kick your oven temp down just 25 degrees, maybe to 425°F. This keeps the surface from drying out too fast, resulting in a softer exterior.
Another little trick if you want it truly tender—and only for this soft version—is to add just 1 tablespoon of melted butter or even a splash of milk into your wet ingredients when you activate the yeast. That tiny bit of fat really helps keep the crumb tender and prevents that rustic chewiness. For more ideas on wonderfully tender baked goods, you have to see my recipe for the best soft, fluffy, buttery dinner rolls!
If you want to jazz up the flavor, either version—crusty or soft—takes herbs beautifully. A tablespoon of dried rosemary mixed in with your flour, or even sprinkling some dried garlic and parmesan on top just before baking the soft loaf, makes for an incredible dinner side. If you were looking specifically for that soft style, Bex’s Kitchen has a fantastic dedicated recipe you might want to compare notes with: Soft fluffy french bread recipe, I hear great things!
Serving Suggestions for Classic French Loaf
I mean, what are you even going to do with this gorgeous, sturdy french bread once it cools down? That is the best part! For us, it’s non-negotiable: it has to be served alongside a big, hearty bowl of soup. Think about dipping that crisp crust into a steaming bowl of my roasted butternut squash soup—it’s absolute heaven. It’s sturdy enough to hold up to heavy dishes, which I love.
Of course, it makes the best sandwiches if you’re using the softer loaf variation, but even the crusty baguette is perfect sliced thin, brushed with olive oil, toasted lightly, and served as the ultimate base for bruschetta. Honestly, any excuse to eat this bread is a good excuse!
Storage and Reheating Instructions for Homemade French Bread
The only thing sadder than baking perfect french bread is eating it the next day when the crust has gone soft! We put so much work into getting that amazing crackle crust, so we absolutely must store it right. The method really depends on what part of the bread you want to preserve most.
If your main goal is keeping that crust **crispy**, you need air circulation. Do NOT put it in a plastic bag! That traps the moisture released from the bread, and the crust turns rubbery really fast. Instead, wrap your cooled loaf loosely in a clean paper bag—the kind you might use for lunch sandwiches. This keeps dust off but allows enough air to flow so the crust stays firm. It will stay great like that for about 24 hours.
Now, if you happen to be making the soft, fluffy loaf variation, or if preserving interior softness is your top priority, an airtight container or a sealed zip-top bag works much better. Honestly, a soft loaf doesn’t last quite as long, but this method locks in moisture to keep it tender for sandwich making.
Here’s the big secret for reviving those crusty loaves the next day: the oven! I never microwave homemade bread—it just gets chewy and weird. Take your loaf (or even half a loaf) and re-wrap it loosely in aluminum foil. Pop it into a 350°F oven for about 5 to 8 minutes. That heat brings the moisture back up to the crust just perfectly, giving you that fresh-out-of-the-oven shatter again! It’s also a great way to revive homemade refrigerator pickles easy crispy recipe day leftovers if you need something crunchy!
Frequently Asked Questions About French Bread
I get so many questions when I post about this recipe because everyone wants that bakery magic at home. It’s totally understandable! Baking from scratch bread baking can seem intimidating, but once you get the hang of yeast breads, you’ll be hooked. If you’re new to this whole world, don’t forget to check out my guide on beginner bread recipes for low-stakes practice.
Can I make this a quick French bread recipe without sacrificing texture?
That’s the eternal question when it comes to yeast bread! While I mentioned that some folks have found ways to whip up a version in 90 minutes, I have to be honest with you: for *this* recipe, which is focused on that deep, complex flavor and perfect airy structure, you really need the full rising time. If you rush the first rise, your french bread will be dense, almost like a brick, because the gluten hasn’t relaxed enough.
If you absolutely need bread faster than the 2 hours this takes, you might want to look for specific “one-hour” recipes that use higher yeast amounts or warmer environments. But for the authentic, artisan result we’re aiming for here, stick to the rising times. It’s worth the wait, I promise!
What is the difference between a baguette and a classic French loaf?
It’s all about surface area and shape, really! A baguette is long, thin, and narrow—think of those iconic loaves you see in Paris. Because it’s long and skinny, it has a much higher crust-to-interior ratio. That’s why baguettes generally feel much, much crustier than a standard loaf.
A “classic French loaf,” especially one made in a standard loaf pan or shaped like a wider batard, has less surface area exposed directly to the heat. This means the interior crumb stays softer longer, and the crust, while still crisp when fresh, doesn’t shatter quite as dramatically as a thin baguette. Both are delicious, of course, but the shape dictates the texture experience. You can see a great demonstration of the baguette shaping technique over at Making Truly Crusty Homemade Baguettes Every Time if you want to see it in action.
If you’re looking for soft, skip the baguette shape and go for my second variation, or try a simple homemade loaf recipe! Either way, you can’t go wrong with fresh yeast bread favorites in your house.
Nutritional Estimates for This Recipe
Okay, let’s talk transparency! When I share my favorite baking secrets, I always want you to have the full picture. Since every brand of flour and every salt measurement might be slightly different at your house compared to mine, these numbers are my best estimate based on averages. This isn’t medical advice, of course, just a good guideline for you to see what’s in this beautiful loaf of french bread.
This delicious bread uses such simple ingredients, which is one of the reasons I love it so much—no weird preservatives or additives! Here’s what you can generally expect per serving (which I calculated as about 1/10th of one loaf):
- Calories: 160
- Fat: 0.5g
- Carbohydrates: 33g
- Protein: 5g
- Sugar: A tiny 1g!
- Cholesterol: 0mg (Yep, zero!)
Remember, the sodium count hovers around 300mg, so if you’re watching salt intake, you might want to dial that back slightly in the dough mix. Enjoying this amazing, crusty bread doesn’t have to mean sacrificing your healthy habits; it just means enjoying wholesome, homemade goodness!
PrintClassic Crusty Homemade French Bread
Make authentic, bakery-style French bread at home. This recipe focuses on achieving a crisp, crackly crust and a soft, airy interior using simple ingredients.
- Prep Time: 20 min
- Cook Time: 25 min
- Total Time: 2 hours 5 minutes
- Yield: 2 loaves 1x
- Category: Baking
- Method: Baking
- Cuisine: French
- Diet: Vegetarian
Ingredients
- 3 cups all-purpose flour
- 1 1/2 cups warm water (about 105-115°F)
- 2 1/4 teaspoons active dry yeast
- 1 1/2 teaspoons salt
- 1 teaspoon sugar
- Water for steaming (in a pan)
Instructions
- In a large bowl, dissolve the sugar and yeast in the warm water. Let stand for 5 to 10 minutes until foamy.
- Add the salt and half of the flour to the yeast mixture. Mix until just combined.
- Gradually add the remaining flour, mixing until a shaggy dough forms.
- Turn the dough out onto a lightly floured surface. Knead for 8 to 10 minutes until the dough is smooth and elastic.
- Place the dough in a lightly oiled bowl, turning to coat. Cover the bowl with plastic wrap or a damp towel and let it rise in a warm place for 1 to 1.5 hours, or until doubled in size.
- Gently punch down the dough. Divide it into two equal pieces. Shape each piece into a long, narrow loaf (baguette shape).
- Place the shaped loaves on a baking sheet lined with parchment paper or a couche. Cover loosely and let them rest for 30 minutes.
- Preheat your oven to 450°F (232°C). Place a shallow pan on the bottom rack during preheating to create steam later.
- Just before baking, use a sharp knife or razor blade to make 3 to 5 diagonal slashes across the top of each loaf.
- Carefully pour 1 cup of hot water into the preheated pan on the bottom rack to create steam. Quickly close the oven door.
- Bake for 20 to 25 minutes, rotating the loaves halfway through, until the crust is deep golden brown and sounds hollow when tapped.
- Remove the bread from the oven and cool completely on a wire rack before slicing.
Notes
- For a very crusty exterior, use a baking stone or steel if you have one, preheated in the oven.
- To mimic bakery steam, you can also spray the oven walls with water a few times during the first 10 minutes of baking.
- If you prefer a soft and fluffy French loaf instead of a crusty baguette, reduce the baking time slightly and skip the intense steaming step.
Nutrition
- Serving Size: 1 slice (approx 1/10 loaf)
- Calories: 160
- Sugar: 1
- Sodium: 300
- Fat: 0.5
- Saturated Fat: 0
- Unsaturated Fat: 0.5
- Trans Fat: 0
- Carbohydrates: 33
- Fiber: 1
- Protein: 5
- Cholesterol: 0