
If you’ve spent five minutes scrolling through any dessert board lately, you know that anything flavored with Lotus cookie butter is having its main character moment. And honestly? I totally get it. The warm, spiced crunch of those cookies just transforms everything they touch. That’s why I spent ages perfecting what I truly believe is the absolute best, easiest No-Bake Biscoff Cheesecake you will ever make. Forget turning on the oven; this recipe comes together so quickly, it’s become my secret weapon for last-minute dinner parties. When I need an indulgent dessert that looks totally professional but takes almost no effort, this creamy biscoff cheesecake is what I reach for every single time. Trust me, you’re going to want to save this one immediately!
- Why This No Bake Biscoff Cheesecake Recipe Works (Crowd Pleasing Dessert)
- Ingredients for the Ultimate Biscoff Cheesecake Recipe
- Step-by-Step Instructions for Your No Bake Biscoff Cheesecake
- Ingredient Notes and Substitutions for Biscoff Cheesecake
- Tips for Success with Your Cookie Butter Cheesecake
- Serving Suggestions for Your Indulgent Dessert
- Storage and Make Ahead Cheesecake Guidelines
- Frequently Asked Questions About Biscoff Cheesecake
- Nutritional Information for This Rich Dessert Recipes Slice
- Serving Suggestions for Your Indulgent Dessert
- Storage and Make Ahead Cheesecake Guidelines
- Frequently Asked Questions About Biscoff Cheesecake
- Nutritional Information for This Rich Dessert Recipes Slice
Why This No Bake Biscoff Cheesecake Recipe Works (Crowd Pleasing Dessert)
When I tell you this No Bake Biscoff Cheesecake is a guaranteed hit, I mean it. It ticks all the boxes for a truly satisfying indulgent dessert without any of the fuss. My goal here was maximum wow factor for minimal kitchen time, and this recipe delivers!
Here’s exactly what makes it so reliable:
- No Oven Desserts are Kings: Seriously, no oven needed! This is perfect for summer entertaining or when you just don’t want to heat up the kitchen.
- Incredibly Creamy Cheesecake Recipe: We use heavy cream whipped to stiff peaks, folding it in gently. This gives you that light, velvety mouthfeel that truly separates a good cheesecake from a great one.
- Quick Cheesecake Dessert Factor: Because there’s no baking, your hands-on time is under 20 minutes. The hard part is just waiting for it to chill!
- That Flavor Combo: The spiced cookie note mixed with tangy cream cheese is honestly legendary. Everyone asks for the recipe afterward.
Ingredients for the Ultimate Biscoff Cheesecake Recipe
Picking the right players is half the battle when making a top-tier Biscoff Cheesecake Recipe, especially since we rely on no-bake structure. You’ll need quality ingredients that bring that signature spiced cookie warmth. Keep an eye out for the soft cream cheese—using room temperature stuff is key so you don’t get lumps! If you love smooth cream cheese textures, you know how important this stage is; for next time, check out my guide on making the best cream cheese frosting for tips on perfect consistency. The authentic flavor comes straight from the Lotus spread, so splurge on that jar!
Here’s your shopping list:
- For the Crust: 1 1/2 cups Biscoff cookie crumbs (that’s about 25 cookies crushed!), and 6 tablespoons of butter that’s been melted down.
- For the Filling: 16 ounces cream cheese that’s nice and soft, 1 cup of powdered sugar that you’ve sifted (no one wants those little sugar flecks!), 1 teaspoon of vanilla extract, and 1 cup of cold heavy whipping cream.
- For That Biscoff Kick: 1 cup of Biscoff cookie butter, warmed just slightly so it mixes cleanly, plus a little extra for drizzling and garnish!
Step-by-Step Instructions for Your No Bake Biscoff Cheesecake
Okay, friend, this is where the magic happens for our Biscoff Cheesecake! Since this is a no-bake version, we skip the oven entirely, which means no worrying about preheating pans or keeping an eye on cracks. The structure relies entirely on chilling, so having everything ready to go is key for maximizing that creamy texture. Remember what I said about the cream cheese? Make sure it is truly soft—that means taking it out at least an hour before you plan to start mixing, or your filling will end up a bit bumpy. If you need a reminder on timing for other baked goods, sometimes I follow the schedule in my pumpkin bread post just to stay on track!
Preparing the Spiced Cookie Cheesecake Crust
This first step is super fast. You just need to dump your Biscoff cookie crumbs and the melted butter into a bowl and mix until it looks like wet sand. That’s the cue! Now, press that mixture firmly into the bottom of your 9-inch springform pan. And here’s my little trick for getting it perfect every time: grab the flat bottom of a large measuring cup or a small glass. Use that smooth base to really pack the crumbs down evenly across the bottom. You want it super compressed so it doesn’t crumble when you slice it later! Once it’s flat and snug, pop that pan into the freezer while you work on the filling—about 15 minutes is plenty.
Creating the Creamy Cheesecake Filling
Next up is the decadent part! Grab your mixer and beat that softened cream cheese until it’s completely velvety smooth. No lumps allowed! Then, add in your sifted powdered sugar and vanilla. Mix until it’s just combined. Now for the crucial part: in a separate, clean bowl, whip your cold heavy cream until you have stiff, glorious peaks. When you fold this whipped cream into the cream cheese base, be gentle! We worked hard building up those air bubbles, so use a spatula and fold gently, turning the bowl as you go until you don’t see any white streaks left. Then, stir in that cup of slightly warmed Biscoff cookie butter until the whole thing is one gorgeous, spiced color.
Assembling and Chilling the Biscoff Cheesecake
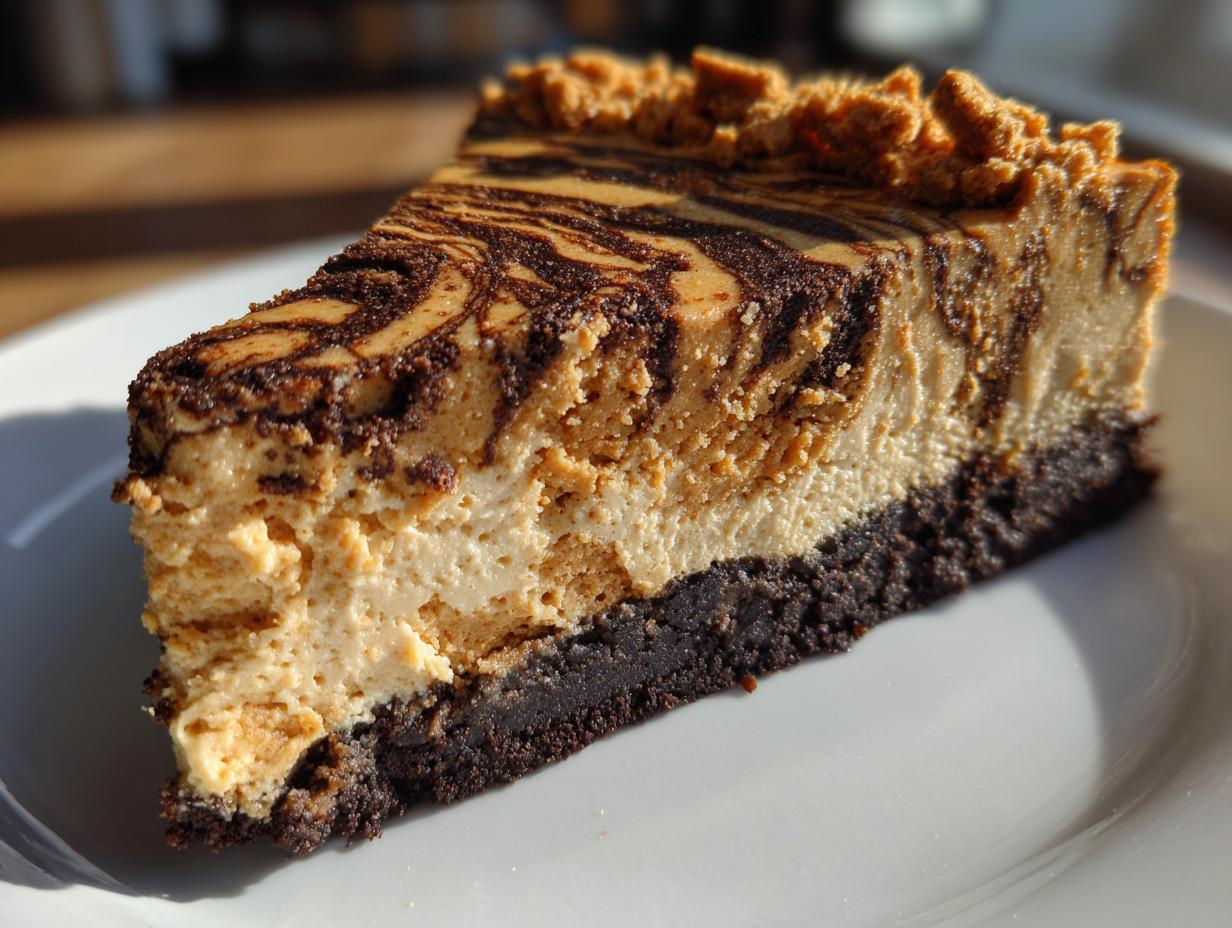
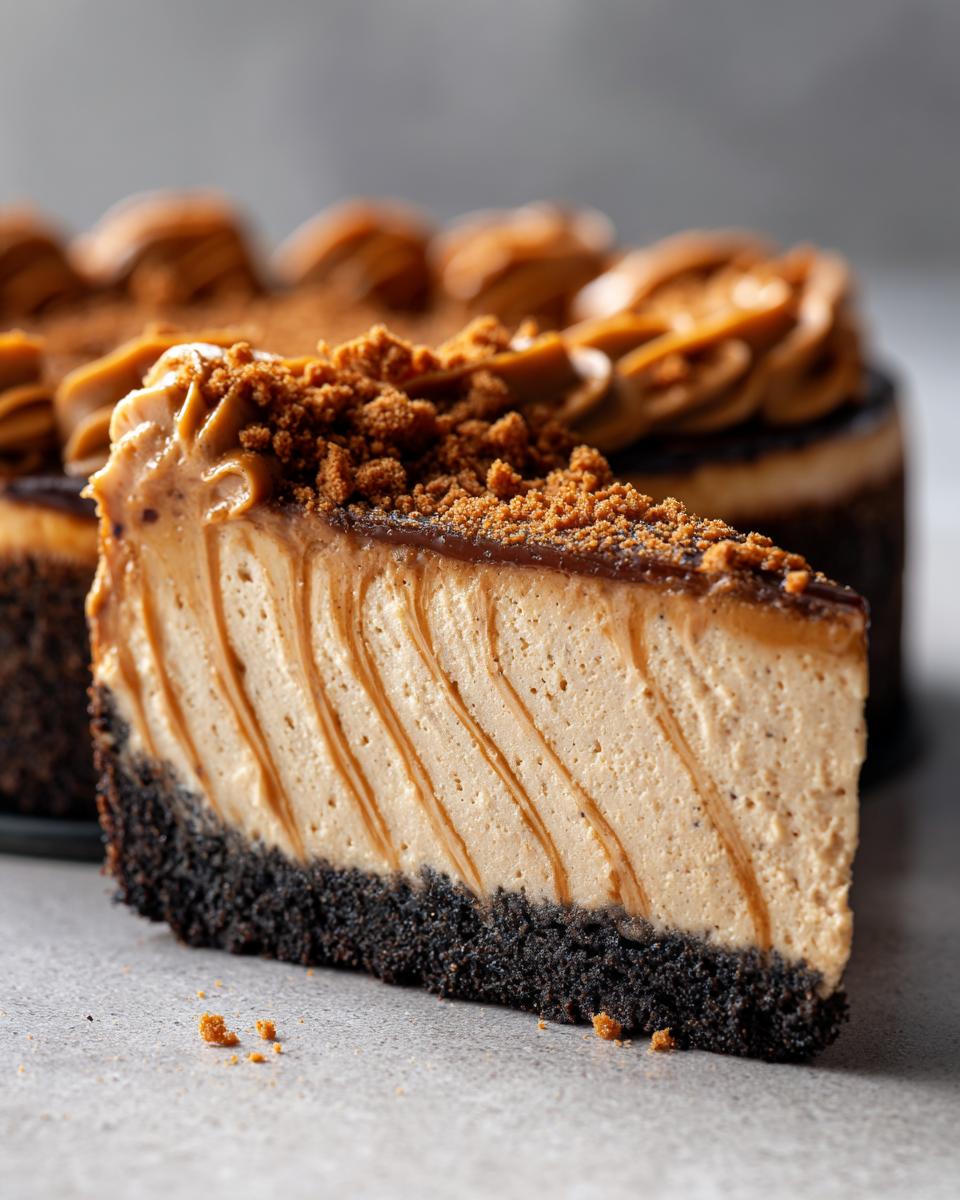
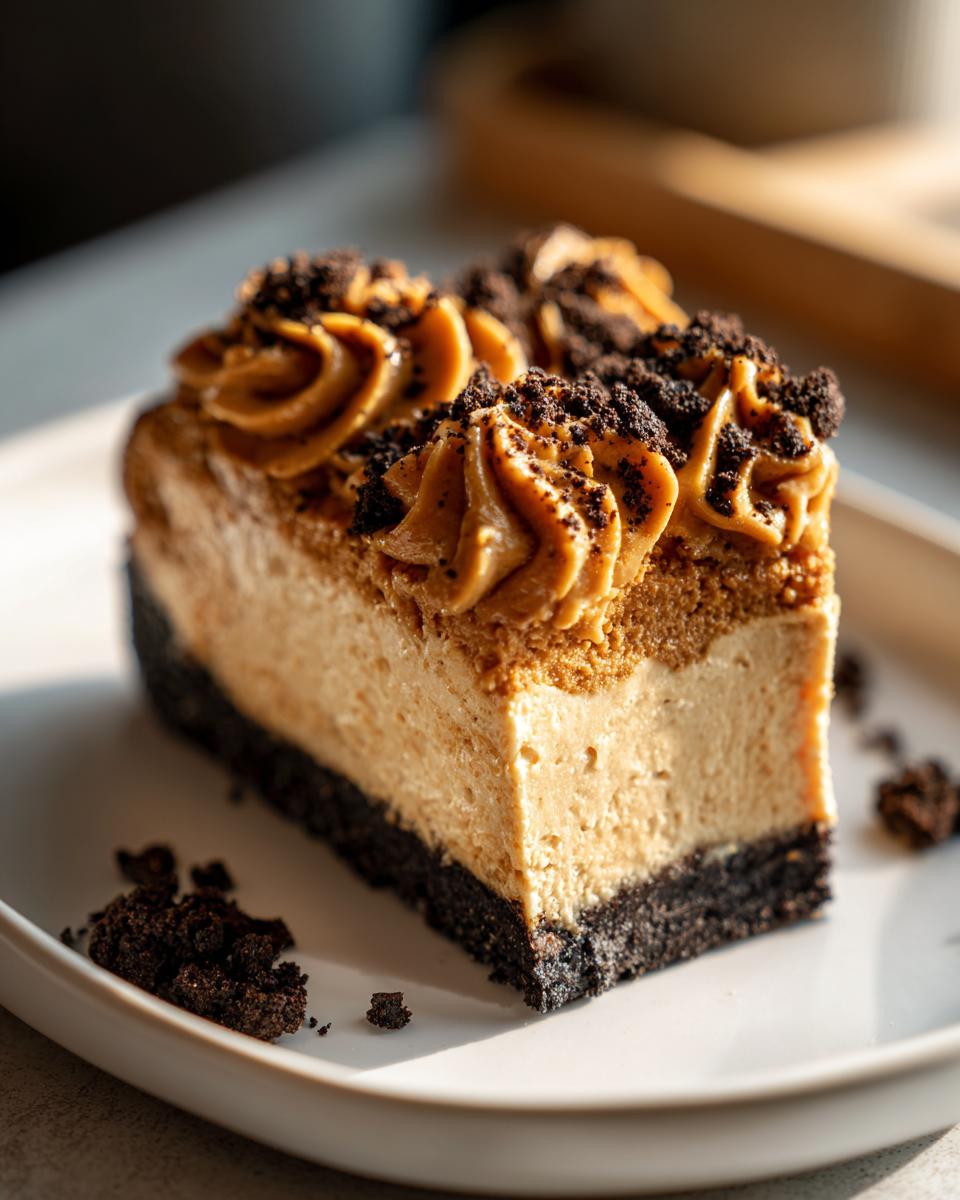
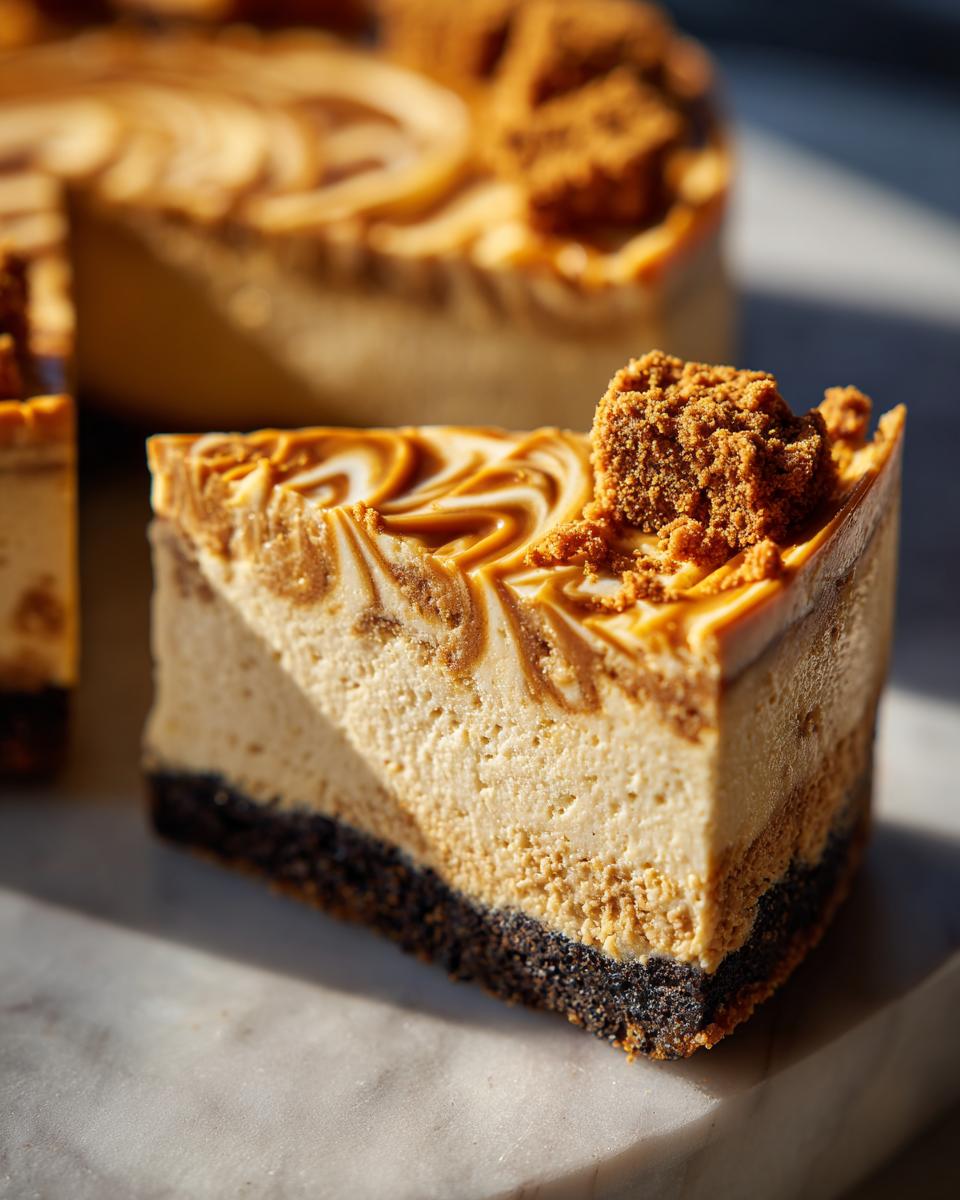
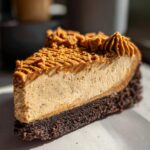
Time to bring it all together! Take that chilled crust out of the freezer and pour that smooth, luscious filling right on top. Level it out with an offset spatula. Take the remaining 1/4 cup of Biscoff cookie butter—I like to warm mine just a touch so it drizzles nicely—and drizzle it all over the top surface. Then, take a thin knife or a skewer and gently drag it through the topping to create those pretty swirls. People love this homemade decoration! Now, cover the pan loosely with plastic wrap. This is non-negotiable: you need to chill this baby for a minimum of 6 hours, but seriously, overnight is the gold standard for this make ahead cheesecake. It needs that time to set up solid!
Ingredient Notes and Substitutions for Biscoff Cheesecake
I just want to chat quickly about the ingredients we used in this Biscoff Cheesecake because sometimes the smallest details make the biggest difference, especially when you’re not baking! When you look at the recipe, you’ll see I listed the 1 cup of cookie butter as “slightly warmed.” This isn’t just for looks, though the drizzle certainly helps! When pure Biscoff cookie butter gets cold, it firms up like cement, right? If you dump that cold, firm spread into your cream cheese base, you risk deflating all the beautiful air we whipped into the cream cheese and the heavy cream mixture.
Warming it up just for 15–20 seconds in the microwave makes it silky smooth. It folds in effortlessly, keeping the filling light and airy, which is exactly what we want for that super creamy texture in the final cream cheese base. Don’t overheat it, though—we just want it soft enough to swirl!
Now, what happens if you run out of Biscoff cookies right before you need to make the crust? Oops! Don’t panic. You can absolutely use vanilla wafers or even graham crackers instead for your foundation here. Just treat them the exact same way—grind them fine and mix them with the melted butter. I have to warn you, though, it won’t have that incredible spiced depth that the Biscoff crumbs give you, but it still results in a fantastic, sturdy Cookie Butter Cheesecake crust. It’s just a little more vanilla-forward if you substitute!
Tips for Success with Your Cookie Butter Cheesecake
Even though we are skipping the oven, there are still a few things that can trip up a baker when making a stunning Cookie Butter Cheesecake. My biggest piece of advice, learned the hard way years ago when I first tried adapting my regular baked cheesecake methods, is all about temperature control!
Here are a few things I always double-check before mixing:
- The Cream Cheese Must Be Soft: I mentioned this before, but seriously, use room temperature cream cheese. I once tried making a batch when the cream cheese was too cold, and no matter how long I beat it, I ended up with tiny cream cheese pebbles in my filling. It was still edible, but it absolutely ruined the smooth, velvety experience everyone expects from a No Bake Biscoff Cheesecake. Now, I stick my block in a warm water bath for just five minutes before I start if I forget to pull it out early.
- Don’t Overmix the Whipped Cream: When you fold the whipped cream into the cheese base, stop mixing the second you lose the white streaks. I know it’s tempting to keep going until it looks perfectly uniform, but if you beat that mixture too much after the cream is in, you knock all the air out. That’s how you go from light and luxurious to dense and heavy in about ten seconds flat.
- Don’t Skip the Overnight Chill: Because this recipe relies on gelatin-free ingredients (butter and cream cheese) to set firm, chilling time is structural time. If you try to rush the 6-hour mark, I guarantee your first slice will weep or collapse slightly when you move it. I always make this the day before a party, similar to how I treat my famous chocolate chip cookies—they are always better on day two!
- The Topping Swirl Needs Patience: When you drizzle that reserved Biscoff topping on top, start drizzling from the center and move out slowly. If you go too fast or place the drizzle too close to the edge before chilling, you might tear the surface when you try to swirl it. Slow and steady wins the race when creating that signature marble effect seen on sites like Recipes by Ree.
Serving Suggestions for Your Indulgent Dessert
This Indulgent Dessert is so perfectly seasoned and rich on its own—the creamy texture contrasted with the spiced cookie crust is just divine! That said, presentation matters, and a little extra drizzle never hurt anyone, right?
Since the flavor profile is so warm and nutty, I find that it pairs wonderfully with simple, tart accompaniments. Forget overly sweet sauces that compete with the butter flavor. Instead, try:
- A Strong Coffee or Espresso: The bitterness of a dark roast cuts through the richness of the cream cheese perfectly. It’s a classic pairing for a reason!
- Fresh Raspberries: A small scattering of tart raspberries around the edge isn’t just pretty; their slight acidity is a beautiful counterpoint to the sweet caramel notes of the Biscoff.
- Finely Chopped Toasted Pecans: If you want another layer of crunch that isn’t Biscoff, toasting some pecans lightly brings out their natural oils and adds a wonderful earthy note.
- Simple Chocolate Drizzle: If you just can’t resist more decadence, a thin drizzle of high-quality dark chocolate (maybe from my chocolate frosting recipe, thinned slightly with a drop of oil) adds a great bitter depth.
Storage and Make Ahead Cheesecake Guidelines
One of the absolute best parts of making this No Bake Biscoff Cheesecake is that it is the ultimate make ahead cheesecake! If you are hosting a holiday or a big weekend gathering, this is your best friend because it forces you to get dessert done early.
Once you’ve fully chilled the cheesecake (remember, overnight is best!), you can keep it stored in the refrigerator, still in the springform pan but covered tightly with plastic wrap or foil, for up to four full days. Seriously, it holds up beautifully because there are no eggs or baked custard components that break down quickly.
If you need to make it even further ahead—maybe a week out? You can carefully remove the chilled cheesecake from the pan and place it on a serving board, then wrap the whole thing tightly in plastic wrap, and then in foil again before freezing. When you want to serve it, move it straight from the freezer to the refrigerator the day before you plan to eat it. It thaws perfectly slowly in the fridge and tastes just as fresh and creamy as the day you made it!
Frequently Asked Questions About Biscoff Cheesecake
Can I bake this No Bake Biscoff Cheesecake recipe?
You certainly *could* try baking it, but my recipe is specifically formulated for that creamy, soft, no-bake texture that we all love! If you tried to bake this, the high moisture content from the whipped cream would likely cause it to weep or just collapse entirely when it cooled down. If you want a baked version, you need more eggs and stabilizers! For the easiest Biscoff dessert, stick to the no-bake method!
What if I can’t find Biscoff cookies for the crust?
No Biscoff cookies? No problem! The flavor profile will change slightly, but the texture will still be great if you reach for vanilla wafers or high-quality graham crackers. Just remember to treat them the exact same way: grind them fine and mix them with the melted butter to create a nice, tight base for your Cookie Butter Cheesecake. You can still swirl the Biscoff spread on top to get that signature flavor infusion.
My cream cheese swirl disappeared; what did I do wrong?
This happens when the base filling is too cold or was overmixed! If your base filling is too cold, the topping sinks right in and mixes fully instead of staying on top. If your filling was overmixed, it becomes too dense and heavy, gripping the topping too tightly. A gentle drizzle and a very light swirl with a toothpick or skewer, as mentioned in the instructions, will keep that beautiful marbling effect on the top layer of your Lotus Biscoff Cheesecake.
How long is this cheesecake good for in the fridge?
Kept covered tightly in the refrigerator, this Biscoff Cheesecake stays wonderfully fresh for up to four days. It’s one of the great benefits of a no-bake dessert—it’s essentially perfectly preserved cheesecake!
Is this recipe good for a holiday gathering?
Yes! It’s one of my favorite holiday desserts because it checks the “make-ahead” box perfectly. You can whip it up the day before your event, which frees up your oven and counter space for everything else. It always gets rave reviews because it feels so special, but only you know how little time you actually spent on it. To see another amazing no-bake option, you can check out the instructions over at Kaotic Krunch!
Nutritional Information for This Rich Dessert Recipes Slice
Now, let’s talk numbers for this incredibly Rich Dessert Recipes slice! Since this is a no-bake cheesecake loaded with cookie butter and whipping cream, it is definitely a treat, not an everyday snack. Please remember these are just estimates based on the standard ingredient amounts laid out in the recipe. Your exact measurements and brands might shift these slightly.
For one slice (based on 10 servings):
- Calories: Around 450
- Fat: About 30g
- Saturated Fat: Roughly 18g
- Carbohydrates: Around 40g
- Sugar: Approximately 35g (most of this comes from the cookie butter and powdered sugar!)
- Protein: About 5g
It’s definitely a decadent sweet treat, perfect for special occasions! If you are looking to sneak in some extra nutrients, you can always incorporate some Greek yogurt into the cream cheese base for a little boost, though that will change the texture slightly. For more satisfying meals with better macros, check out my turkey chili recipe for a completely different kind of satisfying meal!
Serving Suggestions for Your Indulgent Dessert
This Indulgent Dessert is so perfectly seasoned and rich on its own—the creamy texture contrasted with the spiced cookie crust is just divine! That said, presentation matters, and a little extra drizzle never hurt anyone, right?
Since the flavor profile is so warm and nutty, I find that it pairs wonderfully with simple, tart accompaniments. Forget overly sweet sauces that compete with the butter flavor. Instead, try:
- A Strong Coffee or Espresso: The bitterness of a dark roast cuts through the richness of the cream cheese perfectly. It’s a classic pairing for a reason!
- Fresh Raspberries: A small scattering of tart raspberries around the edge isn’t just pretty; their slight acidity is a beautiful counterpoint to the sweet caramel notes of the Biscoff.
- Finely Chopped Toasted Pecans: If you want another layer of crunch that isn’t Biscoff, toasting some pecans lightly brings out their natural oils and adds a wonderful earthy note.
- Simple Chocolate Drizzle: If you just can’t resist more decadence, a thin drizzle of high-quality dark chocolate (maybe from my chocolate frosting recipe, thinned slightly with a drop of oil) adds a great bitter depth.
Storage and Make Ahead Cheesecake Guidelines
One of the absolute best parts of making this No Bake Biscoff Cheesecake is that it is the ultimate make ahead cheesecake! If you are hosting a holiday or a big weekend gathering, this is your best friend because it forces you to get dessert done early.
Once you’ve fully chilled the cheesecake (remember, overnight is best!), you can keep it stored in the refrigerator, still in the springform pan but covered tightly with plastic wrap or foil, for up to four full days. Seriously, it holds up beautifully because there are no eggs or baked custard components that break down quickly.
If you need to make it even further ahead—maybe a week out? You can carefully remove the chilled cheesecake from the pan and place it on a serving board, then wrap the whole thing tightly in plastic wrap, and then in foil again before freezing. When you want to serve it, move it straight from the freezer to the refrigerator the day before you plan to eat it. It thaws perfectly slowly in the fridge and tastes just as fresh and creamy as the day you made it!
Frequently Asked Questions About Biscoff Cheesecake
Can I bake this No Bake Biscoff Cheesecake recipe?
Oh, you know, I get asked this all the time precisely because it looks so rich! I totally designed this recipe to be an amazing Easy Biscoff Dessert that skips the oven entirely. If you try to bake it, the high moisture content from the whipped cream—which gives it that dreamy, cloud-like texture—will likely deflate and turn soupy. For an oven-baked version, you’d need entirely different ratios involving eggs and sometimes gelatin to hold things together once they cool! Stick to the chilling method for that perfect, luxurious No Bake Biscoff Cheesecake.
What if I can’t find Biscoff cookies for the crust?
If you’re in a pinch and can’t find the specific cookies, don’t fret! You can absolutely make a great crust with vanilla wafers or even classic graham crackers. Just process them down to crumbs the same way and mix them with the melted butter. It will still be a wonderful, sturdy base for your Lotus Biscoff Cheesecake. My only warning is that you lose that lovely, unique spiced note that defines the Biscoff crust, so you might want to sneak an extra dash of cinnamon into the cream cheese filling to compensate!
How do I get that perfect swirl on top?
Getting that beautiful marble effect on your Cookie Butter Cheesecake is easier than it looks, but timing is everything! I wait until the very last minute after spreading the filling evenly to drizzle that little bit of topping Biscoff butter on. Then, grab a butter knife or a thin wooden skewer. Dip it just barely into the drizzle and pull it across the surface in smooth, lazy arcs—don’t go over the same spot twice! Any major digging will just pull the heavier topping through the lighter filling too fast. A light touch is what makes this Garnish look intentional and decadent.
How long does the cheesecake last?
Because this is a No Bake Biscoff Cheesecake, it actually stores really well! Since there are no eggs involved in the filling structure, it stays beautifully firm and creamy in the fridge. Once it’s fully chilled, I find it’s best enjoyed within 3 days. After day three, the crust might start to soften just a tiny bit as it absorbs moisture from the filling, but honestly, a dessert this good rarely lasts that long in my house!
Is this recipe good for a holiday gathering?
Yes! It’s one of my favorite holiday desserts because it checks the “make-ahead” box perfectly. You can whip it up the day before your event, which frees up your oven and counter space for everything else. It always gets rave reviews because it feels so special, but only you know how little time you actually spent on it. To see another amazing no-bake option, you can check out the instructions over at Kaotic Krunch!
Nutritional Information for This Rich Dessert Recipes Slice
Now, let’s talk numbers for this incredibly Rich Dessert Recipes slice! Since this is a no-bake cheesecake loaded with cookie butter and whipping cream, it is definitely a treat, not an everyday snack. Please remember these are just estimates based on the standard ingredient amounts laid out in the recipe. Your exact measurements and brands might shift these slightly. If you want something lighter overall, you might try looking at my high-protein chili recipe for dinner instead!
For one slice (based on 10 servings):
- Calories: Around 450
- Fat: About 30g
- Saturated Fat: Roughly 18g
- Carbohydrates: Around 40g
- Sugar: Approximately 35g (most of this comes from the cookie butter and powdered sugar!)
- Protein: About 5g
It’s definitely a decadent sweet treat, perfect for special occasions! It’s important to know what you’re enjoying, but don’t let these numbers completely scare you away from this amazing Biscoff Cheesecake. Sometimes you just need that perfect, indulgent slice, right?
PrintNo-Bake Biscoff Cheesecake
Make this creamy, rich No-Bake Biscoff Cheesecake. It features a simple Biscoff cookie crust and a smooth filling flavored with Lotus cookie butter, making it an easy, indulgent dessert for any gathering.
- Prep Time: 20 min
- Cook Time: 0 min
- Total Time: 6 hr 20 min
- Yield: 10 servings 1x
- Category: Dessert
- Method: No Bake
- Cuisine: American
- Diet: Vegetarian
Ingredients
- 1 1/2 cups Biscoff cookie crumbs (about 25 cookies)
- 6 tablespoons unsalted butter, melted
- 16 ounces cream cheese, softened
- 1 cup powdered sugar, sifted
- 1 teaspoon vanilla extract
- 1 cup heavy whipping cream, cold
- 1 cup Biscoff cookie butter, slightly warmed
- 1/4 cup Biscoff cookie butter, for topping
- 2 tablespoons Biscoff cookies, crushed, for garnish
Instructions
- Prepare the crust: Mix the Biscoff cookie crumbs and melted butter in a bowl until fully combined. Press the mixture firmly into the bottom of a 9-inch springform pan. Place the crust in the freezer while you prepare the filling.
- Make the cheesecake filling: In a large bowl, beat the softened cream cheese with an electric mixer until smooth. Gradually add the sifted powdered sugar and vanilla extract, mixing until just combined.
- In a separate bowl, whip the cold heavy whipping cream until stiff peaks form. Gently fold the whipped cream into the cream cheese mixture until no streaks remain.
- Fold in the 1 cup of slightly warmed Biscoff cookie butter into the cream cheese mixture until the filling is uniform in color and texture.
- Pour the filling over the chilled crust and spread evenly. Drizzle the remaining 1/4 cup of Biscoff cookie butter over the top. Use a knife or skewer to gently swirl the topping into the filling.
- Cover the pan loosely with plastic wrap and chill in the refrigerator for at least 6 hours, or preferably overnight, until firm.
- Before serving, carefully release the springform side. Garnish the top with crushed Biscoff cookies. Slice and serve this decadent dessert.
Notes
- For the easiest crust pressing, use the bottom of a flat measuring cup.
- Warming the Biscoff cookie butter slightly makes it easier to mix into the cream cheese base without deflating the whipped cream.
- This make ahead cheesecake is best prepared one day in advance for the firmest texture.
Nutrition
- Serving Size: 1 slice
- Calories: 450
- Sugar: 35g
- Sodium: 280mg
- Fat: 30g
- Saturated Fat: 18g
- Unsaturated Fat: 12g
- Trans Fat: 0.5g
- Carbohydrates: 40g
- Fiber: 1g
- Protein: 5g
- Cholesterol: 95mg