
Oh, don’t even get me started on store-bought English muffins. You toast them up, and they’re either flat as a pancake or they just burn on the outside before they even warm up inside. We’ve all been there, right? That’s why I’m so thrilled to share this recipe with you. When I started DelishCraze, I wanted to bring back the joy of creating things we used to buy out of convenience. Making your own English muffin from scratch, especially when you nail those signature, buttery ‘nooks and crannies,’ is truly connecting back to something foundational in the kitchen. This isn’t just bread; it’s comfort solidified, and it makes family mornings feel instantly special. Trust me, once you see how these rise on the skillet, you won’t go back!
- Why Our Homemade English Muffins Recipe Works (The Secret to Nooks and Crannies)
- Gathering Ingredients for Perfect English Muffins From Scratch
- Step-by-Step Instructions: How to Make English Muffins
- Pro Tips for Perfect English Muffins Every Time
- Storage and Making Freezer Friendly English Muffins
- English Muffin Breakfast Ideas Beyond Toasting
- Frequently Asked Questions About Homemade Baking
- Estimated Nutritional Data for Your Homemade Muffins
- Share Your Homemade Creations
Why Our Homemade English Muffins Recipe Works (The Secret to Nooks and Crannies)
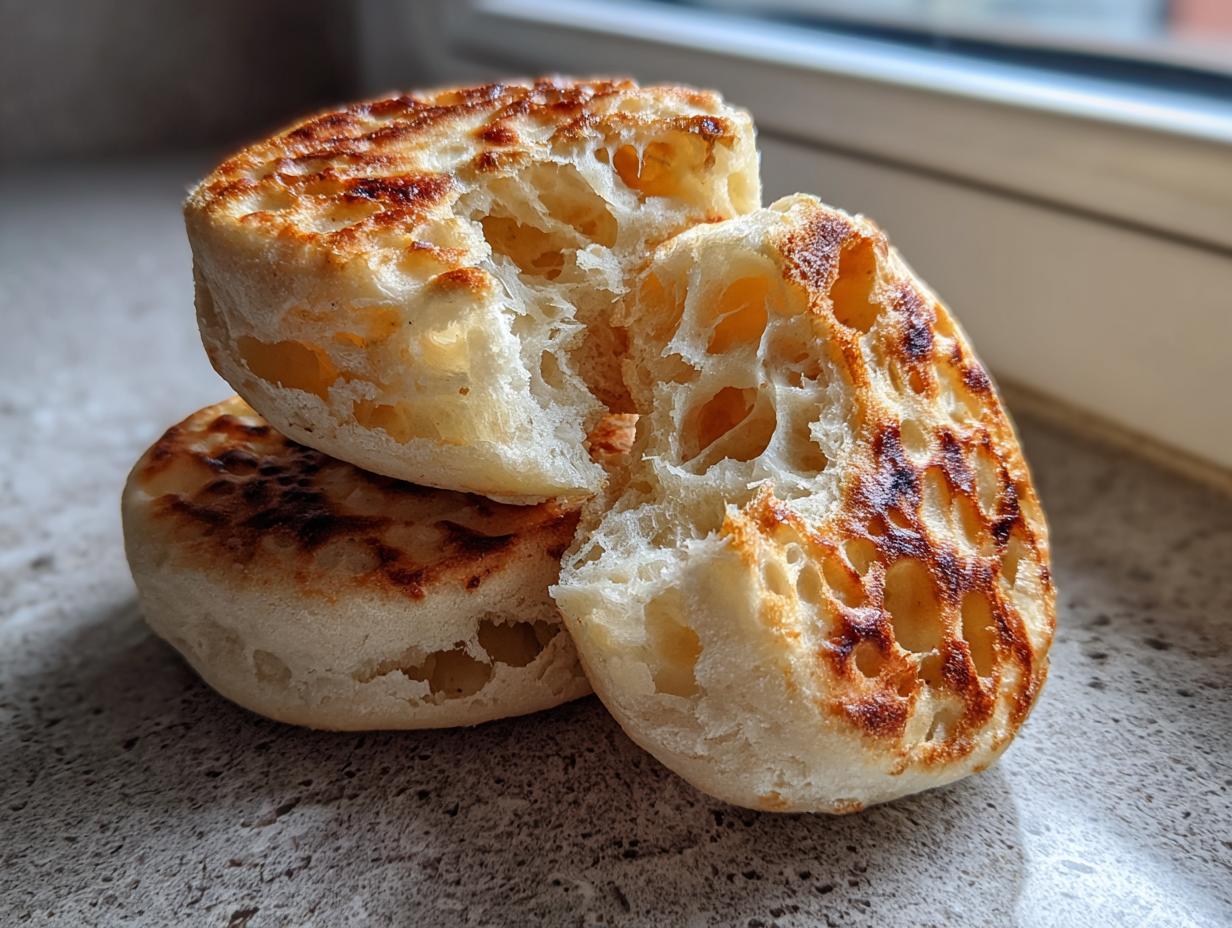
My main goal here is to give you those incredible, open pockets inside that can actually hold butter, jam, or hollandaise sauce—you know, the actual point of an English muffin! We skip the oven entirely because dry, harsh heat is the enemy of tenderness. Instead, we rely on a heavy skillet and low heat.

The real magic ingredient, besides the yeasted dough, is that little bit of buttermilk paired with baking soda. That combination creates a gentle lift right on the griddle, encouraging the dough to expand outwards instead of just straight up. If you’ve fallen into the trap of rolling your dough too thin, you’ll get flat results, but we are aiming for beautifully raised, soft little rounds.
It’s this precise technique—yeast for deep flavor, buttermilk for lift, and stovetop for steamed cooking—that separates these from the dense, squishy things you find wrapped in plastic. If you enjoy this kind of satisfying from-scratch baking, you absolutely have to try my recipe for easy artisan loaf next time you’re kneading!
Achieving Soft Fluffy English Muffins Texture
To get that perfect soft, fluffy English muffins texture, remember two things: gentle kneading and patience while cooking. You only knead for about two or three minutes, just enough to bring the shaggy dough together. Over-handling develops gluten way too much, which leads to chewy, bagel-like results instead of the soft texture we want.
When these hit the griddle, keep that heat low, medium-low only. We are essentially steaming them from the inside out while lightly browning the exterior. If you press down on them while they cook—don’t! That’s how you squash all those precious air bubbles!
Gathering Ingredients for Perfect English Muffins From Scratch
Okay, so we’re making these English muffins completely from scratch, which means you get to control every bit of that wonderful flavor. I promise you, the list isn’t long, but the specific temperatures and ingredient prep are super important for success. This is where we build that trust in the process, right? Taking the extra second to grab room-temperature buttermilk or making sure your water is just right for the yeast pays off huge in the end product.
It’s funny, I feel the same way about my buttermilk biscuits—getting that one key ingredient right makes all the difference. If you’re looking for another fantastic breakfast bread, you might want to check out my recipe for flaky Southern buttermilk biscuits!
Here is what you need to pull this batch together. Measure carefully, especially the flour!
- 1 cup warm water (you really need that 105-115°F range—not too hot, not too cool!)
- 2 1/4 teaspoons active dry yeast
- 1 tablespoon granulated sugar
- 3 cups all-purpose flour, plus more for dusting
- 1 teaspoon salt
- 1/2 teaspoon baking soda
- 1/4 cup buttermilk, room temperature
- 2 tablespoons unsalted butter, melted, plus more for greasing the griddle
Step-by-Step Instructions: How to Make English Muffins
Alright, buckle up! This is where the magic really happens, but we have to move with purpose without rushing the dough. Remember, we are baking, not beating things into submission! Getting the timing right on this first rise and the final rest before the skillet makes all the difference between a muffin that flops and one that rises beautifully with those lovely craters.
Mixing and First Rise for Your English Muffin Dough
First things first, wake up that yeast! Combine your warm—and I mean pleasantly warm, not scorching hot—water, the yeast, and the sugar in your big mixing bowl. Let it sit for about 10 minutes until it looks foamy and happy. If it doesn’t foam, your water was either too hot or the yeast is old, and you’ll need to start those first steps over.
While that’s working, quickly whisk your flour, salt, and baking soda in another bowl. Once the yeast is frothy, stir in the buttermilk and the melted butter. Now, add the dry stuff to the wet stuff slowly. I mean it—add it gradually. You are just mixing until everything barely comes together into what I call a ‘shaggy’ dough. Seriously, stop mixing when you see just a few dry spots left. If you overmix now, you’ll develop too much gluten, and you’ll miss out on that airy interior. Turn it out onto a lightly floured counter and knead it—very gently—for just two or three minutes until it looks a little smoother. It should still feel soft, kind of pillowy.
Toss that dough into a lightly oiled bowl, flip it so it’s coated, cover it tight, and put it somewhere warm. It needs to double in size, which usually takes anywhere from 1 hour to 1 hour and 30 minutes. Don’t rush it!
Shaping and Resting the English Muffin Rounds
Once it’s puffy, gently punch all that air out—we need to reshape it! Turn the dough onto your floured surface and roll it out nice and evenly until it’s about a half-inch thick. Thick enough to hold its shape, but thin enough to cook through properly.
Now, grab a 3-inch round cutter. If you don’t have one, a sturdy drinking glass rim dipped in flour works perfectly fine! Cut out as many rounds as you can, careful not to twist the cutter—twisting seals the edges and prevents rising. Gather up those leftover scraps, gently pat them back together, and cut out a few more. Place all your beautiful rounds on a baking sheet that you’ve dusted generously with cornmeal or flour. They need their space to breathe!
Cover them loosely—a clean tea towel works wonderfully—and let them rest for another 30 minutes. This second rest is crucial before they hit the heat!
The Stovetop Cooking Technique for Classic English Muffins
This is the most important part for getting those beautiful color lines and that signature texture. Heat up a large, heavy skillet or griddle over **medium-low heat**. I want you to think slow and steady wins the race here. Butter the surface lightly—just enough to coat it nicely, not so much that it looks oily.
Lay your rested rounds onto the griddle, careful not to overcrowd them. We are going to cook these for about 6 to 8 minutes per side. They should turn a lovely light golden brown. The lower and slower you cook them, the more they bake through and develop those internal air pockets we love so much. If you see them browning too fast, turn the heat down immediately! And here’s a huge heads-up: **Do not press down on them while cooking** with your spatula. Resist that urge! That pressure squashes all the work the yeast did. Once they look perfectly toasted on one side, flip them gently and cook the other side for the same amount of time. We want that perfect, classic stovetop English muffin look.
When they’re done, move them straight to a wire rack to cool completely. Don’t stack them while hot, or the steam will soften those pretty exteriors!
Pro Tips for Perfect English Muffins Every Time
Now that you’ve mastered the cooking, let’s talk about the grand finale: opening that muffin up!
The Golden Rule: Fork, Don’t Knife!
This is perhaps the most critical piece of advice I can give you if you want to see those amazing nooks and crannies when you finally toast them. Never, ever, cut your cooled English muffins with a knife. A knife seals those beautiful internal tunnels we worked so hard to create!
Instead, use a clean dinner fork. Poke gently around the edges and then split the muffin open right down the middle using the tines of the fork. It rips the interior apart in the most delightfully uneven way, revealing all those pockets waiting for melted butter. It’s an absolute game-changer, and if you only take one tip from this whole recipe, let it be that one.
If you want to see some other great uses for your skillet skills, check out my guide on making easy homemade pretzel dogs—it uses that same low-and-slow heat principle!
For more tips on keeping baked goods fresh, I always look at what other experienced bakers recommend, and Tastes Better From Scratch has some fantastic long-term storage ideas over on their site for their version!
Storage and Making Freezer Friendly English Muffins
Since you’ve just made a whole batch—and trust me, you’re going to want these around—let’s talk about keeping your freezer friendly English muffins perfect for weeks to come. The biggest mistake people make when freezing bread is rushing the cooling process. You absolutely must let them cool completely on the rack first. If you wrap them while they are even slightly warm, you’re essentially steaming them inside the bag, and you’ll end up with soggy spots instead of that lovely crisp exterior.
Once they are totally cool to the touch, I stack mine up—a layer of wax paper between every two muffins helps stop them from sticking together if you get too enthusiastic about packing them in. Slide them into a heavy-duty, freezer-safe zip-top bag, press out as much air as you can, and tuck them in the freezer. They hold up beautifully for about three months!
The best part is the reheat! You can zap them straight from the freezer into the toaster, or if you’re prepping for a big family brunch, just thaw them overnight. I’ve also successfully reheated them briefly in a 350°F oven wrapped in foil for that straight-from-the-griddle warmth.
If you’re looking for another wonderful recipe that freezes incredibly well for last-minute dinners, you should check out my recipe for easy homemade BBQ sauce—it’s perfect for dipping or using as a base for quick meals when you’re short on time.
For more tips on keeping baked goods fresh, I always look at what other experienced bakers recommend, and Tastes Better From Scratch has some fantastic long-term storage ideas over on their site for their version!
English Muffin Breakfast Ideas Beyond Toasting
Okay, so you’ve got a stack of these golden beauties cooling on the rack. Congratulations! But they’re not just for slathering with butter and hoping it melts into those little holes, although that is pretty glorious. We need to talk about how these homemade wonders can absolutely elevate your breakfast game well beyond a simple slice!
Because you cooked them low and slow on the stovetop, they are tender inside, making them the absolute perfect foundation for sandwiches that won’t fall apart on you the second you pick them up. Forget those soggy, floury grocery store versions—these hold up!
If you’re looking for inspiration that goes straight to hearty and delicious, you’ve come to the right place. Think big, impressive brunch dishes or even quick toddler-friendly snacks!
The Ultimate Egg Sandwich Base
This is where our English muffin shines brightest. Make a double batch of these, freeze half, and suddenly you have ready-made heroes for quick weekday breakfast sandwiches. Cook up some fluffy scrambled eggs or fried eggs, layer with a slice of cheese, maybe some crispy bacon or ham, and you’ve got a handheld meal that’s miles better than anything drive-thru sells.
What I love is that when you split them open and toast them slightly before assembling, they still get that gorgeous texture contrast—soft interior, crisp edges, and all those pockets ready to grab onto melted cheese.
Going Fancy: Eggs Benedict Ready
If you’re ever planning a special brunch, these are your secret weapon for Eggs Benedict. Seriously, ditch the pre-made stuff. When you use one of these split, toasted, and topped with Canadian bacon and a perfectly poached egg, the whole dish feels gourmet. Their sturdy structure prevents the bread layer from getting soggy too fast under that rich hollandaise sauce. It’s just a more satisfying eating experience, and you’ll feel like a proper chef just because you made the base!
Speaking of perfect pairings, if you ever want a killer sauce to go alongside your brunch creations, you should give my recipe for easy homemade BBQ sauce a try sometime; it goes great with savory breakfast meats!
Quick English Muffin Pizza Ideas for Any Time
Pizza for breakfast? Yes, please! This is a fantastic way to use up leftovers or make a super fast lunch or dinner for the kids. This is where you can get really creative. Simply spread a thin layer of sauce—tomato or even that BBQ sauce I mentioned—sprinkle on some mozzarella, and add whatever toppings you have floating around. Pepperoni, leftover sausage, even sautéed peppers!
Pop them under the broiler until the cheese is bubbly and golden. This is such a simple, kid-approved meal. If you need a visual guide for making quick mini-pizzas, I saw a great technique demonstrated over at Indiana Recipes that might give you some extra topping inspiration!

Frequently Asked Questions About Homemade Baking
Baking from scratch always brings up a few questions, especially when switching from store-bought habits. I get asked these constantly when people try this recipe for the first time, so let’s knock these out quickly so you can get to the toasting!
Can I use regular milk instead of buttermilk?
You totally can, but the result won’t be quite the same! Buttermilk has that gentle acidity that reacts beautifully with the baking soda we added, which gives the muffins that slight extra lift and prevents them from being too dense. If you only have regular milk, no problem—just stir 1 teaspoon of white vinegar or lemon juice into the 1/4 cup of regular milk and let it sit for about five minutes until it looks slightly curdled. That’s your DIY buttermilk!
Can I bake these in the oven instead of using a skillet?
You certainly could, but you’ll lose those signature golden-brown tops and bottoms, and you risk losing the nooks and crannies! The stovetop method, cooked over low heat, essentially steams the dough from the inside while browning the outside, which is essential for the classic texture. Baking in the oven generally results in a more uniform, softer bread, closer to a biscuit or a roll, rather than a true English muffin.
Why are my muffins coming out flat with no holes?
This usually means one of two things happened! First, your heat might have been too high, causing the outside to set before the yeast had a chance to produce gas bubbles inside. Second, you might have pressed down on them with your spatula while they were cooking—you have to resist that urge! If you want incredible results every time, make sure you check out my tips for easy homemade pretzel dogs, as that low-and-slow technique is key there, too.
How thick should the dough be rolled?
I ask everyone to aim right for 1/2 inch thickness. If it’s much thinner, they’ll spread out flat quickly on the griddle. If it’s way thicker than half an inch, you run the risk of the center not cooking all the way through before the outside gets too dark.
Estimated Nutritional Data for Your Homemade Muffins
When you bake from scratch, you get to skip all those questionable preservatives found in packaged goods, which is a huge win! However, since we are using real ingredients like flour, butter, and a touch of sugar, we still need to track what we’re eating. Nothing in the kitchen should cause worry, but knowing the basics helps when meal planning!
I took the recipe measurements and ran the numbers based on standard grocery store ingredients to give you a baseline. Remember, these values are just estimates—if you swap out the flour or use a different fat source, those numbers will shift slightly. Treat this as a helpful guide for your breakfast bread!
- Serving Size: 1 muffin
- Calories: 180
- Fat: 4g
- Saturated Fat: 2g
- Carbohydrates: 32g
- Fiber: 1g
- Sugar: 2g
- Protein: 5g
- Cholesterol: 10mg
- Sodium: 250mg
See? Nothing scary there! Just wholesome ingredients baked up with care. It’s a fantastic, satisfying way to start the day, and knowing you made this yourself just makes that first toasted bite taste even better.
Share Your Homemade Creations
Now the final, and honestly, my absolute favorite part! You’ve made the dough, you’ve waited patiently, you’ve cooked them low and slow, and you’ve split them open with a fork to reveal those glorious nooks and crannies. I need to know how they turned out!
Please take a second to come back here and drop a star rating for the recipe. Did they turn out fluffy? Did they hold the butter like I promised they would? Those little details you notice while baking are so helpful to me and to other home cooks trying this for the first time. Don’t be shy about sharing your victories—or even a funny mistake, we all make them!
If you managed to snap a picture of your perfectly golden, split-open creation, I would be thrilled if you shared it on Instagram or Facebook. Tag me so I can see your baking success! Knowing that my recipe is making someone’s Sunday brunch just a little bit brighter is what keeps me in the kitchen every day. And hey, if you have any wild topping ideas that aren’t traditional, share those too! We are always looking for new breakfast bread recipes to try out.
PrintThe Best Homemade English Muffins with Signature Nooks and Crannies

Make classic, soft, and fluffy English muffins from scratch using this easy stovetop method. Achieve the perfect nooks and crannies that hold melted butter, making them superior to store-bought versions.
- Prep Time: 20 min
- Cook Time: 20 min
- Total Time: 1 hour 50 min
- Yield: 10 muffins 1x
- Category: Breakfast
- Method: Stovetop Cooking
- Cuisine: American
- Diet: Vegetarian
Ingredients
- 1 cup warm water (105-115°F)
- 2 1/4 teaspoons active dry yeast
- 1 tablespoon granulated sugar
- 3 cups all-purpose flour, plus more for dusting
- 1 teaspoon salt
- 1/2 teaspoon baking soda
- 1/4 cup buttermilk, room temperature
- 2 tablespoons unsalted butter, melted, plus more for griddle
Instructions
- In a large bowl, combine the warm water, yeast, and sugar. Let stand for 5 to 10 minutes until foamy.
- In a separate bowl, whisk together the flour, salt, and baking soda.
- Add the buttermilk and melted butter to the yeast mixture. Stir to combine.
- Gradually add the dry ingredients to the wet ingredients, mixing until a shaggy dough forms. Do not overmix.
- Turn the dough out onto a lightly floured surface. Knead gently for 2 to 3 minutes until the dough is somewhat smooth. It will remain soft.
- Place the dough in a lightly oiled bowl, turning to coat. Cover the bowl with plastic wrap and let it rise in a warm place for 1 to 1.5 hours, or until doubled in size.
- Gently punch down the dough. Turn it out onto a lightly floured surface. Roll the dough to about 1/2 inch thickness.
- Use a 3-inch round cutter to cut out the muffins. Gather the scraps, gently re-roll, and cut out remaining pieces.
- Lightly dust a baking sheet or large platter with cornmeal or flour. Place the cut rounds on the prepared surface, leaving space between them. Cover loosely and let them rest for 30 minutes.
- Heat a large, heavy-bottomed skillet or griddle over medium-low heat. Lightly grease the surface with butter.
- Cook the muffins for 6 to 8 minutes per side. You are looking for a light golden brown color. Do not press down on them while cooking.
- Remove the muffins from the griddle and let them cool completely on a wire rack.
- To achieve the signature texture, split the cooled muffins using a fork, not a knife, before toasting.
Notes
- For the best nooks and crannies, cook these low and slow on the stovetop. High heat will brown the outside before the inside cooks properly.
- These English muffins freeze well. Cool them completely, then place them in a freezer-safe bag for up to 3 months. Thaw overnight or reheat directly from frozen.
- Use these for classic breakfast sandwiches or try making quick English muffin pizzas for a simple dinner.
Nutrition
- Serving Size: 1 muffin
- Calories: 180
- Sugar: 2
- Sodium: 250
- Fat: 4
- Saturated Fat: 2
- Unsaturated Fat: 2
- Trans Fat: 0
- Carbohydrates: 32
- Fiber: 1
- Protein: 5
- Cholesterol: 10