

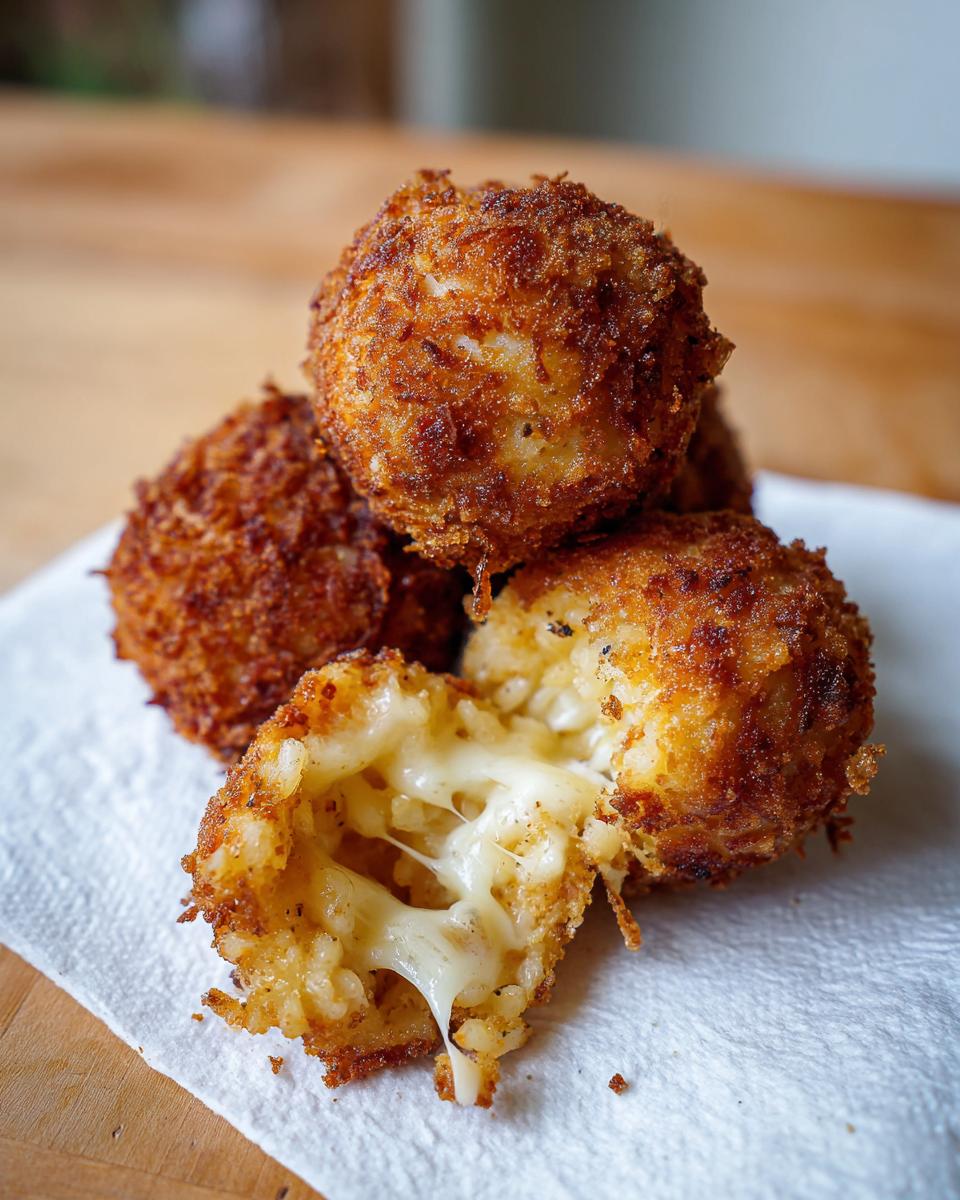
There’s just something about that first bite—the satisfying crackle of the crust giving way to rich, melted cheese inside. That’s pure comfort right there! If you have leftover rice staring at you from last night’s dinner, don’t you dare let it go to waste. We’re transforming it into something truly spectacular: my Easy Cheesy Arancini (Italian Fried Rice Balls).
This is one of those kitchen magic tricks that takes humble ingredients and turns them into a stellar appetizer or a savory snack everyone will devour. Here at DelishCraze, we believe in making home cooking accessible, just like founder Olivia Rosewood always intended when she decided to share her love for simple, classic food right here on our site. We are taking the classic Italian concept and streamlining all the fussy steps so you end up with amazing, crispy, cheesy rice balls in under an hour total. Trust me, once you nail this crispy exterior and gooey center, you’ll be looking for excuses to cook extra rice just so you can use these ideas tomorrow!
- Why You Will Love This Easy Cheesy Rice Balls Recipe
- Ingredients for Perfect Italian Rice Balls (Arancini)
- Expert Tips for Making Crispy Rice Balls
- Step-by-Step Instructions for Your Rice Balls
- Variations for Savory Rice Snacks
- Serving Suggestions for Italian Rice Bites
- Storage and Reheating Instructions for Leftover Rice Balls
- Frequently Asked Questions About Rice Balls
- Nutritional Estimates for Cheesy Rice Balls
Why You Will Love This Easy Cheesy Rice Balls Recipe
I know what you need when you open my recipes—something that tastes incredible but doesn’t require you to babysit the stove for three hours. Arancini should be fun, not torture! These fried rice balls are exactly what you need for your next gathering or just a serious snack attack. You’re going to love them:
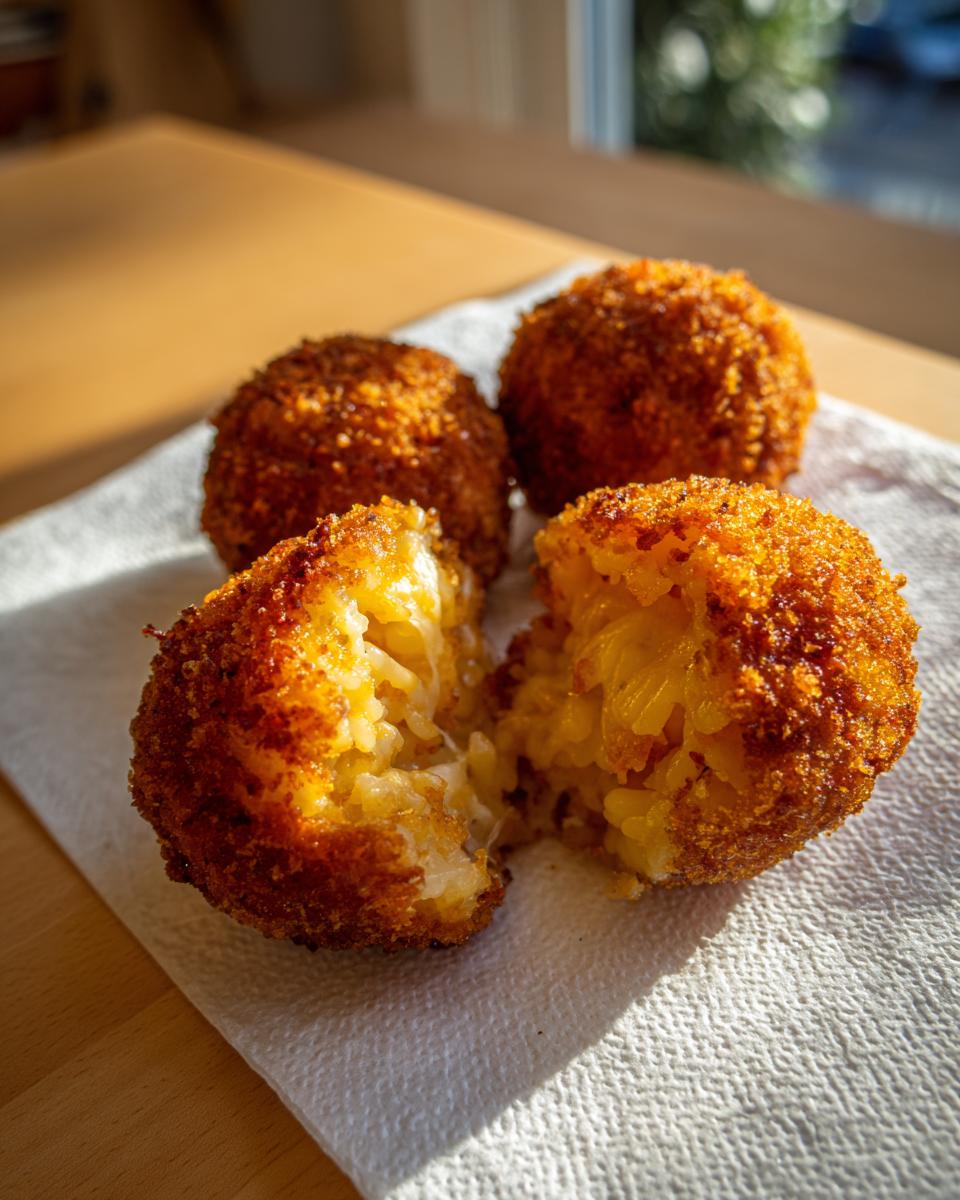
- They are the Ultimate Leftover Rice Recipes Savior: Seriously, cold, cooked short-grain rice is the star here. Stop throwing out that extra batch of rice! This instantly transforms your leftovers into a five-star appetizer.
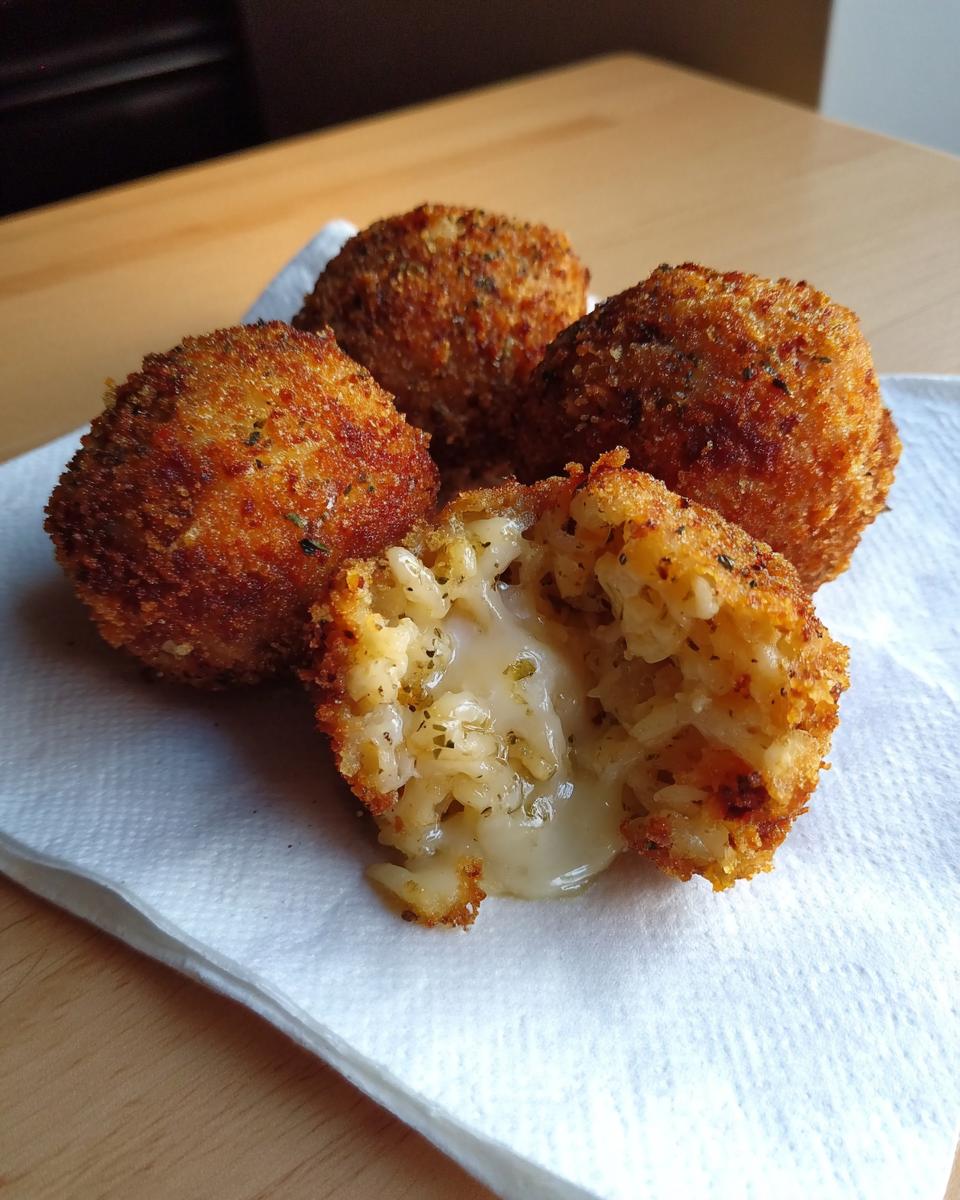
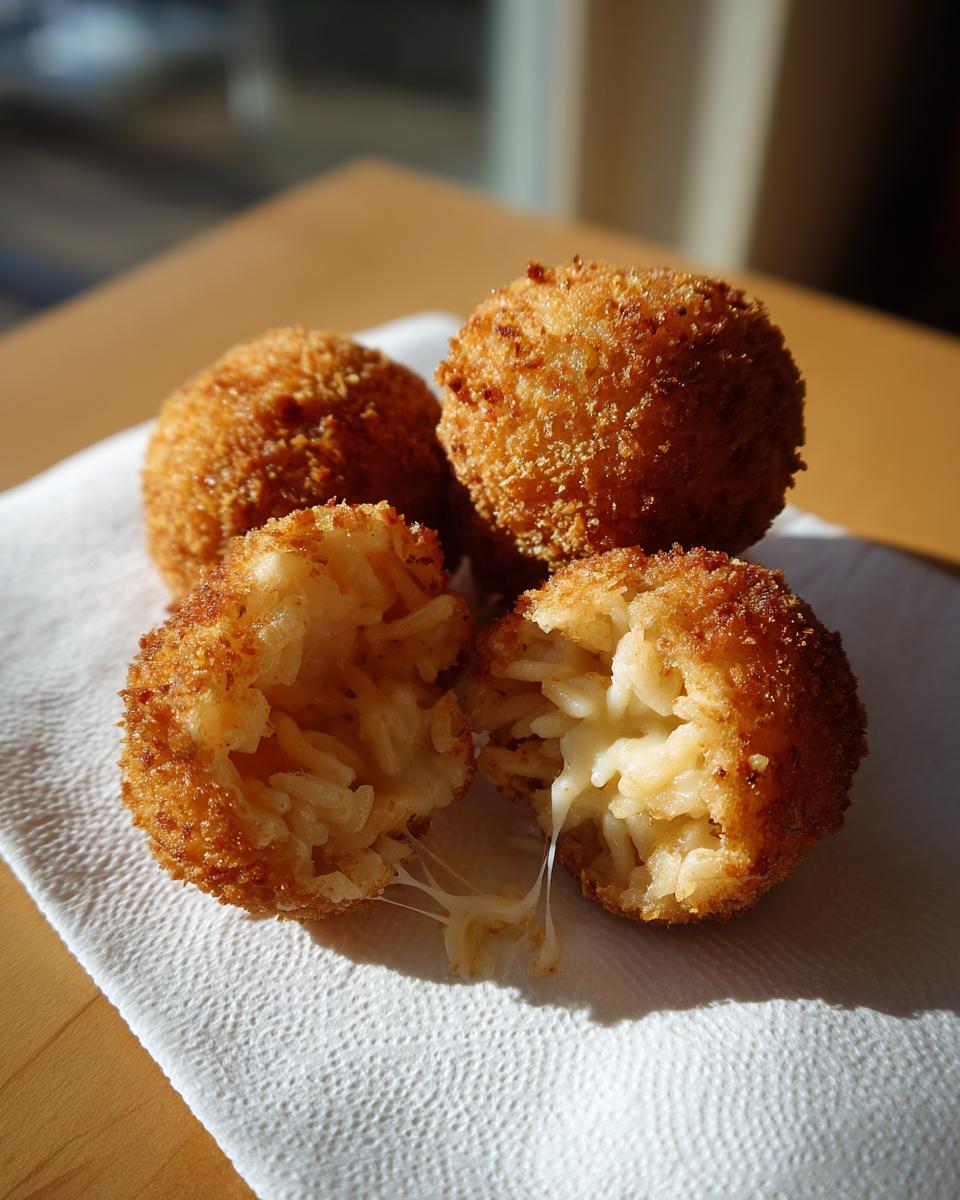
- Pure, Gooey Happiness: That surprise center of melted mozzarella cheese is everything. It’s our cheesy secret weapon, and nobody ever complains when cheese oozes out!
- Speedy Snack Time: Prep is quick, and the frying process is fast. We’re talking about incredible savory rice snacks ready to go in about 35 minutes total. Perfect for last-minute hosting.
- Crowd-Pleasing Appetizer Gold: If you need easy finger food rice recipes for a game night or party, these golden orbs are winners. They look fancy, but they’re so simple.
- Deliciously Crispy Texture: We use Panko, my friends! That means they get wonderfully crunchy on the outside without getting greasy, achieving that perfect crunch you want in homemade arancini.
- Totally Customizable: While this is my favorite cheesy version, they are a fantastic base for adding herbs or small bits of Italian meats if you want to jazz them up for a more complex meal. Check out some of my other favorite appetizer inspiration here!
Ingredients for Perfect Italian Rice Balls (Arancini)
Okay, let’s talk about what’s going into these beauties. This shopping list is short and sweet, which is just how I love it. The most important thing here is making sure your rice is cold—like, *refrigerator* cold. It holds everything together!
For the main rice mixture that forms the body of the arancini, you’ll need:
- 3 cups cooked, cold short-grain rice (Seriously, if you cooked this this morning, stick it in the freezer for 20 minutes, or just use actual leftover rice recipes style!)
- 1 large egg, beaten
- 1/2 cup grated Parmesan cheese
- 1/4 teaspoon black pepper
- 1/2 teaspoon salt
Then comes the gooey, melty heart of the operation—the stuffing!
- 1 cup mozzarella cheese, cut into small cubes (Make sure these cubes are uniform so they melt evenly and stay centered.)
Now, for that essential crispy golden coating. This is where we create that amazing texture you’re craving for your fried rice balls appetizer. You need three separate shallow bowls for dredging:
- 1/2 cup all-purpose flour
- 2 large eggs, beaten (These are for the second dip, like glue!)
- 1 1/2 cups breadcrumbs (I swear by Panko here; they give you the best, lightest crunch.)
And finally, the frying medium. Make sure you have enough on hand:
- Vegetable oil, for frying (You need about 2 inches deep in your pot to get them fully submerged and cooking evenly.)
Expert Tips for Making Crispy Rice Balls
Making great arancini is all about controlling the temperature and keeping things tight. If your rice isn’t cold enough, or you get sloppy when sealing, you end up with cheesy soup instead of perfect little golden spheres. Don’t worry, I’ve got the tricks to keep everything together so you end up with that perfect crust every single time. Keeping your oil happy is just as important as making sure your cheese stays put!
The Secret to Shaping Great Rice Balls
This is where patience pays off! Take a mound of that seasoned rice mixture, maybe a bit bigger than a golf ball, and flatten it gently in the palm of your hand. Think of it like making a small, sturdy pancake. Now, place that cube of mozzarella right in the center. You have to wrap the rice around the exposed cheese completely. Seal it tight—really press those edges closed! If you leave any gap, hot oil finds it, and bam, goodbye, beautiful mozzarella center. I like to roll them briefly between my palms after sealing just to make sure they are perfectly smooth before they even see the breadcrumbs.
Achieving Golden Fried Rice Balls
Oil temperature is non-negotiable for proper crispy rice balls. You absolutely must heat your oil to 350°F (175°C). If it’s too cool, your tasty italian rice bites soak up grease and become heavy; too hot, and the outside burns before the cheese melts. Don’t crowd your pot, either! Drop them in gently—I usually do three or four at a time—and give them a slow turn after a minute or two. This keeps the oil temperature steady and ensures that beautiful, even golden-brown color spreads over the whole surface. If you want more on getting that perfect fry, check out my tips for getting crispy fried textures—the science is the same!
Step-by-Step Instructions for Your Rice Balls
Alright, let’s get cooking! This process moves pretty quickly once you get your rhythm going, but timing is key. Remember what I said about the oil temperature? You want to get your oil heating up on the stove *while* you are breading the balls. That way, everything is hot and ready at the same time, which is what makes these happen fast! Efficiency in the kitchen is everything when you’re dealing with delicate ingredients like these.
Mixing the Base for Cheesy Rice Balls
First up, grab that big bowl. Remember we only used one egg for the base mixture—that helps bind the rice without making it too damp. Toss in your cold, cooked rice, the single beaten egg, the Parmesan cheese, salt, and pepper. Now, mix this up really well! You need to make sure that cheese and seasoning are evenly distributed throughout every grain of rice. Don’t be shy; use your hands if you have to, getting everything incorporated beautifully means no bland spots in your finished cheesy rice balls.
Setting Up the Breading Station for Crispy Rice Balls
Once your balls are formed around that mozzarella centerpiece, it’s time to build the crispy armor! Set up your three dishes in a row: the first bowl gets the flour. The second bowl gets your extra two beaten eggs—this is your glue coat. The final, most important dish holds your Panko breadcrumbs. You are going to dredge each ball first into the flour, shaking off any excess right away. Then, dunk it completely in the egg wash, letting the extra drip off. Finally, roll it right into those Panko crumbs! Press lightly all over to make sure you get that super crispy coating to stick perfectly. If you need inspiration for other quick bites to serve alongside these, check out my garlic butter chicken bites—another fantastic finger food!
After breading, those little guys are ready for their hot bath! Get that oil up to temperature and start frying those gorgeous, golden spheres!
Variations for Savory Rice Snacks
While the cheesy Arancini version is my absolute go-to comfort food, you know I love getting creative, especially when I’m trying to use up random bits from the fridge! These little orbs are such a fantastic vehicle for just about anything savory you can think of. Think of the base mixture as your blank canvas for making easy, handheld meals or snacks.
If you’re looking to skip the cheese, or just want something with more heft, try swapping out that mozzarella cube for one of these delicious stuffing ideas. You get that same incredible crispy crust, but the inside tastes completely new every time. This is the perfect way to clear out leftovers without making two separate full meals!
Here are a few of my favorite ways to stuff these little bites:
- Mini Meatball Surprise: Take a tiny, pre-cooked cocktail meatball—maybe a leftover from Sunday dinner—and wrap it right up in the rice mixture. You get a wonderful, meaty center! For flavor, I usually season the rice base heavily with dried oregano and garlic powder when I go this route.
- Veggie Power: If you want to keep things light, try some finely chopped, sautéed mushrooms and spinach. Make sure you squeeze every drop of liquid out of the greens after cooking, or they’ll make your rice ball soggy! A little dash of soy sauce in the rice mix works wonders here.
- Ham and Pea Classic Addition: This is a bit more traditional. Just mix some tiny, diced cooked ham—I use leftover holiday ham if I have it—and some sweet frozen peas right into the rice base itself, before you even start forming the balls. No stuffing needed, just pure flavor mixed throughout!
- Spicy Tuna Filling: If you’re looking for something closer to the Japanese side of things but still want that Italian crunch, you can mix canned tuna (drained well!) with a little Sriracha or chipotle powder, and then use that as a filling instead of cheese. It creates such an unexpected, zesty bite!
Making these variations means you can serve them for appetizers one night and then serve the leftovers as a hearty side dish the next day. They work brilliantly as fun, portable finger food! If you’re looking for more ideas on how to load up different savory fillings, you should definitely check out my recipe for stuffed mushrooms; the principle of stuffing and binding is very similar!
Serving Suggestions for Italian Rice Bites
So, you’ve pulled those gorgeous, golden Italian rice bites out of the oil, and now what? You can’t just leave them sitting there looking lonely! These little guys beg for a dip, truly. The simplest approach, and my absolute favorite, is a bowl of good, slightly warm marinara sauce—it just brings out that rich, savory flavor, you know?
If you’re feeling a little fancier, whip up a quick homemade garlic aioli! It’s amazing how such a simple sauce elevates everything we fry. You can find my favorite quick recipe right here on the blog. For pairing, serve them alongside fresh mozzarella balls or maybe some marinated olives. They are the perfect starter before digging into a big pasta dish!
Storage and Reheating Instructions for Leftover Rice Balls
The true test of any great fried food is what happens the next day, right? Luckily, these cheesy rice balls handle leftovers like troopers, provided you treat them right! The microwave is your enemy here—it turns the crispy crust instantly soggy, and nobody wants that. We need to restore that beautiful crunch!
First things first: cooling. Make sure your fried rice balls are completely cooled down to room temperature before you even think about storing them. If you trap steam inside a container, you risk making the outside soft.
Once cooled, slide them into an airtight container. They’ll keep nicely in the fridge for about three days. Seriously, I’ve never had them last longer; they get too tempting sitting there!
Now for reheating, which is the exciting part, because we are making them taste freshly fried again! If you have an air fryer—and if you don’t, you really should get one, they are miraculous for leftovers, check out my air fryer baked potato technique for proof—that is your absolute best friend. Toss them back in the air fryer at 350°F for about 6 to 8 minutes. They crisp right back up!
If you don’t have one, the oven works great too! Spread them in a single layer on a baking sheet and pop them into a 375°F oven for about 10 minutes. This bakes off any residual moisture and gets that crust singing again. You are basically re-frying them without the oil!
Oh, and here’s a little bonus tip from the inspiration notes: if you want to avoid the deep fry entirely next time, you can always prepare the breaded balls and then follow the baked arancini alternative method mentioned in the notes section for a less oily, but still tasty, snack!
Frequently Asked Questions About Rice Balls
I always get tons of questions about these because everyone wants that perfect, non-messy result! Below, I’ve pulled together the most common things people ask when they are making their rice balls for the first time. Hopefully, this helps you feel totally confident heading into the frying station!
Can I prepare the rice balls ahead of time?
Oh, yes, you absolutely can! This is one of my favorite tricks for entertaining. You can mix up the rice base, form all the balls around the mozzarella cubes, and seal them perfectly. Once they are shaped, cover the platter tightly with plastic wrap and pop them into the fridge for up to a day. Just a heads-up: they need to be fully chilled before you bread them! If you try to dredge warm, soft rice balls, the coating won’t stick well. Bread them right before you’re ready to fry them up.
What is the best rice for making rice balls?
For the best, stickiest, most cohesive rice balls, you want something starchy. Short-grain white rice is my top choice because it glues together wonderfully once it cools down, which is exactly what we need for holding those cheese cubes hostage! If you have Arborio rice (the kind you use for risotto), that works brilliantly too, provided it’s well-cooked and chilled solid. Please, try to avoid long-grain rice like Basmati if you can for this recipe, because those grains stay separate and crumbly, and you’ll end up with sad, messy fried clumps rather than a tight ball.
If you’re ever struggling with binding things in the kitchen, maybe give my creamy chickpea soup a look—sometimes adding an extra binder like that chickpea puree can help stabilize things, though for these fried snacks, cold rice is usually king!
Nutritional Estimates for Cheesy Rice Balls
Now, let’s get real for a second. These are fried, cheesy, glorious handheld bites of happiness. They are totally worth every single satisfying crunch, but we also need to be real about what’s in them! Because we are deep-frying, the final calorie, fat, and sodium counts can jump up depending on how much oil your beautiful rice balls happen to absorb. Take this information with a big grain of salt—literally!
As Olivia always reminds us when sharing these fun recipes, these numbers are just guidelines. This estimate is based on the recipe yielding about 12 balls total, and serving size being 2 balls:
- Serving Size: 2 balls
- Calories: 280
- Total Fat: 14g (Be careful, this will change based on oil!)
- Saturated Fat: 6g
- Trans Fat: 0.5g
- Cholesterol: 65mg
- Sodium: 350mg
- Carbohydrates: 28g
- Fiber: 1g
- Protein: 10g
- Sugar: 1g (That’s just from the mozzarella and Parmesan!)
See? Not terrible, especially when you consider how much flavor you cram into each bite. Just remember that the frying process is where the biggest variables are. If you use the baked alternative, those fat numbers will drop significantly, which is interesting if you’re counting macros!
PrintEasy Cheesy Arancini (Italian Fried Rice Balls)

Make crispy, cheesy Italian rice balls using leftover rice. These fried rice balls make a simple appetizer or savory snack.
- Prep Time: 20 min
- Cook Time: 15 min
- Total Time: 35 min
- Yield: About 12 servings 1x
- Category: Appetizer
- Method: Frying
- Cuisine: Italian
- Diet: Vegetarian
Ingredients
- 3 cups cooked, cold short-grain rice (leftover rice works well)
- 1 large egg, beaten
- 1/2 cup grated Parmesan cheese
- 1/2 teaspoon salt
- 1/4 teaspoon black pepper
- 1 cup mozzarella cheese, cut into small cubes
- 1/2 cup all-purpose flour
- 2 large eggs, beaten (for dredging)
- 1 1/2 cups breadcrumbs (Panko recommended for crispiness)
- Vegetable oil, for frying
Instructions
- In a large bowl, combine the cold cooked rice, 1 beaten egg, Parmesan cheese, salt, and pepper. Mix until everything is evenly combined.
- Take about 2 tablespoons of the rice mixture and flatten it in your palm. Place one cube of mozzarella cheese in the center. Gently form the rice around the cheese to create a tight, uniform ball shape. Repeat until all the mixture is used.
- Set up a standard breading station: place flour in one shallow dish, the 2 beaten eggs in a second dish, and breadcrumbs in a third dish.
- Dredge each rice ball first in the flour, shaking off excess. Then dip it completely in the beaten egg mixture. Finally, roll it thoroughly in the breadcrumbs, pressing gently so the crumbs adhere well.
- Pour vegetable oil into a deep, heavy-bottomed pot or deep fryer to a depth of about 2 inches. Heat the oil to 350°F (175°C). Use a thermometer to monitor the temperature.
- Carefully lower 3-4 rice balls into the hot oil, ensuring you do not overcrowd the pot. Fry for 3 to 4 minutes, turning occasionally, until they are golden brown and crispy on all sides.
- Remove the fried rice balls with a slotted spoon and place them on a plate lined with paper towels to drain excess oil.
- Serve the crispy rice balls immediately while the cheese inside is melted.
Notes
- Using cold, day-old rice helps the balls hold their shape better during frying.
- If you prefer a baked arancini alternative, spray the breaded balls lightly with cooking spray and bake at 400°F (200°C) for 15-20 minutes, flipping halfway, until golden.
- For extra flavor, add 1/4 cup finely chopped fresh parsley to the initial rice mixture.
Nutrition
- Serving Size: 2 balls
- Calories: 280
- Sugar: 1
- Sodium: 350
- Fat: 14
- Saturated Fat: 6
- Unsaturated Fat: 8
- Trans Fat: 0.5
- Carbohydrates: 28
- Fiber: 1
- Protein: 10
- Cholesterol: 65