
The holiday table just isn’t complete without that perfect, rich sauce draped over everything, right? When I think about the meals I want to share with my family, having the absolute **best turkey gravy** ready to go is non-negotiable. Forget those thin, sad packets from the store. We are making something truly special today—a foolproof, lump-free recipe using those precious pan drippings to achieve that silky smooth holiday gravy.
For me, food is all about connection. If my gravy can make someone stop talking for just one blissful second while it coats their mashed potatoes, then I’ve succeeded! This recipe, built around simple technique and those savory drippings, is the one that brings everyone closer together at the table. Trust me, once you master this, it’s going to be your go-to every single time.
- Why This Foolproof Homemade Turkey Gravy Recipe Works
- Ingredients for Classic Turkey Gravy Sauce
- Easy Turkey Gravy Instructions: Making the Best Turkey Gravy from Scratch
- Ingredient Notes and Substitutions for Turkey Gravy
- Make Ahead Turkey Gravy and Storage Instructions
- Tips for Serving Your Rich Savory Gravy
- Frequently Asked Questions About Turkey Gravy
- Estimated Nutritional Data for Turkey Gravy
- Share Your Best Turkey Day Topping Experience
Why This Foolproof Homemade Turkey Gravy Recipe Works
Making gravy shouldn’t be stressful, especially when the turkey is resting! This recipe stands out because it prioritizes ease without sacrificing that deep, comforting flavor we all want. It’s engineered to deliver that perfect texture every time, even if you’re new to making a classic sauce for the holidays.
We nail this because we focus on two main things:
- Building the flavor foundation right in the pan.
- Using a simple technique that completely avoids any pesky lumps.
Achieving Silky Smooth Holiday Gravy Texture
The secret weapon here is whipping the flour right into the fat first—that’s how we make the magic paste called a roux. When you slowly whisk in the stock after that, those lumps just can’t form! That roux is what turns a watery mess into the rich, silky smooth holiday gravy everyone fights over.
Rich Flavor from Turkey Gravy Using Pan Drippings
Honestly, you need those browned bits and that rendered fat from the roasting pan! That’s where all the character is. Using your drippings is the absolute shortcut to the best homemade turkey gravy from scratch. If you skip this step, your sauce will taste flat. We want savory depth, and the drippings deliver that every single time.
Ingredients for Classic Turkey Gravy Sauce
Okay, gather your supplies! This recipe is incredibly straightforward, which is why I love it for Thanksgiving when my kitchen is already chaos. Remember, we’re using the drippings, but we always have backup plans, which I’ll talk about later. For now, here is exactly what you need for the richest, classic turkey gravy sauce ever.
Keep this ready near your stovetop. You’ll see I mentioned optional wine, which really punches up the flavor, but don’t feel pressured if you want to skip it. You can even get a head start by prepping your stock ingredients while the bird is finishing!
- 1/2 cup turkey pan drippings (make sure you get both the fat that collects and all those gooey brown bits—that fat and juice combined is gold!).
- 1/2 cup all-purpose flour (this builds our roux foundation).
- 4 cups turkey or chicken stock (I always grab low sodium because I have no idea how salty my turkey drippings will be).
- 1/2 teaspoon salt (seriously, taste first, then add!).
- 1/4 teaspoon black pepper (freshly cracked is always better, you know?).
- Optional: 1/4 cup dry white wine or sherry (this adds a beautiful tanginess that cooks off fast!).
If you’re looking for other easy staples to have on hand, I recently made some amazing homemade pita bread, which, by the way, is fantastic for dipping into leftover gravy!
Easy Turkey Gravy Instructions: Making the Best Turkey Gravy from Scratch
Alright, here is where the magic happens! These easy turkey gravy instructions take us from puddles of drippings to that gorgeous, rich sauce you see on all the holiday magazines. Because we are starting with the roux, we are already winning the battle against lumps. Remember what I said about those savory bits? Make sure your pan drippings—fat and all—are in a nice, wide skillet over medium heat before you start anything else. I always, always taste the stock first because homemade turkey drippings can be super salty. That gives me an idea of how much salt I need to add at the very end to make this **turkey gravy** perfect.
This whole process, from combining the flour to your first taste test, takes maybe 20 minutes total. Seriously! If you want to see someone else nail this technique, our friends over at Cooking With Emy have a great visual walk-through, too.
Creating the Roux for Lump Free Gravy Technique
This part is the absolute foundation for any lump free gravy technique. Take your flour and whisk it right into those warm pan drippings until it looks like a thick, bubbly paste. We call that a roux! Don’t rush this step; you need to cook out that raw, pasty flour taste. Stir it constantly for a good 1 to 2 minutes. It shouldn’t look pale white anymore; maybe it’s taking on a very light tan color. This step is what guarantees you won’t end up with grainy or starchy gravy later.
If you’re adding white wine or sherry to deepen the flavor—and you totally should!—pour it in right after the roux cooks. Whisk hard for a full minute until that wine has completely vanished into the paste. It’s amazing how much flavor that little bit adds.
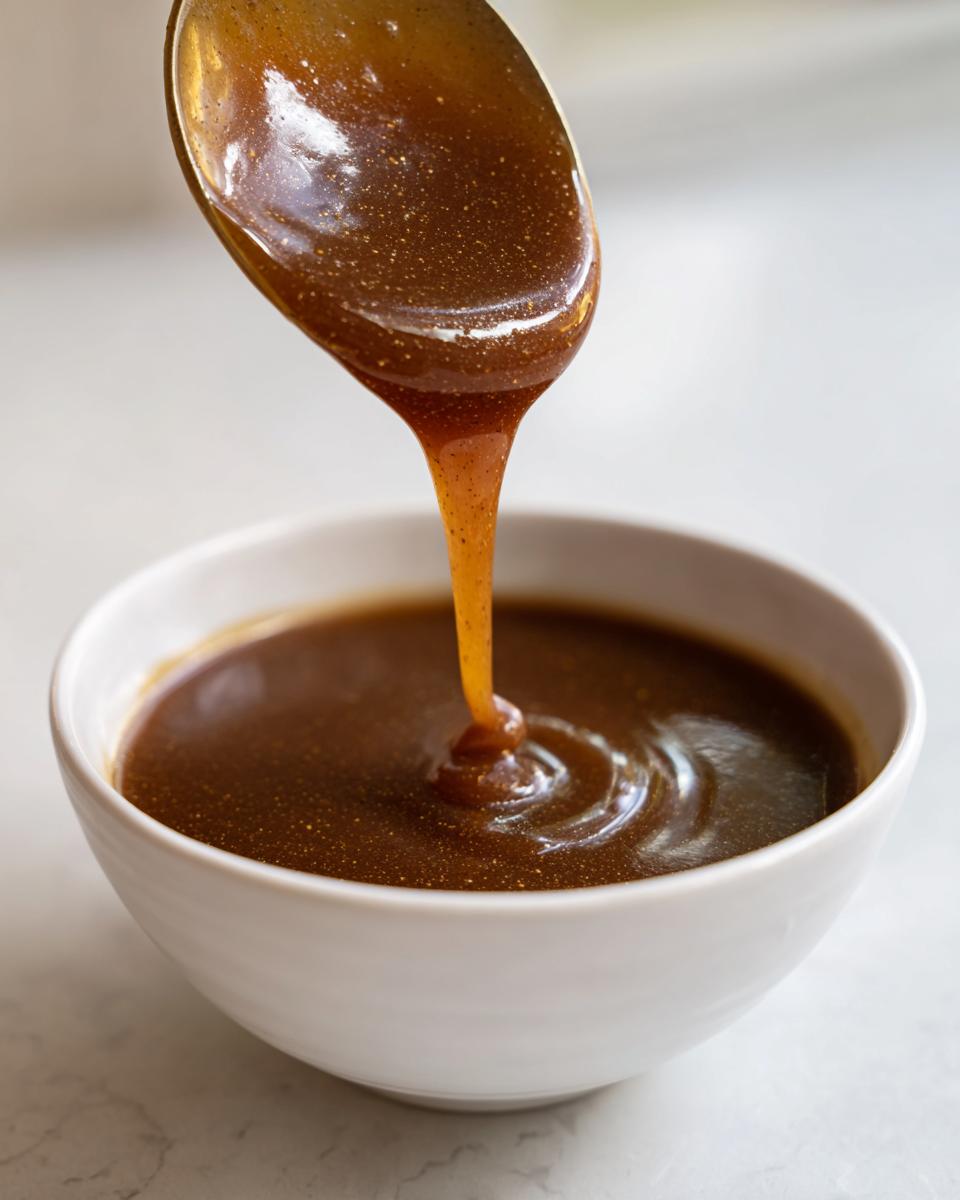
Achieving Perfect Consistency in Your Turkey Gravy
Now for the gentle part! This is where we introduce the liquid to keep things silky smooth. Whisk in your nice warm stock—don’t dump it all in at once! Add about a cup, whisk until it’s totally smooth and you see zero lumps, and *then* add the next cup. Keep going until all 4 cups are incorporated.
Once it’s all combined, bring the whole pan up to a gentle simmer. Keep whisking every now and then. You want to let it bubble away gently for about 5 to 10 minutes. It will thicken on its own as it simmers, turning into that beautiful, pourable sauce we’re aiming for. If, after simmering, you think, “Nope, still too thin,” don’t panic! We promise it will turn out right. If you need it thicker, just mix a tablespoon of cornstarch with two tablespoons of cold water—that’s called a slurry. Whisk that slurry in slowly while it simmers. That’s the foolproof gravy recipe secret for adjusting thickness perfectly!

Once that sauce coats the back of a spoon nicely, take it off the heat. Time for salt and pepper, and definitely taste test before serving over your creamy sides!
Ingredient Notes and Substitutions for Turkey Gravy
I know the pressure of the big meal means things sometimes go wrong—maybe your turkey shrank more than you thought, or maybe you just didn’t get enough good, flavorful drippings leftover. Don’t even worry about it! This section is all about making sure you still end up with amazing gravy, regardless of what you have in the pan.
We covered the need for great pan drippings earlier, but I want to make sure you know exactly what to do if you’re short. Remember, the heart of this **classic turkey sauce** is the creamy roux, so as long as you have fat and flour, you’re golden.
Also, real quick—since we are talking about texture—if you ended up with gravy that’s just a little too runny after you thought it was done cooking, don’t panic! Remember that cornstarch slurry I mentioned in the instructions? Whisk 1 tablespoon of cornstarch mixed with 2 tablespoons of *cold* water until it’s completely smooth, then slowly whisk that into your simmering gravy. It will thicken right up! That’s a lifesaver when you’re running out of time.
Turkey Gravy Without Drippings Alternative
If your turkey was lean or you simply didn’t have enough fat skimmed off the roasting tray, this is how you make a proper **Homemade Turkey Gravy Recipe**. It’s SUPER simple. You just replace the 1/2 cup of turkey drippings entirely with 1/2 cup of good, unsalted butter.
You’ll still make your roux with the butter and then proceed exactly as the instructions say, just using 4 cups of good turkey or chicken stock for the liquid component. You lose a tiny bit of that deep, roasted flavor, but honestly, with good stock, nobody will know the difference! This is how you get a great result when you need a **Turkey Gravy Without Drippings Alternative**.

If you’re prepping ahead, I love making things like my homemade applesauce a day or two early, so gravy prep is the last thing I worry about on Turkey Day!
Make Ahead Turkey Gravy and Storage Instructions
I am a huge fan of prepping anything possible the day before Thanksgiving, and honestly, this **Homemade Turkey Gravy Recipe** is one of my favorites to get out of the way early! If you’re worried about timing everything on the actual holiday, making your gravy ahead of time is a total game-changer. It completely frees up stove space when you need it most.
The good news is that this gravy stores beautifully, probably because we made it right using the proper roux technique. You don’t want it sitting on the counter for long, though, because we’re talking about rich turkey stock here. Plan to make it the day before or freeze it for later!
Here is what you need to know for storage and reheating:
- Cool It Down: After you finish simmering and seasoning your gravy, take it off the heat immediately. Let it cool down on the counter for maybe an hour or so until it’s just lukewarm. Don’t put a super hot pot directly into your fridge, please!
- Store It Right: Transfer the gravy into an airtight container. You can store this in the refrigerator for up to three days. It will get super thick, almost like a paste, and that’s totally normal—it’s just the starch and the fat settling.
- Reheating Magic: When it’s time to serve, scoop the thickened block of gravy into a saucepan. Put it over low heat. You absolutely have to whisk constantly while it melts and warms up. If it seems too stiff, just whisk in a splash of extra warm stock or water until you get that perfect pourable consistency back. If you use leftover stock, it adds even more flavor to your **Classic Turkey Sauce**!
I often find making things ahead, like this gravy or even my favorite holiday stuffing, honestly makes the whole evening feel so much more relaxed. You get to actually enjoy your guests instead of frantically whisking on the stove!
Tips for Serving Your Rich Savory Gravy
Okay, you’ve got this gorgeous, thick, rich savory gravy sitting on the stove, warm and ready. It smells absolutely incredible because you used those lovely drippings! Now for the best part—serving it up so everyone gets that perfect bite of holiday heaven. Trust me, presentation matters, even with gravy!
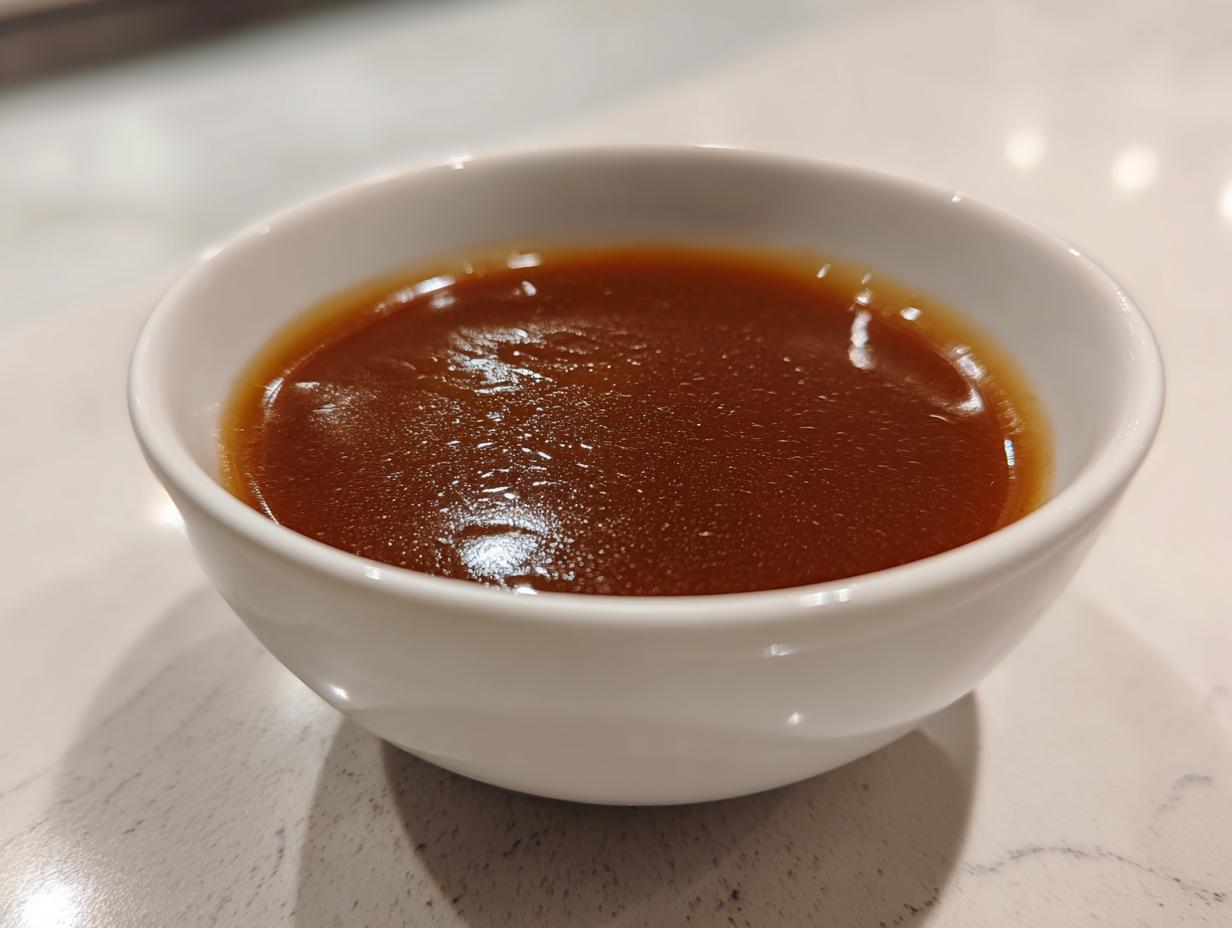
Before it even hits the gravy boat, I have one final, crucial tip for that absolutely unbeatable, restaurant-quality texture. If you’re aiming for that truly silky smooth consistency that makes people look twice, you need to strain it. Seriously! Pour the finished gravy through a fine-mesh sieve right before you serve it. It catches any tiny bits of pepper, flour that didn’t completely dissolve, or stray herbs. It’s an extra 30 seconds of work that makes your **turkey gravy** look and feel luxurious.
Once strained, watch how beautifully it pours! This isn’t just an addition to your plate; it’s a vital part of the Thanksgiving Side Dishes Gravy experience. You need something this flavorful to truly complement the main event!
The Perfect Pairings for Your Homemade Gravy
Where is this beautiful sauce going, you ask? Everywhere! This is the moment where all that effort really pays off. My absolute favorite way to use this rich sauce is smothering a giant pile of fluffy mashed potatoes. Have you tried my recipe for creamy baked mashed potatoes yet? They practically beg for this gravy.
And of course, what is Thanksgiving without stuffing? A slice of moist stuffing just needs a generous drizzle of this sauce. My classic homemade herb stuffing soaks it up like a sponge. Don’t forget the turkey slices and even a little bit over roasted vegetables—this gravy works hard, so let it shine everywhere!
If you want to check out some other amazing holiday inspiration, my friends at Murray’s Menu have fantastic ideas for using up all those rich leftovers. Enjoy every single savory spoonful until next year!
Frequently Asked Questions About Turkey Gravy
FAQs always pop up when you dive into making a classic recipe from scratch, especially around the holidays when stress can run high! I put together a few common troubleshooting questions to make sure your **turkey gravy** journey is completely smooth sailing. I want this to be the easiest part of your whole Thanksgiving prep.
How do I fix turkey gravy that is too thin?
Don’t sweat it if your sauce ends up a little too liquidy! This happens sometimes, especially if your stock was thinner than you expected. Remember that cornstarch slurry we talked about in the **Easy Turkey Gravy Instructions**? That’s your quick fix. Just whisk 1 tablespoon of cornstarch together with 2 tablespoons of *cold* water until it’s completely smooth—no dry pockets allowed! Then, drizzle that mixture slowly into your simmering gravy while whisking constantly. It thickens up almost instantly, giving you that perfect consistency for pouring over everything!
Can I make this recipe gluten-free?
Oh, absolutely! I have friends who have to stick to gluten-free diets, and we make this **Homemade Turkey Gravy Recipe** all the time. The beauty of the roux is that you can easily swap out the regular all-purpose flour. Just replace the 1/2 cup of flour with an equal amount of a good quality 1:1 gluten-free baking blend. If you use a blend that contains xanthan gum, great! If it doesn’t, you might need to add just a tiny pinch of xanthan gum or use that cornstarch slurry trick again if the sauce seems a little loose after simmering.
What kind of stock gives the best flavor depth?
For the absolute deepest flavor in your **Classic Turkey Sauce**, you really want to use homemade turkey stock if you have it. That slow-simmered goodness, made from the turkey carcass, carries so much savory richness that store-bought just can’t touch. If you don’t have turkey stock, please use a high-quality, low-sodium chicken stock. That combination of the roasted drippings plus good stock is what creates that incredible, savory flavor profile that makes people ask for the recipe!
Can I make this ahead of time?
Yes, this is high on my list of recommended prep-ahead items! It’s one of the best things you can tackle the day before your big meal. It stores wonderfully in the fridge, though it will firm up a lot. When reheating, remember to whisk in a splash of extra warm stock or water to get it back to that perfect, pourable consistency. Having this ready means less cooking stress on the actual holiday!
Estimated Nutritional Data for Turkey Gravy
Ever since I started putting all my recipes up online, people always ask about the nitty-gritty—and that includes nutrition! Look, my priority is always flavor and making sure you have that perfect comfort food gravy, not counting every calorie. But I know you want to know what’s in this rich sauce, especially when it’s going over everything on the plate!
Here’s a little breakdown based on the recipe above, but I have to give you the standard disclaimer: since this **turkey gravy** relies so heavily on whatever fat comes out of your unique turkey, these numbers are just my best guess. Different brands of stock or how much butter you add if you substitute for drippings will change these figures a bit. Consider this a starting point for your notes!
- Serving Size: 1/2 cup
- Calories: 150
- Fat: 10g
- Saturated Fat: 5g
- Carbohydrates: 12g
- Protein: 3g
- Sodium: 450mg (This is why I always stress using low-sodium stock, because those drippings can really pump up the saltiness!)
It’s a holiday treat, so don’t worry about it too much! The flavor payoff for those 150 calories is totally worth it when you smell this **Classic Turkey Sauce** bubbling away on the stove.
Share Your Best Turkey Day Topping Experience
That’s it! You’ve done it. You’ve created the most wonderfully rich, savory, and perfectly silky **Classic Turkey Sauce** right in your own kitchen, all thanks to those simple pan drippings. I truly hope you feel proud, because making your own gravy is a huge accomplishment and sets the tone for the entire meal.
Here in the DelishCraze kitchen, we believe food is the language of love, the thing that brings everyone around the same table and slows down the busy world, even if just for a little while. When you serve this gravy, you’re serving connection, patience, and tradition. I absolutely love seeing how this recipe works for you!
Please, if you loved how this simple technique turned out lump-free and full of flavor, take a moment to share your joy with us. Leave a star rating right below the recipe card—it lets me know I nailed the instructions for you. And definitely leave a comment below!
Tell Me How It Tasted!
Did you strain it for that extra velvety texture? Did you use the optional wine? I want all the details! Telling me how this homemade gravy elevated your holiday feast helps me create even better recipes for our community. It keeps that connection going, long after the plates are cleared.
If you are looking for more ways to simplify the rest of your meal so you can focus on enjoying time together, check out some of my easy go-to recipes for quick and easy weeknight dinners. Because less stress in the kitchen means more time around the table!
Don’t Forget to Share the Love
If you snapped a picture of your beautiful meal covered in this fantastic gravy, tag us! Sharing your success story inspires the next person who might be nervous about making gravy from scratch for the very first time. Remember, everyone starts somewhere, but with this easy guide, you are already using the most foolproof method out there!
PrintFoolproof Homemade Turkey Gravy from Drippings
Make rich, silky smooth turkey gravy from scratch using your pan drippings. This easy recipe guarantees a lump-free sauce perfect for your holiday meal.
- Prep Time: 10 min
- Cook Time: 20 min
- Total Time: 30 min
- Yield: 4 servings 1x
- Category: Side Dish
- Method: Stovetop
- Cuisine: American
- Diet: Vegetarian
Ingredients
- 1/2 cup turkey pan drippings (fat and juices combined)
- 1/2 cup all-purpose flour
- 4 cups turkey or chicken stock (low sodium preferred)
- 1/2 teaspoon salt (or to taste)
- 1/4 teaspoon black pepper (or to taste)
- Optional: 1/4 cup dry white wine or sherry
Instructions
- Pour the turkey drippings into a large saucepan or skillet. If you have less than 1/2 cup of drippings, add butter to reach 1/2 cup total fat. Heat over medium heat.
- Whisk the flour into the drippings until a smooth paste, called a roux, forms. Cook this roux for 1 to 2 minutes, stirring constantly, to cook out the raw flour taste.
- If using wine, pour it in now and whisk until it is fully absorbed, about 1 minute.
- Slowly whisk in the turkey or chicken stock, a little at a time, making sure to fully incorporate the liquid before adding more. This prevents lumps.
- Bring the mixture to a simmer, whisking frequently. Continue to simmer for 5 to 10 minutes, or until the gravy thickens to your desired consistency.
- Remove from heat. Stir in the salt and pepper. Taste and adjust seasonings as needed.
- For the smoothest texture, strain the gravy through a fine-mesh sieve before serving.
Notes
- If you need to make gravy without drippings, substitute the drippings with 1/2 cup of unsalted butter and use 4 cups of stock.
- You can make this gravy ahead of time. Cool completely, store in an airtight container in the refrigerator for up to 3 days, and reheat gently on the stovetop, whisking in a splash of extra stock if it thickens too much.
- If your gravy is too thin, create a slurry by mixing 1 tablespoon of cornstarch with 2 tablespoons of cold water. Whisk this slurry into the simmering gravy until thickened.
Nutrition
- Serving Size: 1/2 cup
- Calories: 150
- Sugar: 1
- Sodium: 450
- Fat: 10
- Saturated Fat: 5
- Unsaturated Fat: 5
- Trans Fat: 0
- Carbohydrates: 12
- Fiber: 0
- Protein: 3
- Cholesterol: 15