

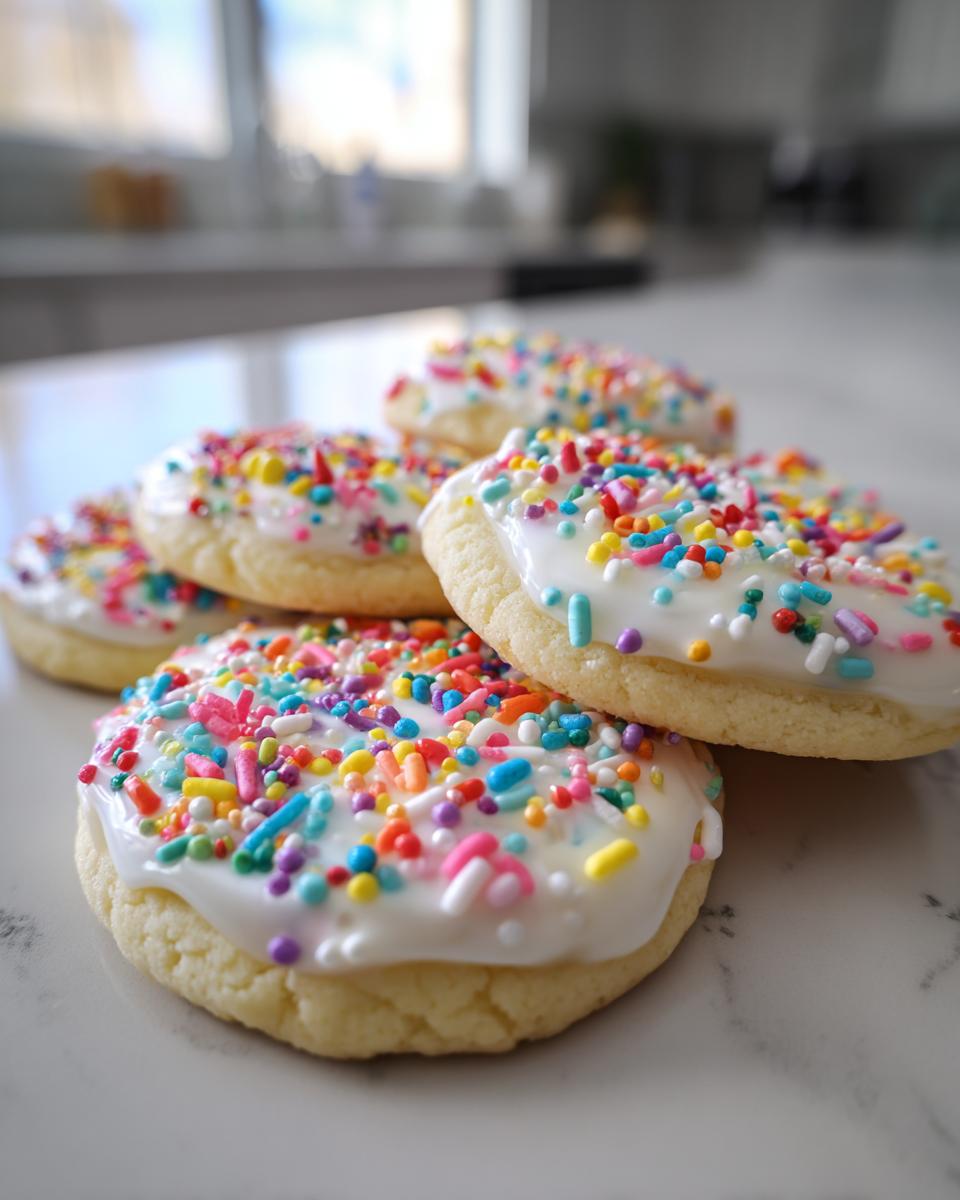
Oh, tell me I’m not the only one who has spent hours decorating the prettiest cut-out cookies, only to have the icing still be tacky the next morning? It drives me absolutely bananas! You spend all that time getting your designs perfectly smooth, and then when you try to stack them, *whoops*—you end up with smudged messes instead of beautiful Christmas gifts. Well, those days are over, friends! Here at DelishCraze, we are all about making home-cooking joyful, not frustrating. That’s why I spent ages perfecting this simple recipe for **sugar cookie icing that hardens** completely, giving you that flawless, glossy, stackable finish every single time. Meet the only glaze you’ll ever need!
- Why This is the Ultimate Sugar Cookie Icing That Hardens
- Ingredients for Your Hardening Cookie Icing Recipe
- How to Prepare Sugar Cookie Icing That Hardens Perfectly
- Drying Times and Setting Your Sugar Cookie Icing That Hardens
- Tips for Professional Cookie Icing Finish and Troubleshooting Sticky Cookie Icing
- Serving Suggestions for Your Beautifully Decorated Cookies
- Storage and Reheating Instructions for Durable Cookie Frosting
- Frequently Asked Questions About Sugar Cookie Icing That Hardens
- Estimated Nutritional Data for This Easy Cookie Icing That Sets Firm
Why This is the Ultimate Sugar Cookie Icing That Hardens
Oh, tell me I’m not the only one who has spent hours decorating the prettiest cut-out cookies, only to have the icing still be tacky the next morning? It drives me absolutely bananas! You spend all that time getting your designs perfectly smooth, and then when you try to stack them, *whoops*—you end up with smudged messes instead of beautiful Christmas gifts. Well, those days are over, friends! Here at DelishCraze, we are all about making home-cooking joyful, not frustrating. That’s why I spent ages perfecting this simple recipe for **sugar cookie icing that hardens** completely, giving you that flawless, glossy, stackable finish every single time. Meet the only glaze you’ll ever need! You can find the full breakdown of this method over on my sugar cookie icing recipe that hardens glossy post, but let’s talk about *why* this one works so well.
When you’re making cut-out cookies, especially for gifting or loading up a platter, you need icing confidence. This isn’t your average powdered sugar glaze; this is the icing that dries hard so you can actually move your beautiful designs! I tested so many versions trying to get that professional cookie icing finish right here in my own kitchen. The result is a recipe that works perfectly for anyone, even if you’re totally new to decorating.

Here’s why I know this is the best formula for you:
- It dries completely hard—no more sweating cookies!
- The texture remains incredibly smooth—nothing grainy here.
- It sets with a beautiful, desirable glossy appearance.
- It’s completely stackable for gifts or easy storage.
- Honestly, it’s super beginner-friendly; you can’t mess this up!
This simple recipe gives you that reliable, durable cookie frosting we all dream about. It’s the recipe I turn to when I know those cookies need to hold up beautifully.
The Secret Ingredient for Icing That Dries Hard
If you want that perfect, smooth, hard icing that never feels sticky, you absolutely must include corn syrup. Seriously, don’t skip it! Light corn syrup does something amazing once the icing cures—it prevents crystallization and keeps the surface from staying tacky. Without it, you’re just guessing whether your cookies will be ready to package by bedtime. It’s my expert tip for guaranteeing that your cookies are truly ready to stack and survive the trip to Grandma’s house without sticking together. It’s the secret to making sure you have a great icing that dries hard every single time.
Ingredients for Your Hardening Cookie Icing Recipe
Okay, so these are the very few things you need! I love that this recipe uses pantry staples, but the ratios are tight, so please measure carefully. I developed this recipe to perfectly balance sweetness and structure so it dries firm.
- 2 cups powdered sugar, sifted
- 3 tablespoons milk (whole milk works best)
- 1 tablespoon light corn syrup
- 1 teaspoon vanilla extract
- Gel food coloring (optional)
Ingredient Notes and Substitutions
The quality of your ingredients really shows up when you are aiming for that professional, smooth hard icing for cookies. Here are a few little things I learned while testing everything out:
First, you absolutely must sift that powdered sugar. If you don’t, you’ll end up with little lumps that prevent that smooth finish we are going for, and lumps absolutely sabotage the hardening process! We need this nice and fine.
Secondly, look for clear vanilla extract if you want a bright, pure white icing. Standard vanilla extract is brown, and while it tastes great, it gives everything a slight beige tint. If you are adding vibrant gel colors later, this step isn’t so important, but for a classic white base, go clear!
Finally, while the recipe calls for milk, you can substitute water if you have an allergy concern, but I really feel whole milk helps add a bit of richness that stabilizes the structure just a tiny bit better. If you use water, just be extra careful when adjusting the consistency later on.
And please, please use gel colorings over liquid drops. Liquid coloring adds too much extra moisture, and we already know moisture is the enemy of icing that dries hard! A tiny dab of gel gives you intense color without messing up our perfect chemistry.
How to Prepare Sugar Cookie Icing That Hardens Perfectly
Alright, getting the right texture for this sugar cookie icing that hardens is where the magic happens, but it’s easy once you know the trick! Remember how I mentioned Grandma Rosewood always had an intuition about measurements? Well, developing this icing took serious intuition! It took me ages to realize that the process isn’t just about mixing; it’s about creating *two* distinct textures from the same base batch—one for drawing borders and one for filling them in smoothly.
- First things first: grab your bowl and toss in that sifted powdered sugar and the vanilla extract. Give those a gentle blend.
- Next, add your light corn syrup and 2 tablespoons of the milk. Start mixing this slowly, maybe with a whisk or your stand mixer on low. We don’t want a sugar cloud exploding in our kitchen!
- Keep mixing until everything is just coming together. Now, start adding that remaining milk, just a teaspoon at a time. You are looking for what I call the ‘stiff’ consistency. This needs to hold its shape nicely, perfect for tracing the edges of your cookies.
- Now, this is fun! If you need to flood your centers (which you do!), separate some icing into a clean bowl. Add just a few tiny drops of milk to this second batch, mixing gently until you hit the perfect sugar cookie glaze consistency.

I remember the first time I truly nailed the flood consistency—it was a total accident! I thought I’d ruined it by adding too much milk, but then I watched it pour off my spoon in a beautiful, slow ribbon, and when I tapped the bowl, that ribbon disappeared totally within about ten seconds. Wow! That was the moment I knew I had cracked the code for surface tension that dries rock solid. If you want more tips on this type of reliable icing, check out my deep dive on royal icing recipes!
Once you have your two consistencies ready, pipe that border using the stiff icing. Let those outlines “crust” for about 10 to 15 minutes. Seriously, don’t rush this step! Then, go back with your thinner flood icing and fill in the cookie centers. Gently tap that cookie sheet on the counter a few times to coax those air bubbles up to the surface. If you want color, now is the time to mix in your gel coloring until you have that vibrant look we love.
Achieving the Right Consistency for Outlining and Flooding
Consistency is absolutely everything here. For outlining, you want stiffness. If you lift your whisk or spatula, the icing should stand up like soft-serve ice cream for a second before slumping over. If it collapses instantly, add a tiny bit more powdered sugar! Remember, this border needs to hold the flood icing in place, so it has to be firm.
For flooding, we’re looking for the ’10-second rule.’ Once the icing is mixed—thin it with milk drop by drop—drizzle some off your whisk back into the bowl. If that drizzle mark sits on the surface and slowly melts back into the mixture over about ten seconds, you’ve got perfect flow. If it disappears instantly, it’s too thin; if it sits there forever, it’s too thick. This exact flow rate is what gives you the smooth, durable finish that we are counting on for our easy cookie icing that sets firm.
Drying Times and Setting Your Sugar Cookie Icing That Hardens
Okay, sweet friend, now we have reached the hardest part of this entire process: waiting! You can’t rush perfection, especially when you need that glorious finish where the icing sets firm. Because we used corn syrup and achieved that perfect sugar cookie glaze consistency, this icing dries much harder than a simple milk glaze, but it still needs time to fully cure.
You have to let the cookies dry uncovered at room temperature. I know it’s tempting to try and speed things up, but don’t tent them or put them in the oven! We need the air to pull that moisture out.
I always advise a minimum of 8 to 12 hours before you even dare touch them. Really, for any serious decorating where you might want to put a second layer of icing on top, or if you plan to stack them—which is the whole point of using a durable cookie frosting like this—you should let them sit for a full 24 hours. I’ve learned this the hard way when trying to sneak a peek too early!
Now, humidity is your arch-nemesis here. If it’s pouring rain outside or I’m baking in the deep summer humidity, drying time can easily double. If your icing still feels slightly soft after 24 hours, just leave them out for another half-day. When you gently tap the surface, it should sound solid, not soft or squishy. Trust the process; waiting for that full cure is what ensures your beautiful cookies are gift-ready and won’t stick together in the box!
Tips for Professional Cookie Icing Finish and Troubleshooting Sticky Cookie Icing
Even with our foolproof formula for that sugar cookie icing that hardens, things can sometimes go a little sideways. I’ve been there! When you’re aiming for that bakery style cookie icing, you need to know how to fix those little disasters. Don’t panic if your icing cracks or stays tacky—we can usually save it if you catch it fast enough. As you know from my efforts to nail this in my own kitchen, I’ve made every possible mistake!
Here are the quick fixes I rely on when things don’t dry perfectly:
- If your icing is cracking: This usually means your ratio of powdered sugar to liquid was too high, or you didn’t add enough corn syrup. If the crack is small, you can sometimes thin a tiny bit of fresh icing and let it gently settle into the crack, but honestly, it might just be easier to scrape that spot off and add a dot of fresh, wet icing on top once it’s dry. Cracking is often caused by the icing drying too quickly on the surface before the lower layers have set.
- Troubleshooting sticky cookie icing: This is the big one! If your cookies are still tacky after 24 hours, it’s almost always humidity indoors or the lack of corn syrup. If it’s just slightly tacky, put the tray uncovered in front of a gentle fan for an hour or two to expedite the surface dry. If it’s really wet, you might need to wait longer, but the corn syrup should have prevented this!
- Achieving a true gloss: The corn syrup helps here, but if you want that extra shine, ensure you are using whole milk instead of water, and always use clear vanilla extract. A slightly thinner flood consistency that flows well also tends to look glossier than a very stiff icing.
- For a professional, durable cookie frosting look: Make sure you tap those cookies well on the counter right after flooding. Getting those air bubbles out prevents little craters in the surface, leaving you with that smooth finish that looks like it came right from a high-end cookie shop.
Once you are 100% sure the icing is completely cured—literally hard as a rock—you can finally package them up! For gifting or storing, always place your decorated cookies in a single layer in an airtight container. If you must stack them, put a very thin piece of parchment paper between the layers. Keeping them out of high humidity areas will keep this great icing that dries hard perfect for weeks!
Serving Suggestions for Your Beautifully Decorated Cookies
Now that you have this magical sugar cookie icing that hardens, the real fun starts: showing them off! Because this glaze dries so firm, they truly are perfect for packaging up. For holiday exchanges, wrap individually in cellophane bags tied with a nice ribbon. They look so neat stacked up this way because they won’t smudge one bit!
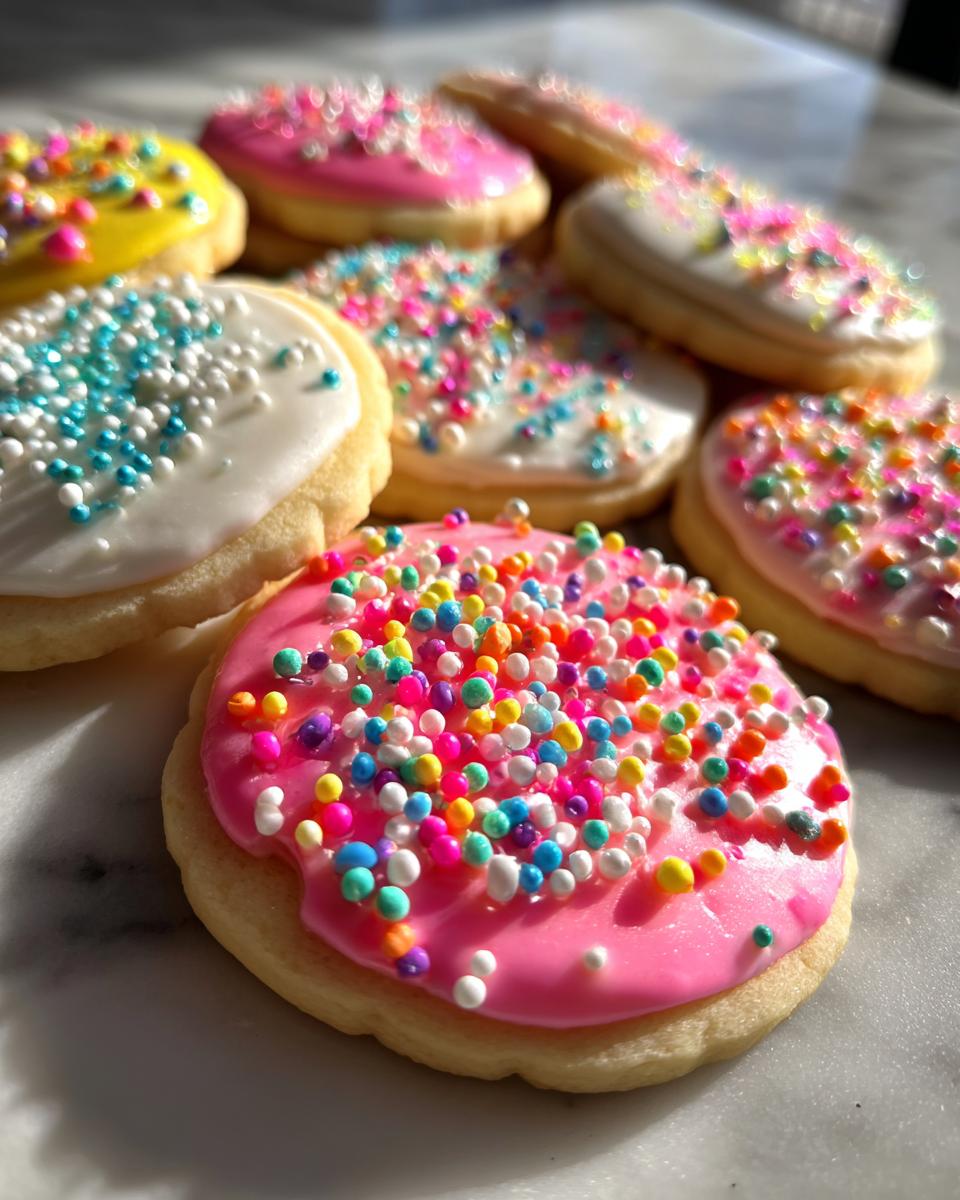
If you are just keeping them at home, arrange them nicely on a big platter. They look absolutely stunning clustered together—that glossy finish catches the light beautifully. Honestly, I love serving these alongside a fresh cup of coffee or, better yet, a lovely mug of my favorite homemade hot chocolate when the weather gets chilly. They are sweet, sturdy, and ready to impress!
Storage and Reheating Instructions for Durable Cookie Frosting
One of the best parts about mastering a sugar cookie icing that hardens is knowing these cookies last! Forget about buttercream frosting that melts if the kitchen gets too warm. Once your cookies are completely cured—and I mean truly rock hard—you want to seal in that freshness. Store your decorated cookies in a single layer, or carefully separated by parchment paper, inside a truly airtight container.
Keep them right on the counter at cool room temperature. They don’t need refrigeration, and honestly, refrigerating can sometimes cause condensation, which softens that lovely hard shell we worked so hard for!
And here’s the best news: You never, ever need to reheat hard glaze cookies. They are ready to eat straight out of the container, holding that fantastic, durable cookie frosting finish for days, sometimes even weeks!
Frequently Asked Questions About Sugar Cookie Icing That Hardens
I know you might still have some nagging doubts—it’s normal when you want that guaranteed hard set! Dealing with icing is tricky, which is why I wanted to nail down these last few key points. Getting the right look for gifting and stacking means getting the science right, too. Here are the questions I hear most often about making sure this sugar cookie icing that hardens works for everyone.
How long until I can stack cookies covered in this icing?
This is the most important question for someone making cookies for a holiday swap! While the icing feels semi-firm after maybe 6 or 8 hours, I absolutely beg you not to stack them before the 24-hour mark. If you need them sooner, place a tiny square of parchment paper between each cookie. That full day allows the corn syrup to fully lock in that hard, glossy sugar cookie glaze finish, guaranteeing no smudges!
Why is my icing cracking after it dries?
Ugh, cracking is the worst! It almost always happens for one of two reasons when trying to achieve an icing that dries hard. First, your icing was too thick when you applied it—if you forced it on without enough liquid, it cracks as it shrinks while drying. Second, and this is common, the icing was applied over cookies that were still warm from the oven. You must let your cookies cool completely first, or the trapped steam will cause fracturing. It shows you need that perfect sugar cookie glaze consistency!
Can I use water instead of milk in this recipe?
Yes, you definitely can! If you use water, you’ll still get a great hard finish, especially because of that little bit of corn syrup we added. I prefer milk because I think it adds a touch more richness and can sometimes help the surface look a bit smoother. But if you need to swap it out, water works just fine for making your easy cookie icing that sets firm. Just add it slowly!
I want pure white icing; do I really need clear vanilla extract?
If you are using plain vanilla extract, your icing will definitely look creamy, almost off-white. If you show up to a Christmas cookie party with stark, bright white decorations, they just look so much cleaner! Since we are aiming for that professional look, using clear vanilla extract helps you achieve that bright white shade that really pops when you add your gel colors on top. It’s a small detail but makes a huge difference for a stunning, bakery style cookie icing finish.
Estimated Nutritional Data for This Easy Cookie Icing That Sets Firm
If you’re like me, sometimes you just need to know the numbers, even if the cookies are going to be devoured in five minutes flat! Providing accurate nutritional estimates is part of what we do here at DelishCraze to make sure you have all the information you need to feel good about your home baking adventures. This recipe for easy cookie icing that sets firm is really just sugar and corn syrup, so it’s pretty straightforward!
Keep in mind that these figures are based directly on the ingredients used in the recipe provided and divided down to a serving size of about 1/4 cup of the mixed icing before it’s even spread on a cookie. Remember, different brands of powdered sugar or the exact amount of milk you use can make these values shift slightly! This is a helpful guide, not a lab result.
- Serving Size: 1/4 cup icing
- Calories: 180
- Sugar: 45g
- Sodium: 5mg
- Fat: 0g
- Saturated Fat: 0g
- Unsaturated Fat: 0g
- Trans Fat: 0g
- Carbohydrates: 45g
- Fiber: 0g
- Protein: 0g
- Cholesterol: 0mg
See? Mostly sweet goodness! If you are tracking major metrics, you can see the carbs are high, which is exactly what you expect from a delicious glaze that dries hard like this one. It’s the perfect topping for our simple sugar cookies!
PrintThe Ultimate Sugar Cookie Icing Recipe That Dries Hard & Glossy (Foolproof for Stacking)

Make sugar cookie icing that hardens completely with this simple recipe. You achieve a smooth, durable, and glossy finish perfect for decorating, stacking, and gifting your cut-out cookies.
- Prep Time: 10 min
- Cook Time: 0 min
- Total Time: 10 min active time plus 12 hours drying
- Yield: Coats approximately 2 dozen medium cookies 1x
- Category: Dessert
- Method: No-Bake Glazing
- Cuisine: American
- Diet: Vegetarian
Ingredients
- 2 cups powdered sugar, sifted
- 3 tablespoons milk (whole milk works best)
- 1 tablespoon light corn syrup
- 1 teaspoon vanilla extract
- Gel food coloring (optional)
Instructions
- In a medium bowl, combine the sifted powdered sugar and the vanilla extract.
- Add the light corn syrup and 2 tablespoons of the milk. Mix with a whisk or electric mixer on low speed until just combined.
- Continue mixing, adding the remaining milk one teaspoon at a time until the icing reaches a thick, smooth consistency suitable for outlining cookies. This is your ‘stiff’ consistency.
- If you need icing for flooding, separate a portion into a new bowl and add a few drops of milk at a time, mixing until it flows slowly off the whisk in a ribbon that disappears after about 10 seconds.
- Use the stiff icing to outline your sugar cookies. Let the outline set for 10 to 15 minutes.
- Use the thinner ‘flood’ icing to fill in the outlined areas. Gently tap the cookie sheet on the counter to release air bubbles.
- If using color, add gel coloring now and mix until uniform.
- Allow the cookies to dry uncovered at room temperature for at least 8 to 12 hours, or until the icing is completely hard to the touch. For best results, allow 24 hours before stacking or packaging.
Notes
- For a bright white icing, use clear vanilla extract instead of standard vanilla.
- If your icing is too thin for flooding, add a small amount of sifted powdered sugar. If it is too thick, add milk a half teaspoon at a time.
- This icing dries hard because of the corn syrup content, which prevents stickiness. Do not skip the corn syrup if you need a durable, stackable cookie topping.
- Store decorated cookies in an airtight container once the icing is fully cured.
Nutrition
- Serving Size: 1/4 cup icing
- Calories: 180
- Sugar: 45g
- Sodium: 5mg
- Fat: 0g
- Saturated Fat: 0g
- Unsaturated Fat: 0g
- Trans Fat: 0g
- Carbohydrates: 45g
- Fiber: 0g
- Protein: 0g
- Cholesterol: 0mg