
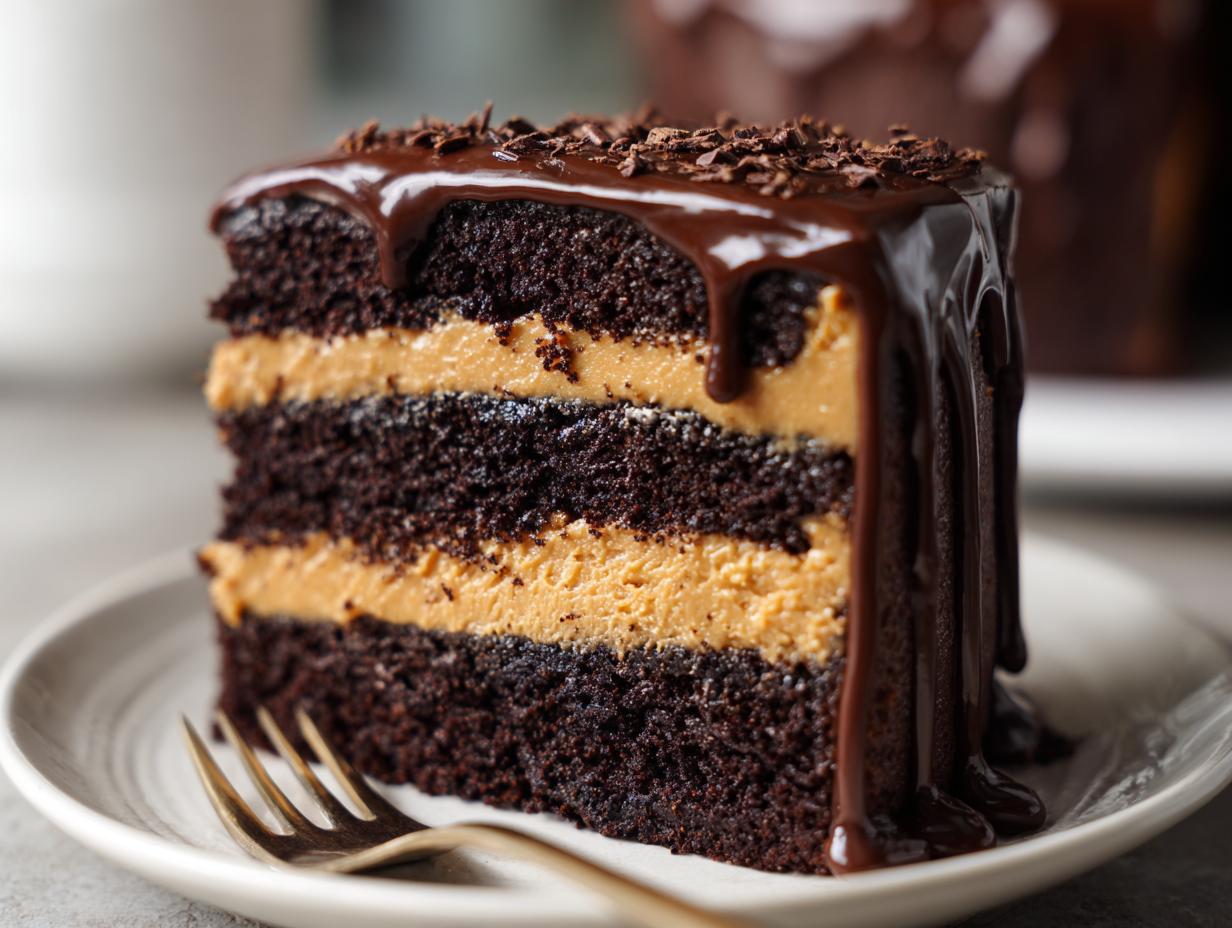
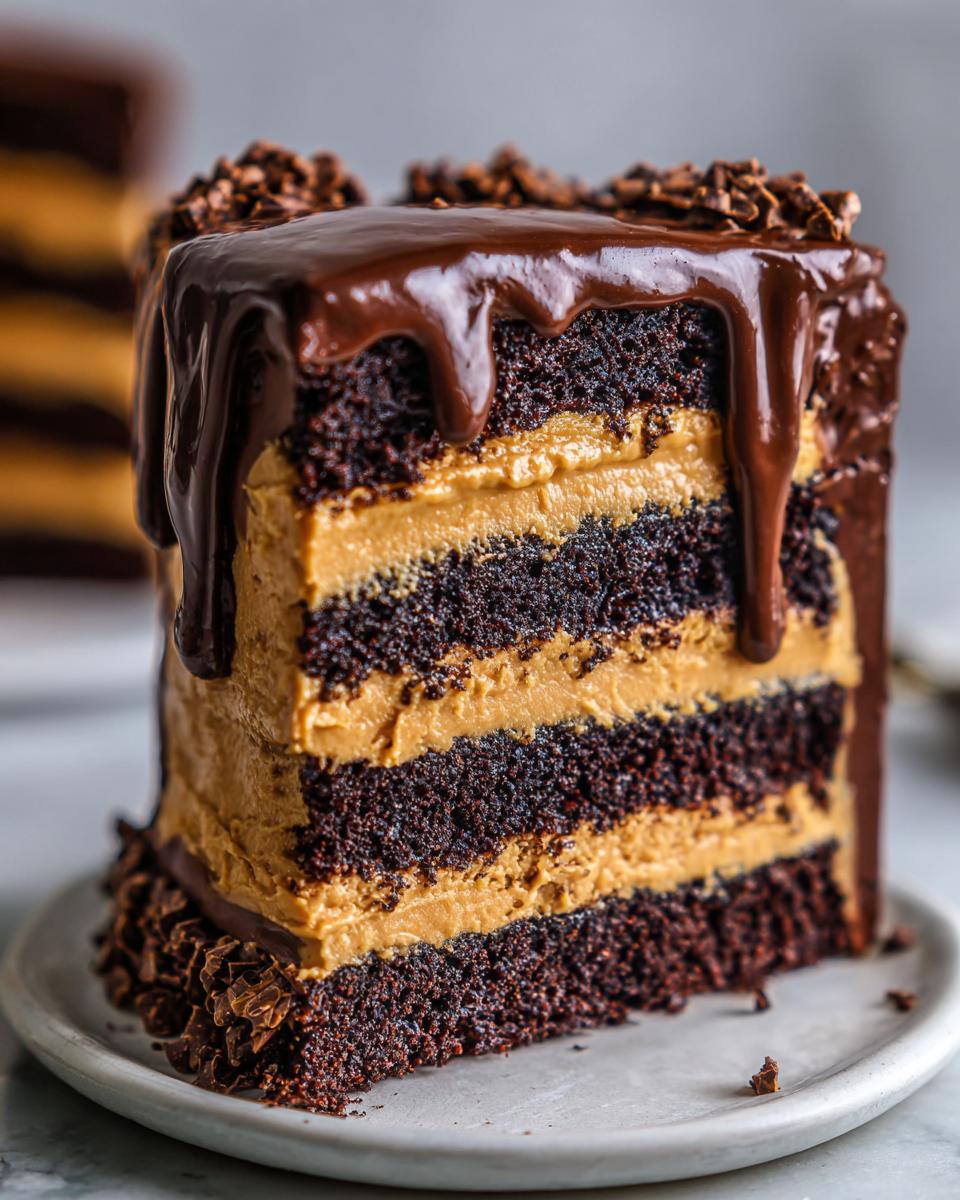
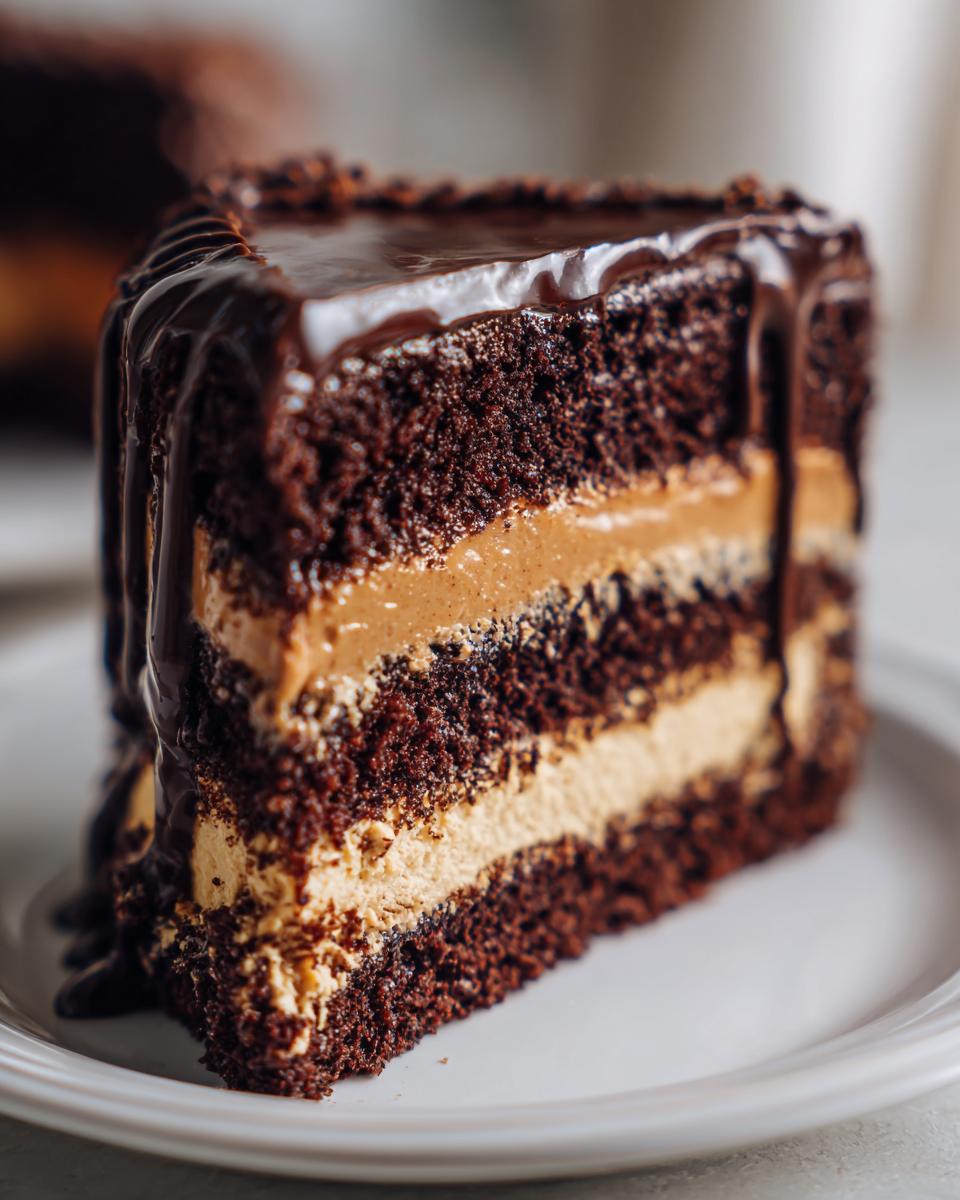
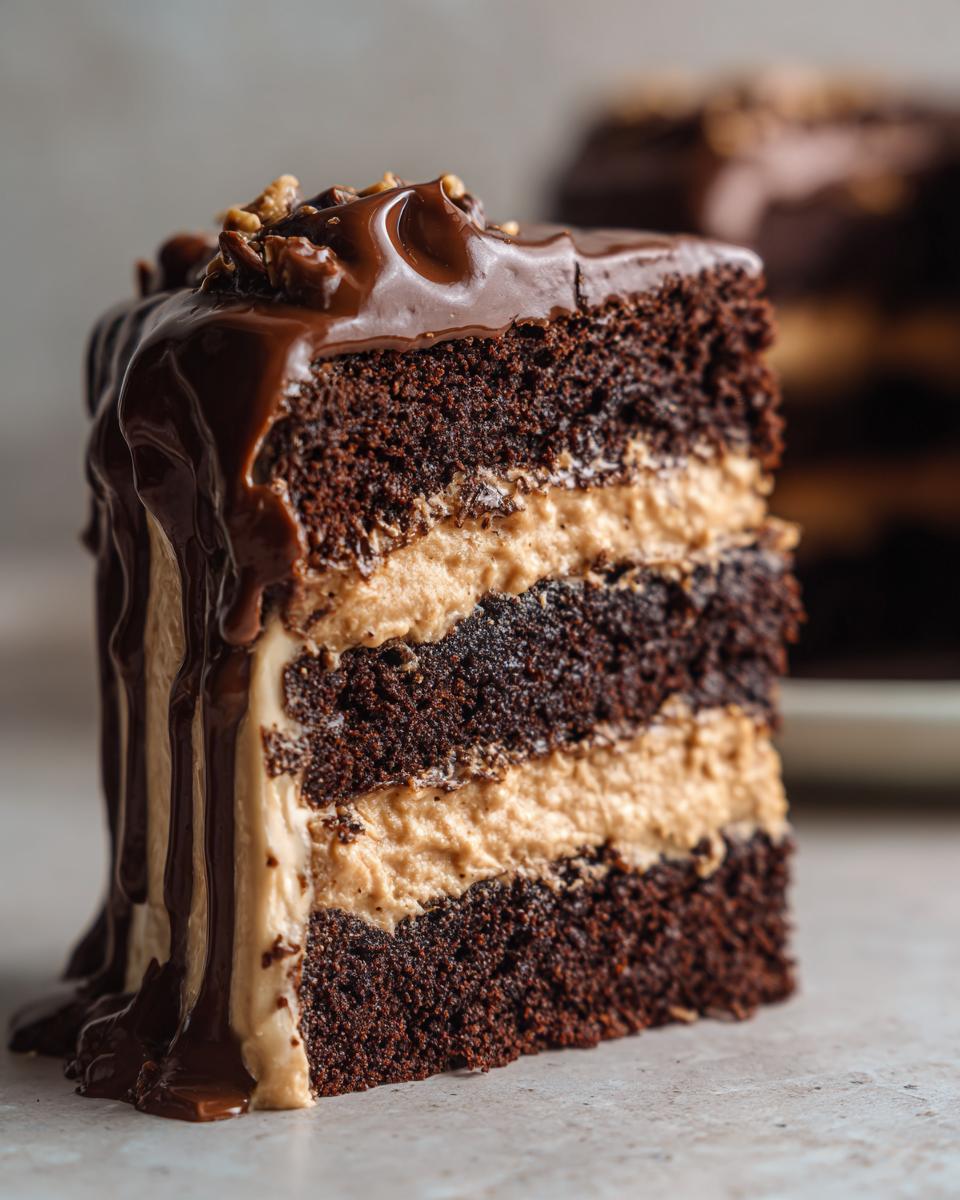
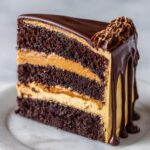
Sometimes, you just need a dessert that unapologetically screams celebration, you know? Forget those quiet, demure sweets; we’re talking about a showstopper. That’s exactly what this Extra Moist Chocolate Peanut Butter Layer Cake with Ganache is. It takes that classic chocolate peanut butter cake pairing—that sweet and salty magic—and turns it up to eleven. It sounds fancy, but trust me, Olivia Rosewood built this entire site on making big flavors feel simple for the home baker. You can read more about her philosophy on comfort and connection in the kitchen over at our story. This recipe is proof positive that you don’t need a professional pastry degree to create something truly decadent that everyone will remember.
- Why This Chocolate Peanut Butter Cake Is a Must-Bake
- Ingredients for the Ultimate Chocolate Peanut Butter Cake
- Step-by-Step Instructions for Your Chocolate Peanut Butter Cake
- Tips for a No-Fail Chocolate Peanut Butter Cake
- Making This Chocolate Peanut Butter Cake a Celebration Sheet Cake Variation
- Storage and Reheating Instructions for Your Rich Dessert Recipes
- Frequently Asked Questions About Chocolate Peanut Butter Cake
- Nutritional Estimates for This Indulgent Sweet to Bake
- Share Your Homemade Peanut Butter Dessert Creation
Why This Chocolate Peanut Butter Cake Is a Must-Bake
I know, I know, there are a million chocolate cake recipes out there. But this one? This one is different. It hits every single spot you look for when you want something truly indulgent. It’s my go-to when I need a cake that looks like I worked for three days, even if I didn’t!
- Unbeatable Moisture: We use a few tricks—like that hot coffee—that keep the chocolate layers impossibly moist, every single time.
- Rich Flavor Bomb: It’s the ultimate two flavor combination: deep, dark chocolate mixed with salty, creamy peanut butter. It’s pure magic.
- Celebration Ready: This stands tall and proud as a layer cake. It’s perfect for those big birthdays or when you need a guaranteed potluck hit.
- Decadent Layers: Between the cake, the fluffy frosting, and that glossy ganache, this hits every mark for a truly rich dessert recipe.
Ingredients for the Ultimate Chocolate Peanut Butter Cake
Whenever I bake this, I always lay out the ingredients first, like setting up my station for success. Having everything measured and ready makes the actual mixing fly by, which is essential when you want that perfect texture. Remember, high-quality cocoa powder and buttermilk are your secret weapons here; they are non-negotiable if you want that truly rich dessert recipe flavor and that famously soft crumb!
For the Decadent Chocolate Cake Layers
These are the dry things first, just whisk them up so there are no clumps hiding when you start mixing.
- 1 3/4 cups all-purpose flour
- 1 3/4 cups granulated sugar
- 3/4 cup unsweetened cocoa powder – make sure it’s the dark, good stuff!
- 1 1/2 teaspoons baking soda
- 3/4 teaspoon baking powder
- 3/4 teaspoon salt
Now for the wet bits, except the coffee for just a moment. The buttermilk is crucial for tenderness!
- 2 large eggs
- 1 cup buttermilk
- 1/2 cup vegetable oil
- 2 teaspoons vanilla extract
- 1 cup hot brewed coffee – Trust me, the heat helps bloom that cocoa powder, making the cake richer!
For the Creamy Peanut Butter Frosting
This is where all the creamy peanut butter frosting magic happens! Make sure that butter is nicely softened—not melted, just easily pressed—or your frosting will be lumpy, and we want smooth sailing here. If you nail this frosting, you might also love my recipe for perfect peanut butter cookies!
- 1 cup creamy peanut butter
- 1/2 cup unsalted butter, softened
- 3 cups powdered sugar (sifted, if you have time, but I usually just give it a good wiggle in the bag)
- 1/4 cup milk or heavy cream
For the Chocolate Ganache Topping and Garnish
This topping gives it that beautiful, glossy finish that makes the cake look so fancy. It’s so simple to make, too, and it really takes this cake over the top, especially if you add those candies everyone loves.
- 4 ounces semi-sweet chocolate, chopped
- 1/2 cup heavy cream
- Optional: Mini Reese’s Cups for topping—because why not turn this into a full-on Reese’s cup cake recipe?
Step-by-Step Instructions for Your Chocolate Peanut Butter Cake
Okay, let’s get baking! This whole process sounds like a lot, but honestly, once you have your ingredients ready, it moves surprisingly quickly. We’ll split this into three clear parts: getting those beautiful chocolate layers baked, whipping up that dreamy frosting, and then putting it all together. Just follow along, especially with the cooling times—that’s the secret to a clean finish, which is vital for a great layer cake tutorial. If you’re feeling inspired and want an easier bake next time, I have a fantastic apple crumb cake recipe that is just as cozy!
Baking the Moist Layer Cake Ideas
First things first: get that oven warmed up to 350°F (175°C). We need those two 9-inch pans greased and floured so nothing sticks! Grab your biggest bowl and whisk together all the dry stuff—flour, sugar, cocoa, baking soda, powder, and salt. Don’t skip the whisking! Then, in another bowl, mix your eggs, buttermilk, oil, and vanilla.
Now, bring them together! Pour the wet mixture into the dry and beat it on medium speed for about two minutes. This helps build the air for that perfect crumb structure. Here’s the game-changer: gently stir in that cup of hot brewed coffee by hand until the batter looks smooth. It will be thin, so don’t panic! Pour it evenly into your prepared pans and bake them for about 30 to 35 minutes. Check with a wooden pick; when it comes out clean, they are done! Let them cool for 10 minutes in the pan before flipping them onto a rack to cool completely. Don’t rush this part!
Creating the Fluffy Peanut Butter Filling
While those cakes are cooling—and they MUST be completely cool before frosting, seriously—we make the frosting. This is where we build that fluffy peanut butter filling. Use your mixer to beat the softened butter until it’s really smooth. Then, smash in your creamy peanut butter and mix until everything is totally combined and velvety.
Now comes the sugar. Add the powdered sugar gradually, alternating with a splash of milk or cream. Start slow so you don’t end up wearing it! Beat it until it’s light, fluffy, and perfectly spreadable. If it’s too stiff, add a tiny bit more milk, drop by drop, until it feels just right.
Assembling the Ultimate Chocolate Cake
Once those cakes are stone cold, it’s time for the fun part! Place your first layer on your serving platter—this is your foundation. Take about a third of that incredible peanut butter frosting and spread it evenly across the top. Place the second cake layer right on top. Now, use the rest of the frosting to generously cover the top and sides of the entire ultimate chocolate cake.
Next up: the ganache! Whisk that hot cream into your chopped chocolate until it’s glossy. Let it sit for just a minute or two to cool slightly—we want slow drips, not a chocolate flood! Gently pour the ganache over the center of the top layer and use a spatula to encourage it down the sides. If you want those perfect drips, make sure the ganache isn’t too hot. If you’re feeling extra, melt a few of those mini Reese’s Cups and drop them right on top while the ganache is setting. I love adding a piece of extra crunch to my cakes!
Tips for a No-Fail Chocolate Peanut Butter Cake
Even with a clear recipe, sometimes things go a little sideways in the kitchen, right? Don’t worry about that! I’ve picked up a few tricks over the years to make sure this no-fail chocolate cake turns out perfectly decadent every time. These little details are the result of baking this recipe dozens of times, and they really make the difference between a good cake and an *amazing* one.
When I’m aiming for that perfectly moist result, checking my ingredient temperatures is the first thing I do. Trust me on this one!
Room Temperature is Key for All Dairy
If you’re rushing, it’s easy to just grab buttermilk and eggs straight from the fridge. But for this cake, please, please let those ingredients sit out for about 30 minutes. Room temperature buttermilk and eggs emulsify much better with the fats in the batter. This means you get a smoother mix much faster, and the cake has a more uniform, tender crumb structure. Cold ingredients can actually cause the batter to seize up slightly, leading to denser spots.
Troubleshooting Your Ganache Drip
The glossy ganache topping is the showstopper, but it can be tricky if it’s too hot or too cool when you pour. If your chocolate drizzle is running right down the sides and pooling on the plate? Oops! That means your ganache is still too warm and thin. Just let it sit on the countertop for another 15 to 20 minutes and stir it gently every few minutes. You want it to be thick enough to coat the back of a spoon before it starts dripping down the side of the cake dramatically. If it gets too thick, just heat up a teaspoon of heavy cream separately and whisk that little bit in to loosen it back up.
Why You Can’t Substitute the Coffee
I often get asked if they can skip the hot coffee and just use hot water. My answer is always a firm, gentle, “Please don’t!” Replacing it with water won’t ruin your cake, but it certainly won’t make it the *ultimate* cake either. That hot coffee doesn’t make the cake taste like coffee; what it does is deepen the flavor profile of the cocoa powder, making the chocolate taste richer and darker than you thought possible. It’s the simple trick for achieving that signature deep flavor in our rich dessert recipes.
Making This Chocolate Peanut Butter Cake a Celebration Sheet Cake Variation
Now, I absolutely love the drama of a two-layer cake, but sometimes you need something easier to manage, especially for a big crowd like a potluck or a huge office party. That’s where turning this into a celebration sheet cake comes in handy! You get all that incredible flavor without the fuss of leveling and stacking layers. It’s the perfect way to scale up this classic chocolate peanut butter dessert.
The main difference here is the pan choice and, critically, the baking time. We’re ditching the round pans and moving everything into one big 9×13 inch baking dish. This makes serving slices a snap—no messy cutting required!
Switching to a 9×13 Inch Pan
Go ahead and prepare a 9×13 inch pan. I use the same greasing routine: butter and flour, or my homemade cake goop if I’m feeling fancy. Pour the entire batch of batter—yes, all of it—into the prepared pan. It will be thick, but don’t worry, that’s what we want.
Because the batter is now spread thinly across a wider area instead of being piled high in two layers, the heat hits it differently. This means the bake time is going to decrease quite a bit. You aren’t looking for 30 to 35 minutes anymore.
Adjusting the Baking Time
For a standard 9×13 inch pan using this recipe, you’ll want to start checking around the 25-minute mark. I usually set my timer for 25 minutes and then check it every five minutes after that. It typically finishes baking somewhere between 28 and 32 minutes total. Remember the test: if that wooden pick comes out with just a few moist crumbs clinging to it, it’s done. You want the center set, not jiggly at all, since sheet cakes can dry out faster than layer cakes.
Frosting the Sheet Cake Simply
This is the easiest part! Once the cake is completely, totally cool—and I mean stone cold—you can spread that gorgeous peanut butter frosting right over the top. Use an offset spatula to take care of the sides if you want; it’s much faster than trying to frost individual layers.
For the ganache, instead of trying to get those perfect drips down the sides, just pour it evenly over the top surface and spread it out. It will set into a thick, fudgy layer. This version is fantastic for bake sales because it travels so well! If you need more ideas for great bake sale favorites, check out this post on easy brunch bakes that are always popular.
Storage and Reheating Instructions for Your Rich Dessert Recipes
So you managed to make this incredible chocolate peanut butter cake, and now you have leftovers—lucky you! This is definitely one of those rich dessert recipes that tastes like it gets better the next day, but you have to store it correctly so that frosting stays perfect. Since we are dealing with a creamy, dairy-based peanut butter frosting, refrigeration is our best friend for safety and structure.
Storing Your Frosted Layer Cake
You must keep this cake chilled once it’s fully frosted, especially if you live anywhere warm! I always put the cake (covered loosely with a cardboard cake dome or just a large overturned bowl if I don’t have a proper container) into the refrigerator. Covering it loosely is key here; if you wrap it tightly in plastic wrap right away, you risk crushing that lovely frosting.
It keeps really beautifully in the fridge for about three or four days. The cake layers—thanks to that oil and coffee—stay wonderfully moist inside the cool environment. If you’re worried about the cake absorbing any funny fridge smells, wrap the base with a strip of parchment paper taped around the sides before going in for the seal.

Bringing It Back to Perfect Temperature
Okay, here is the most important step for serving leftovers: You absolutely cannot slice into this cake straight from the fridge! A cold cake is stiff, and the frosting becomes hard, which totally ruins the experience. You want that creamy peanut butter filling to be soft and luscious again.
About an hour, maybe an hour and a half, before you plan to serve it, pull the cake out of the refrigerator and set it on the counter. If your kitchen is piping hot, an hour might be enough. You want it to warm up just enough so that the frosting is soft to the touch but not melting or sliding off the sides. This gentle tempering brings back the full flavor, especially the taste of that rich peanut butter.
Freezing This Indulgent Sweet
Yes, you can totally freeze this! If you’re making it for a future event, bake the layers, let them cool completely, wrap each layer tightly in two layers of plastic wrap, and then wrap them again in foil. Freeze them like that for up to three months.
If you want to freeze it already frosted—which I sometimes do right after I pour the ganache, before it fully sets—you need to flash freeze it first. Stick the entire frosted cake in the freezer uncovered for about an hour until the frosting is rock hard. Then, cover it tightly with plastic wrap and foil. Thaw it overnight in the refrigerator, and remember to bring it out onto the counter for that final hour of warming up before serving!
Frequently Asked Questions About Chocolate Peanut Butter Cake
I get so many sweet notes asking about tweaking things in this recipe, so I thought I’d gather the most common questions right here. Whether you’re looking for a quick fix or just curious about the science behind the flavor, hopefully, these clear up any confusion for your next baking adventure!
What is the best peanut butter to use for the creamy peanut butter frosting?
When it comes to the creamy peanut butter frosting, you absolutely need to stick to commercial, shelf-stable peanut butter—the kind that comes in a jar and needs stirring. I always use Jif or Skippy! Natural peanut butter (the kind that separates) has too much oil and not enough stabilizers, which will make your frosting loose and greasy. We need that smooth, familiar base for that fluffy filling to hold its shape!
Is the hot coffee really required, or can I use plain hot water?
I hear this one all the time! Look, you *can* use hot water, and the cake will still bake up fine, making it a decent cake. But if you want this to be that seriously deep, almost fudgy, decadent chocolate cake recipe that I promised you? You need the coffee. It doesn’t make the cake taste like a latte, I promise. The heat blooms the cocoa powder, intensifying its darkness and flavor profile. It’s honestly the best way to ensure you get that deeply satisfying, rich dessert flavor!
Can I use this recipe for cupcakes instead of a layer cake?
Oh yes, these make the most amazing cupcakes! To make this an easy peanut butter dessert in small form, just divide the batter evenly among lined cupcake tins—you should get about 24 standard-sized ones. Cupcakes bake much faster than those two thick layers. Start checking them around 18 to 20 minutes at 350°F (175°C). Once they cool, you can pipe the peanut butter frosting high on top and skip the ganache for a quicker finish, or just drizzle a little on top. They are always a huge hit!
How do I ensure the layers don’t stick when baking?
This is a critical question when aiming for perfect moist layer cake ideas! Since this batter has a fair amount of oil, it can sometimes cling to the sides. My favorite trick is using what some call “cake goop” (equal parts oil, shortening, and flour smoothed together) spread on all surfaces of the pan. Once baked, let them cool in the pan for a good 10 minutes, but don’t let them sit longer than that. After 10 minutes, invert them onto your cooling rack to finish cooling completely. That brief time in the pan helps the initial structure set before you unmold them.
If you’re looking for more wonderful ideas for two-flavor desserts or other simple cake baking projects, stick around! I’m always sharing new ways to combine big flavors.
Nutritional Estimates for This Indulgent Sweet to Bake
Now, let’s talk fuel! I know we aren’t making this indulgent sweet to bake because we’re counting carbs, but it’s important to know what you’re digging into, right? When you bake something this rich and amazing, a little estimation goes a long way, especially if you’re serving this at a big party or gathering. You always want to give guests a little heads-up if they ask!
Keep in mind that since this is such a decadent chocolate peanut butter cake with frosting and ganache, the numbers reflect one generous slice cut from the full 12-serving yield. These figures are based on standard ingredient usage, so if you use extra peanut butter or load up on the Reese’s Cups, your numbers will definitely creep up—but oh, is it worth it!
Here are the estimated figures for one slice of this powerhouse dessert:
- Serving Size: 1 slice
- Calories: 550
- Sugar: 65g (Yes, that’s a lot of necessary deliciousness!)
- Fat: 32g
- Saturated Fat: 12g
- Carbohydrates: 68g
- Protein: 9g
- Cholesterol: 55mg
- Sodium: 350mg
Just a quick note for everyone planning their plates: Since we used whole eggs, buttermilk, and heavy cream for that luscious frosting and ganache, there is a fair bit of saturated fat here. That’s the trade-off for that incredible texture! If you’re looking for other great recipes that might be a bit lighter on the scales, you can sneak a peek at my collection of easy sweet snacks recipes collection, but trust me, this cake is built for indulgence.
Share Your Homemade Peanut Butter Dessert Creation
Phew! You’ve made it! Seriously, take a moment to admire that stunning chocolate peanut butter cake sitting on your counter. It looks like it belongs on a magazine cover, doesn’t it? This is the kind of signature bake that people talk about long after the party is over, and I know you nailed it.
Now that you’ve experienced the intense flavor of this classic chocolate peanut butter dessert, I really, really want to hear about it! Don’t keep that victory all to yourself. Your feedback helps everyone else who is nervous about tackling a layer cake feel confident, too.
Rate This Recipe and Leave a Comment
Did the ganache drip just right? Was the frosting as fluffy as you hoped? Pop right down into the comments section and give this recipe a star rating. Even better, tell me what occasion you baked this for! Was it a huge birthday bash? A quiet Tuesday night treat (because sometimes we deserve that)? I read every single comment, and I absolutely love seeing what you all think about whipping up such a rich dessert at home.
Show Me Your Chocolate Peanut Butter Masterpiece
If you snapped a picture of that towering beauty—maybe you even chopped up some extra Reese’s Cups to sprinkle on top—I want to see it! Tag me on social media or use the hashtag for this recipe so I can cheer you on. Seeing your successful bakes is genuinely the best part of my job here at DelishCraze. It proves that anyone can create magic with simple, good ingredients.
If you are already looking for your next baking challenge after conquering this masterpiece, you should absolutely check out how I make my homemade peanut butter cups. Once you master this cake, you’ll be ready for anything!
PrintExtra Moist Chocolate Peanut Butter Layer Cake with Ganache
Bake a rich, decadent chocolate layer cake filled with creamy peanut butter frosting and topped with glossy chocolate ganache. This recipe delivers a show-stopping dessert perfect for celebrations.
- Prep Time: 25 min
- Cook Time: 35 min
- Total Time: 60 min
- Yield: 12 servings 1x
- Category: Dessert
- Method: Baking
- Cuisine: American
- Diet: Vegetarian
Ingredients
- 1 3/4 cups all-purpose flour
- 1 3/4 cups granulated sugar
- 3/4 cup unsweetened cocoa powder
- 1 1/2 teaspoons baking soda
- 3/4 teaspoon baking powder
- 3/4 teaspoon salt
- 2 large eggs
- 1 cup buttermilk
- 1/2 cup vegetable oil
- 2 teaspoons vanilla extract
- 1 cup hot brewed coffee
- 1 cup creamy peanut butter (for frosting)
- 1/2 cup unsalted butter, softened (for frosting)
- 3 cups powdered sugar (for frosting)
- 1/4 cup milk or heavy cream (for frosting)
- 4 ounces semi-sweet chocolate (for ganache)
- 1/2 cup heavy cream (for ganache)
- Optional: Mini Reese’s Cups for topping
Instructions
- Preheat your oven to 350°F (175°C). Grease and flour two 9-inch round cake pans.
- In a large bowl, whisk together the flour, sugar, cocoa powder, baking soda, baking powder, and salt for the cake.
- Add the eggs, buttermilk, oil, and vanilla extract to the dry ingredients. Beat with an electric mixer on medium speed for two minutes.
- Carefully stir in the hot coffee until the batter is smooth. The batter will be thin.
- Divide the batter evenly between the prepared cake pans.
- Bake for 30 to 35 minutes, or until a wooden pick inserted into the center comes out clean.
- Let the cakes cool in the pans for 10 minutes before inverting them onto a wire rack to cool completely.
- To make the peanut butter frosting, beat the softened butter until creamy. Add the peanut butter and mix until combined.
- Gradually add the powdered sugar, alternating with the milk, beating until the frosting is smooth and fluffy.
- To make the ganache, place the chopped chocolate in a heatproof bowl. Heat the heavy cream until it just simmers. Pour the hot cream over the chocolate and let it sit for 5 minutes. Whisk until smooth.
- Once the cakes are completely cool, place one layer on a serving plate. Spread about one-third of the peanut butter frosting over the top.
- Place the second cake layer on top. Frost the top and sides of the entire cake with the remaining peanut butter frosting.
- Pour the slightly cooled ganache over the top of the cake, allowing it to drip down the sides.
- Garnish with chopped or whole mini Reese’s Cups, if desired. Chill briefly before slicing and serving.
Notes
- For an extra moist cake, use room temperature buttermilk and eggs.
- If you prefer a thicker ganache drip, let it cool longer before pouring.
- You can substitute a boxed chocolate cake mix for the dry ingredients if you want a quicker version.
Nutrition
- Serving Size: 1 slice
- Calories: 550
- Sugar: 65g
- Sodium: 350mg
- Fat: 32g
- Saturated Fat: 12g
- Unsaturated Fat: 18g
- Trans Fat: 0.5g
- Carbohydrates: 68g
- Fiber: 3g
- Protein: 9g
- Cholesterol: 55mg