
Oh my goodness, let’s talk about desserts that just scream happy memories! Sometimes you need something rich and decadent, but you definitely don’t want to turn on the oven in the middle of summer, right? That’s where the magic of a good, classic, no-bake treat comes in. Forget fussy recipes; today, we’re diving headfirst into what I truly believe is the Ultimate No Bake Oreo Dirt Cake with Gummy Worms!
This isn’t just another layered pudding; this is THE dirt cake recipe you’ll be asked to bring to every single potluck from now on. It screams fun, it’s unbelievably creamy, and it satisfies that craving for something nostalgic. That’s actually what Olivia Rosewood focused on when she built DelishCraze—she wanted those simple, crowd-pleasing American classics that weave right into your family gatherings. You can read more about her amazing philosophy over at the About Us page. Trust me, whipping up this simple, yet spectacular, dirt cake recipe is going to make you look like a dessert genius without breaking a sweat.
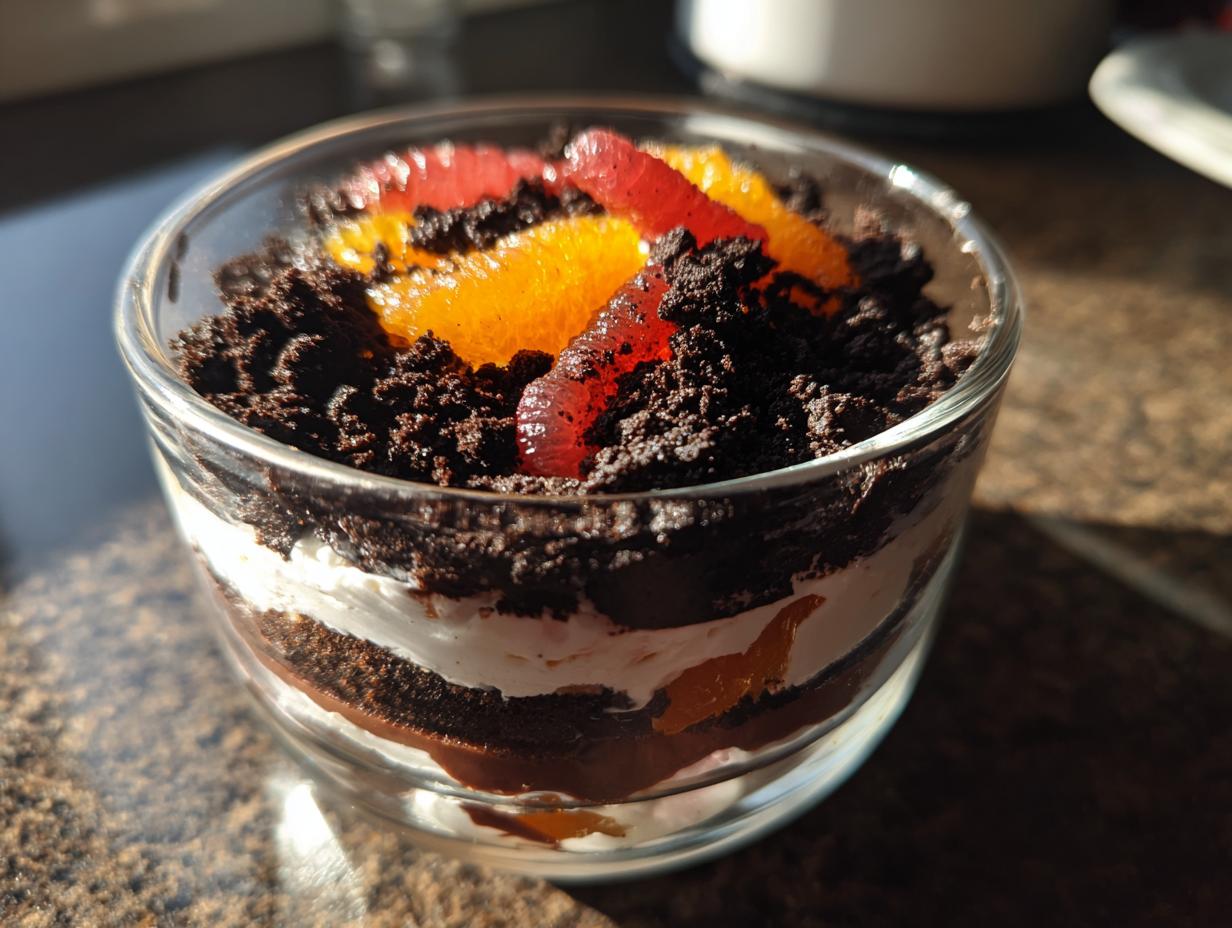
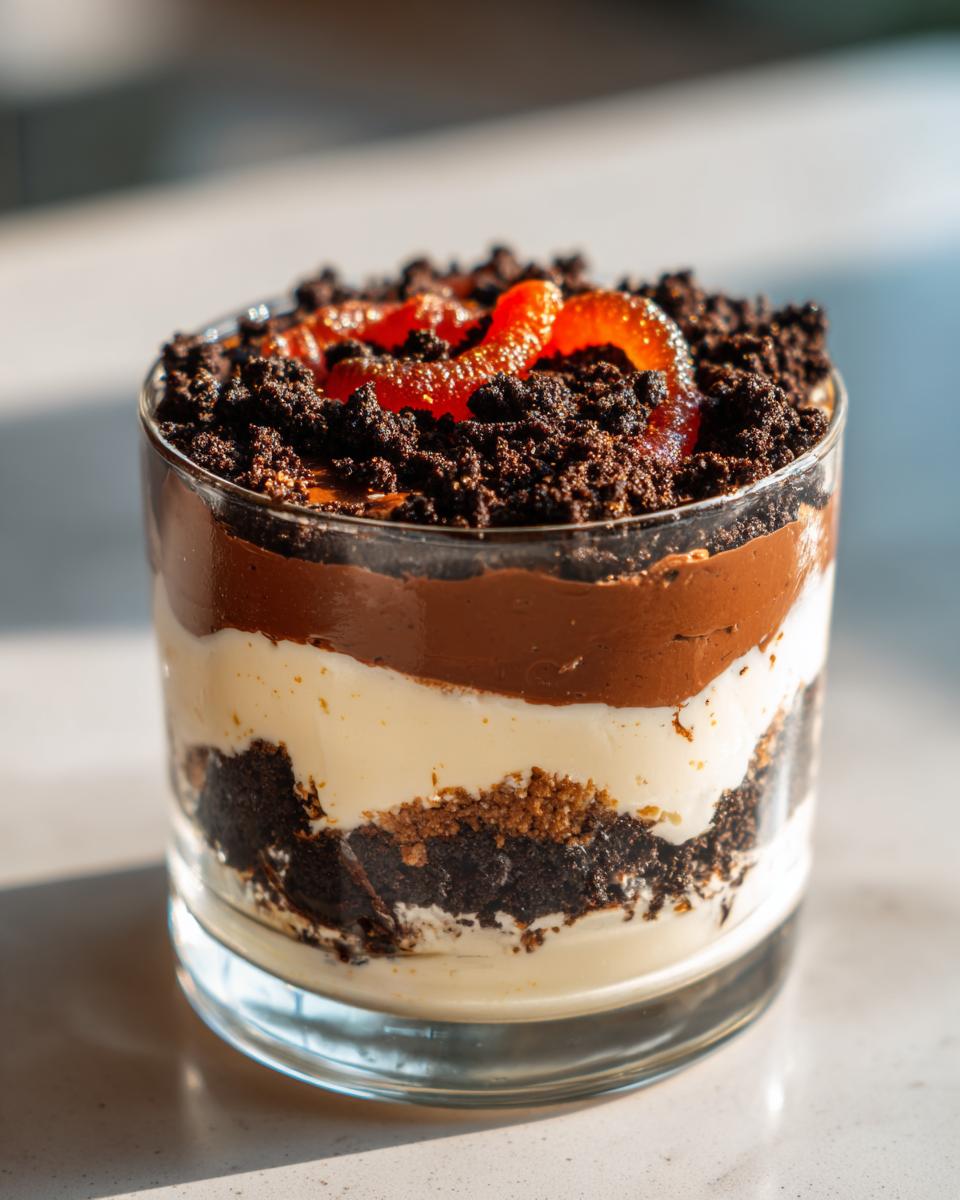
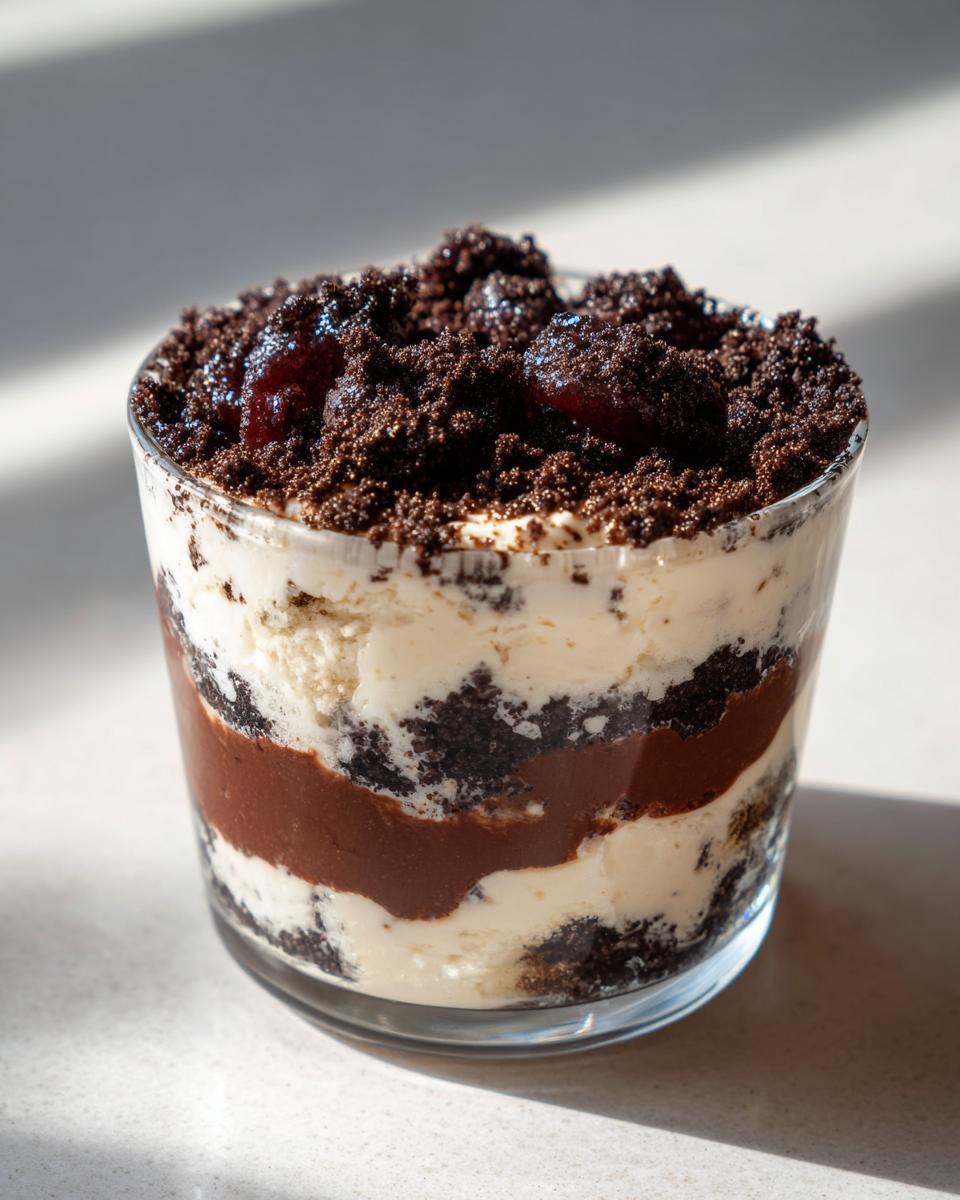
It’s layered perfection—rich chocolate pudding mixed into a cheesecake-like base, all buried under mountains of dark Oreo crumbs. It’s surprisingly easy, and honestly, the hardest part will be keeping the kids (or maybe just me!) from eating all the topping before it gets to the table!
- Why This Ultimate No Bake Oreo Dirt Cake Recipe Works (Easy Dirt Cake Dessert)
- Gathering Ingredients for Your Creamy Dirt Pudding
- Step-by-Step Instructions for the Best Dirt Cake Recipe
- Tips for the Perfect Layered Oreo Dessert Presentation
- Making Ahead: Storing Your Dirt Cake with Gummy Worms
- Troubleshooting Common Dirt Cake Issues
- Frequently Asked Questions About This Easy Dirt Cake Dessert
- Estimated Nutritional Data for This Chocolate Pudding Dessert
- Share Your Ultimate Dirt Cake Creations
Why This Ultimate No Bake Oreo Dirt Cake Recipe Works (Easy Dirt Cake Dessert)
You want to know why this specific Oreo Dirt Cake Recipe became my go-to? It’s all about that texture, honestly. We aren’t messing around with eggs or baking time here; this is peak No Bake Dirt Cake performance! When I was developing this, I noticed so many versions out there were either too runny or basically brick-hard once chilled. The secret, Olivia found out, is the ratio between the cream cheese mixture and the instant pudding.
Using that perfect amount of softened cream cheese and butter mixed with the powdered sugar creates a sturdy, fluffy base. When you gently fold in the thickened chocolate pudding, you get this unbelievably rich and Creamy Dirt Pudding that holds its layers so beautifully. It’s the definition of a Simple Make Ahead Dessert.
- It’s completely no-bake—zero oven time required!
- The texture is rich, creamy, and perfectly balanced; never grainy.
- It’s easily one of the best Easy Dirt Cake Dessert options for busy weeks.
- It tastes even better the next day!
If you are looking for more ridiculously easy things to whip up when you don’t want to stress in the kitchen, you should check out Collection of Easy Sweet Snacks Recipes!
Perfect for Parties and Potlucks (Potluck Dessert Ideas)
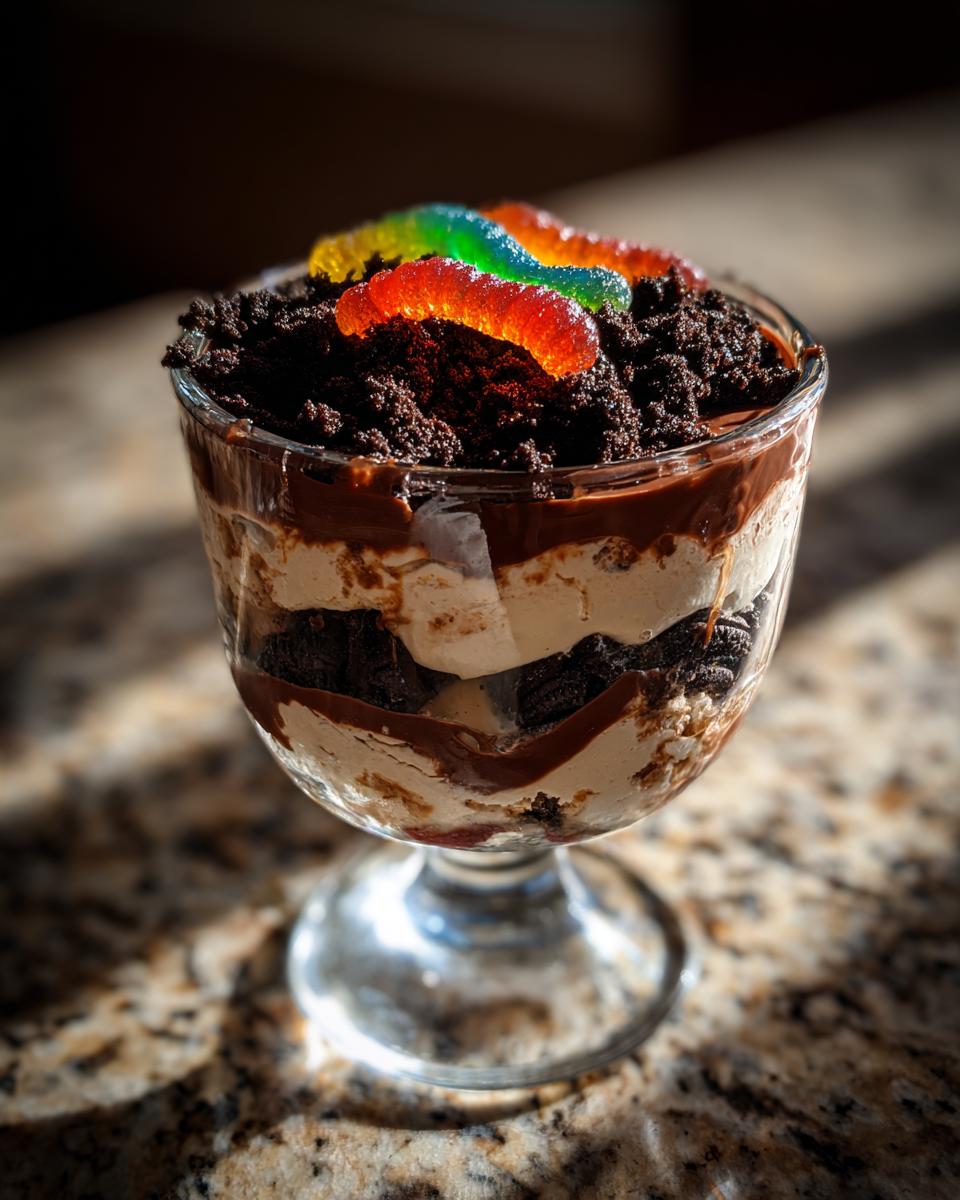
This dessert is a powerhouse when you’re bringing something to share. Because it chills so well, you can make it the day before a big event, wrap it up tight, and boom—dessert solved! It travels like a dream, whether you put it in a big trifle dish or use those cute individual cups I love. And let’s be real, who doesn’t want to find a dessert that has hidden gummy worms peeking out? It’s an instant winner for kids and adults alike; just an awesome Fun Party Treat!
Gathering Ingredients for Your Creamy Dirt Pudding
Okay, let’s get our shopping list ready for this glorious mess! The beauty of making this dirt cake is that you probably have most of this stuff already chilling in your fridge or pantry. Seriously, there’s nothing tricky about these ingredients, which is exactly what makes it such a reliable, Easy Dirt Cake Dessert. We are building this dessert from simple comforts, so grab your stand mixer and let’s make sure everything gets prepped right.
Here is what you need for about 12 servings of this spectacular treat. Remember, the cream cheese and butter absolutely must be softened—don’t even try to cheat this step! Also, make sure that large container of whipped topping is fully thawed before you start mixing.
- 1 package (8 ounces) cream cheese, softened
- 1 cup (2 sticks) unsalted butter, softened
- 1 cup powdered sugar
- 1 container (12 ounces) frozen whipped topping, thawed, divided
- 2 packages (3.9 ounces each) instant chocolate pudding mix
- 3 cups cold milk
- 1 package (14.3 ounces) Oreo cookies, finely crushed (about 35 cookies)
- 1 bag gummy worms (for decoration)
Ingredient Notes and Substitutions for Your dirt cake
A couple of quick notes to make sure this turns out perfectly, because details matter even in a dessert this fun! First, you MUST use the *instant* chocolate pudding mix here. The kind you cook on the stove is way too gelatinous after it sets, and it won’t blend right into our creamy base. Keep it instant!
Also, about those Oreos—we need “dirt,” not chunks. If you have a food processor, use that for quick, fine crumbs. If you don’t, toss the cookies into a heavy-duty zip-top bag, seal it up tight (press out the air!), and go to town with a rolling pin or the bottom of a heavy saucepan. Feel free to give those cookies a good, satisfying smash! And use the full-fat cream cheese; the lower-fat stuff sometimes doesn’t hold up as well when it’s chilling for hours.
Step-by-Step Instructions for the Best Dirt Cake Recipe
Okay, here’s where the fun really starts! This is the process I’ve used dozens of times now, and it guarantees that perfect, cloud-like texture inside the dirt. Don’t rush these steps, especially when we start combining things, because we want to trap all that air in our creamy mixture. Trust me, taking your time here really sets this No Bake Dirt Cake apart from the sad, runny versions out there. If you love no-bake desserts that set up perfectly, you might also want to check out my recipe for no-bake pumpkin cheesecake balls!
Preparing the Creamy Filling and Crushing the Oreo Dirt
First things first, get that cream cheese, butter, and powdered sugar whipped together in a large bowl until it’s totally smooth. We want fluffy, light, and completely homogenous—no lumps allowed! Then, you’re going to gently fold in half of your thawed whipped topping. I mean *fold*, not beat! We are keeping the air in there, which is key for that Creamy Dirt Pudding texture.
Next, set that aside. In a completely different bowl, grab your instant chocolate pudding mix and whisk it vigorously with the 3 cups of very cold milk. You need to whisk this for a full two minutes—no less! It will thicken up fast, but you need that full mixing time to activate the starches properly. Once it’s thick, gently fold that into your cream cheese mixture until it’s just blended. Then, crush up those Oreos like we talked about!
Layering and Chilling Your No Bake Dirt Cake
Now we build! Grab your trifle dish or your individual cups. Start by spreading a nice, even layer of those crushed Oreos on the bottom. That’s our foundational layer of “earth.” On top of that, spread half of the creamy chocolate mixture we just made. Now, add a second layer of Oreos.
Top that second dirt layer with the rest of your creamy mixture. For the grand finale, you want to completely cover the top with the remaining crushed Oreos. This final ‘dirt’ layer needs time to set up before anyone touches it. Cover the whole thing up carefully and get it into the refrigerator. You need a minimum of four hours, but honestly, if you can let this sit overnight, the layers firm up so beautifully and you get the cleanest slices. If you need ideas for serving it in smaller portions, check out these tips for making cute dirt cake cups!
Tips for the Perfect Layered Oreo Dessert Presentation
Listen, we did the hard work making this Layered Oreo Dessert taste incredible, but half the fun of a dirt cake is how silly and fun it looks! Presentation is everything, especially when gummy worms are involved. Whether you use a big, beautiful trifle dish to show off those distinct layers, or you opt for individual servings, a little attention to detail makes this dessert truly pop.
I personally love making individual servings in clear plastic cups—they are so handy for parties! If you use cups, you can really stack those layers up high, and everyone gets their perfect cookie-to-cream ratio in every bite. We want that visual wow factor, right? If you’re thinking about layering things up like this, you should definitely see how I layer my Slutty Brownies; the concept is similar!
Now, the worms! This is where you can really lean into the fun. Don’t just toss them on top! I like to stick them half in and half out of the top layer of crushed Oreo “dirt.” Make it look like they are actually crawling out of the ground! If you’re serving a crowd, try to intersperse them nicely—some heading up, some wiggling sideways.
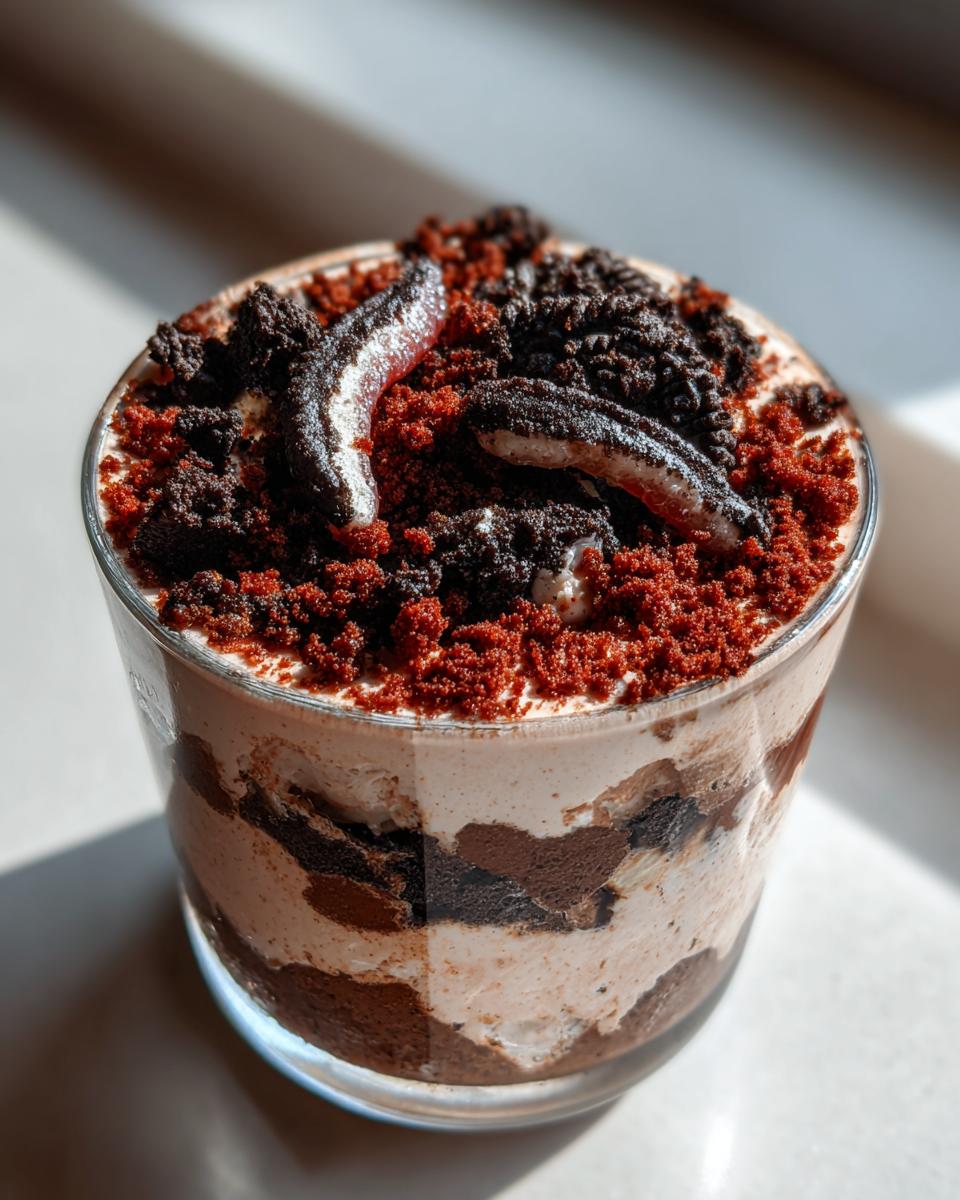
It also helps to reserve a few nice, larger chunks of Oreo—not the ultra-fine ‘dirt’—to sprinkle across the very top. That little bit of contrast in texture on the surface makes it look even more enticing. If you’re serving it in a big dish, use a spatula to create little hills and valleys in that final layer of crumbs; it makes the worms look even more realistic! For more great ideas on making fun desserts, take a peek at what they are doing over at The Bite Stuff!
Making Ahead: Storing Your Dirt Cake with Gummy Worms
One of the absolute best things about this No Bake Dirt Cake is that it’s designed to be a make-ahead champion! You know how much I love a Simple Make Ahead Dessert, because who wants to rush assembly when guests are walking in the door? You absolutely should chill this dessert for the full four hours minimum, but honestly, it really improves overnight.
When stored properly, this creamy dream lasts beautifully in the refrigerator for about three to four days. The layers stay nice and firm, and trust me, the flavors actually deepen a little bit as the pudding and cream cheese mixture marry the Oreo crumbs. Just make sure you cover that dish really well—plastic wrap pressed right onto the surface works wonders to keep things fresh and stop it from absorbing any weird fridge smells!
Now, here is the most important tip regarding the worms: Do NOT put the gummy worms in hours ahead of time! If you do, they get soft, sticky, and frankly, a little gross looking after sitting in that moisture for too long. Wait until you are ready to serve or bring the dessert out to the party before you press those wiggly friends into the top layer of dirt. Save the decoration until the very end! If you’re making another make-ahead favorite, like Boston Cream Pie Fudge, this rule definitely applies there too—decorate last!
Troubleshooting Common Dirt Cake Issues
Even with an easy, no-bake recipe like this, things can sometimes go a little sideways, right? Don’t panic if your dirt cake isn’t behaving exactly as planned. This always happens, even to folks like Olivia who spend countless hours testing these recipes! The good news is that most fixes are super simple once you know what went wrong. I’ve definitely had my share of slightly runny layers, so let’s walk through what to do when this decadent dessert throws you a curveball.
The biggest potential hiccup I see people run into is when that chocolate pudding just won’t firm up. If you whisked the instant pudding mix and milk for the full two minutes and it’s still soup when you fold it in, I suspect you used the wrong type of milk or maybe didn’t whisk hard enough. Remember, instant pudding needs that vigorous initial whipping to activate. If you used milk that wasn’t ice-cold, that might be the culprit too! If it’s too runny, just mix a tiny extra spoonful of pudding mix directly into the runny section and whisk lightly before folding it into the cream cheese base. It should firm up enough once chilled.
Now, let’s talk about the layers bleeding together. If you cut into your beautiful Layered Oreo Dessert and it looks more like mud than distinct layers, nine times out of ten, it needed more chill time. This recipe relies heavily on that cold time for the fat in the cream cheese and butter mixtures to solidify around the pudding. If you rush it, everything merges. If it’s too soon, just pop the whole thing back in the fridge! Patience is truly the secret ingredient here.
Finally, maybe your cream mixture was too soft when you started. If your cream cheese and butter weren’t softened *just right* (soft enough to dent, but not greasy or melty), your base won’t hold its structure properly, making the whole thing collapse a bit. If you catch this early before folding in the pudding, put the bowl in the fridge for about 15 minutes to let that fat firm up slightly before continuing. A little chill can fix almost any textural issue!
Frequently Asked Questions About This Easy Dirt Cake Dessert
I always get so many questions about this dirt cake because everyone wants to make sure they get that perfect creamy texture! Hosting a party and wondering about adjustments is totally normal, so I gathered the things I hear most often right here for you. You’ll find that this recipe is wonderfully adaptable, but a few core rules should always stay the same!
Can I use different cookies instead of Oreos?
Oh, that’s a good question! While this is absolutely an Oreo Dirt Cake Recipe at heart (and the cream filling between the cookies is crucial for flavor!), you *can* substitute if you absolutely have to. If you use chocolate wafer cookies or even some dark chocolate graham crackers, it will work. But—and this is important—you lose that signature “black dirt” color and flavor that makes it so iconic. I really recommend sticking to the classic sandwich cookies for the true experience. If you love cookie-based desserts, you might enjoy my recipe for Cinnamon Roll Cookies!
Do I have to use instant chocolate pudding mix? I prefer cook-and-serve!
No, no, no! Please stick to the instant pudding mix for this. It’s not negotiable for this layering method! The cook-and-serve pudding is designed to set up very firm, almost chewy, when cooked and cooled. We need the lighter, moussey set that the instant mix provides when whisked with cold milk in just two minutes. If you use the cook-and-serve kind, your layers will either be too hard or won’t blend correctly with the cream cheese mixture, resulting in a messy disaster instead of a beautiful No Bake Dirt Cake.
Can I adapt this recipe for Halloween or another holiday (Holiday Dirt Cake)?
Totally! This is such a fantastic Holiday Dirt Cake because it’s so versatile. For Halloween, you already know you add the gummy worms. But for Christmas, instead of worms, try crushing some peppermint Oreos for the top layer, or dust it with a bit of powdered sugar and strategically stick in some small red and green M&Ms to look like decorative sprinkles poking out of the ground. Since it’s a Simple Make Ahead Dessert, it reduces stress on big holiday cooking days!
How do I make individual dirt cake cups instead of one big dish?
This is one of my favorite ways to serve this Easy Dirt Cake Dessert, especially if you’re worried about transport or serving messy slices! You just follow the exact layering instructions in the recipe—Oreo, cream, Oreo, cream, Oreo topping—but use clear, single-serving cups, jars, or even plastic tumblers. This lets everyone see those gorgeous layers. Just make sure you use the very cold milk and whisk the pudding for a full two minutes, as the pudding thickens a bit slower when spread into thinner layers versus one big dish. Before serving, you can just stick one or two little worms right into each cup. For more serving ideas, you can look at how others make individual cups over at Joy Food Sunshine!
Estimated Nutritional Data for This Chocolate Pudding Dessert
I try not to think about the numbers too much when I’m making something as purely joyful as this dirt cake, but I know some of you are curious! Since this is a super rich, decadent treat made with cream cheese, butter, and all those wonderful Oreos, it definitely falls on the indulgent side. This is our special occasion Chocolate Pudding Dessert, after all!
Based on the ingredients listed here, here is the general nutritional breakdown per serving (this recipe makes 12 servings):
- Calories: 450
- Fat: 28g
- Carbohydrates: 48g
- Protein: 5g
- Sugar: 45g
Now, please remember this is just an estimate! The exact numbers can shift quite a bit depending on the brand of cream cheese you grab, the type of milk you use (whole vs. 2%), and even how large your gummy worms are! This is a homemade classic, so we embrace the estimates and focus on the smile it brings!
Share Your Ultimate Dirt Cake Creations
Alright, you have successfully made the best dirt cake in your neighborhood (I just know it!). Now, the fun part: showing it off! When you make a dessert this nostalgic and this much fun, you have to tell me how it went. Did you use a massive trifle dish, or did you go for those cute individual cups? I want to see the chaos!
Please, whenever you share photos of your masterpiece on social media, tag us! We absolutely love seeing your glorious, crumb-covered creations. Did you stick to the classic gummy worms, or did you get really creative with your decorations? Did you sneak an extra layer of cream in there when nobody was looking? (I won’t tell, promise!)
And if you tried this recipe and it became your new favorite staple—which I’m betting it will—please hit that star rating right below this section! Five stars are what we aim for when we make something this perfectly easy and delicious. Your feedback really helps other folks find this awesome No Bake Dirt Cake!
If you need another delightfully simple idea for next time you’re entertaining, I always love whipping up my recipe for the easy 4-ingredient garlic butter spread. It’s savory instead of sweet, but just as guaranteed to please a crowd!
PrintUltimate No Bake Oreo Dirt Cake with Gummy Worms

Make this easy, no-bake Oreo Dirt Cake. It features creamy layers, crushed Oreos for ‘dirt,’ and is a perfect crowd-pleasing dessert for parties or potlucks.
- Prep Time: 25 min
- Cook Time: 0 min
- Total Time: 4 hr 25 min
- Yield: 12 servings 1x
- Category: Dessert
- Method: No-Bake
- Cuisine: American
- Diet: Vegetarian
Ingredients
- 1 package (8 ounces) cream cheese, softened
- 1 cup (2 sticks) unsalted butter, softened
- 1 cup powdered sugar
- 1 container (12 ounces) frozen whipped topping, thawed, divided
- 2 packages (3.9 ounces each) instant chocolate pudding mix
- 3 cups cold milk
- 1 package (14.3 ounces) Oreo cookies, finely crushed (about 35 cookies)
- 1 bag gummy worms (for decoration)
Instructions
- In a large bowl, beat the softened cream cheese, softened butter, and powdered sugar together until the mixture is smooth and creamy.
- Fold in half of the thawed whipped topping into the cream cheese mixture. Set aside.
- In a separate bowl, whisk together the instant chocolate pudding mix and the cold milk for about two minutes until the mixture thickens.
- Gently fold the thickened chocolate pudding into the cream cheese mixture until just combined. Do not overmix.
- Crush the Oreo cookies until they resemble fine dirt. You can do this in a food processor or by placing them in a sealed bag and crushing them with a rolling pin.
- In a large trifle dish or individual serving cups, begin layering the ingredients. Start with a layer of crushed Oreos on the bottom.
- Top the Oreo layer with half of the creamy chocolate mixture.
- Add another layer of crushed Oreos over the cream mixture.
- Spread the remaining half of the chocolate cream mixture on top of the second Oreo layer.
- Top the entire dessert with the remaining crushed Oreos to create the ‘dirt’ layer.
- Cover the dish and chill in the refrigerator for at least four hours, or preferably overnight, to allow the layers to set.
- Before serving, press the gummy worms into the top layer of ‘dirt’ for decoration.
Notes
- For individual servings, use clear plastic cups to show off the layers.
- If you do not have time to soften the butter and cream cheese, you can use an electric mixer on medium speed to speed up the process.
- Reserve a few whole or half Oreos to place on top for extra texture contrast.
Nutrition
- Serving Size: 1 serving
- Calories: 450
- Sugar: 45
- Sodium: 350
- Fat: 28
- Saturated Fat: 15
- Unsaturated Fat: 13
- Trans Fat: 0.5
- Carbohydrates: 48
- Fiber: 2
- Protein: 5
- Cholesterol: 45