
Oh, that perfect snap, the gooey middle, the chocolate coating—who can resist a good candy bar? For years, I wished I could capture that magic in one bite without opening a wrapper. So, I put my head down, dusted off my mixer, and developed what I now call the Easy Homemade Soft & Chewy Twix Cookies with Layered Caramel and Chocolate. Trust me, these twix cookies are a game-changer! Reclaiming simple joys in my kitchen means turning nostalgic treats into simple, achievable baking projects. This recipe tastes exactly like the real thing, but you get to make it yourself. It’s special, but honestly, it’s so easy, you’ll be making it every week.
- Why You Will Love These Easy Twix Cookies
- Essential Ingredients for Perfect Twix Cookies
- Step-by-Step Instructions for Homemade Twix Recipe
- Tips for Success with Twix Cookies
- Variations for Your Twix Inspired Desserts
- Storing and Reheating Your Chewy Caramel Treats
- Frequently Asked Questions About Twix Cookies
- Nutritional Estimate for Twix Cookies
- Share Your Ultimate Dessert Cookies Experience
Why You Will Love These Easy Twix Cookies
Honestly, for a cookie that tastes this decadent, they are ridiculously simple. You’ll be happy you tried this recipe, trust me!
- They taste unbelievably like the real candy bar—it’s the perfect copycat candy bar cookies experience!
- Super fast prep time! This is one of those fantastic quick dessert recipes you need.
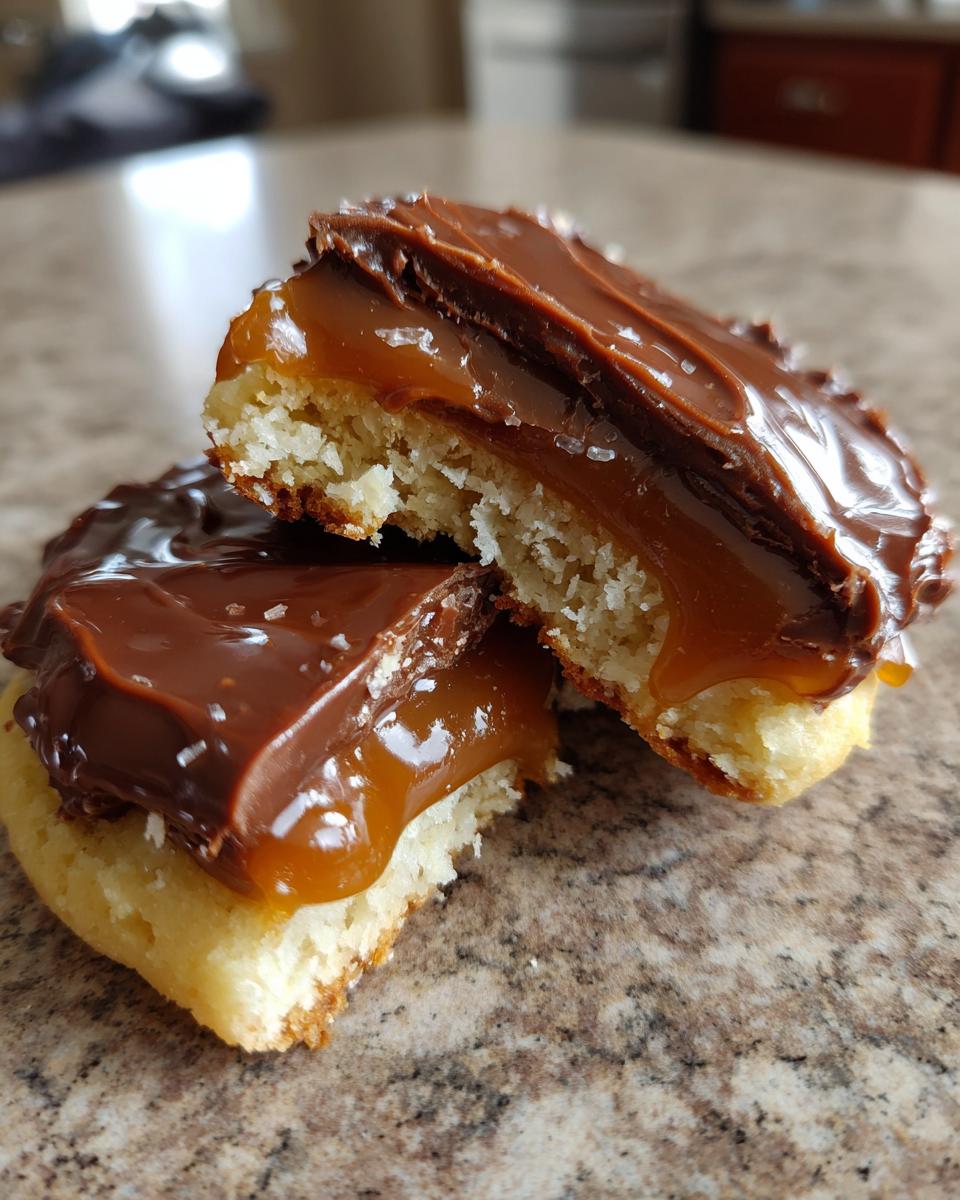
- We use a delightfully soft, buttery cookie base that melts in your mouth.
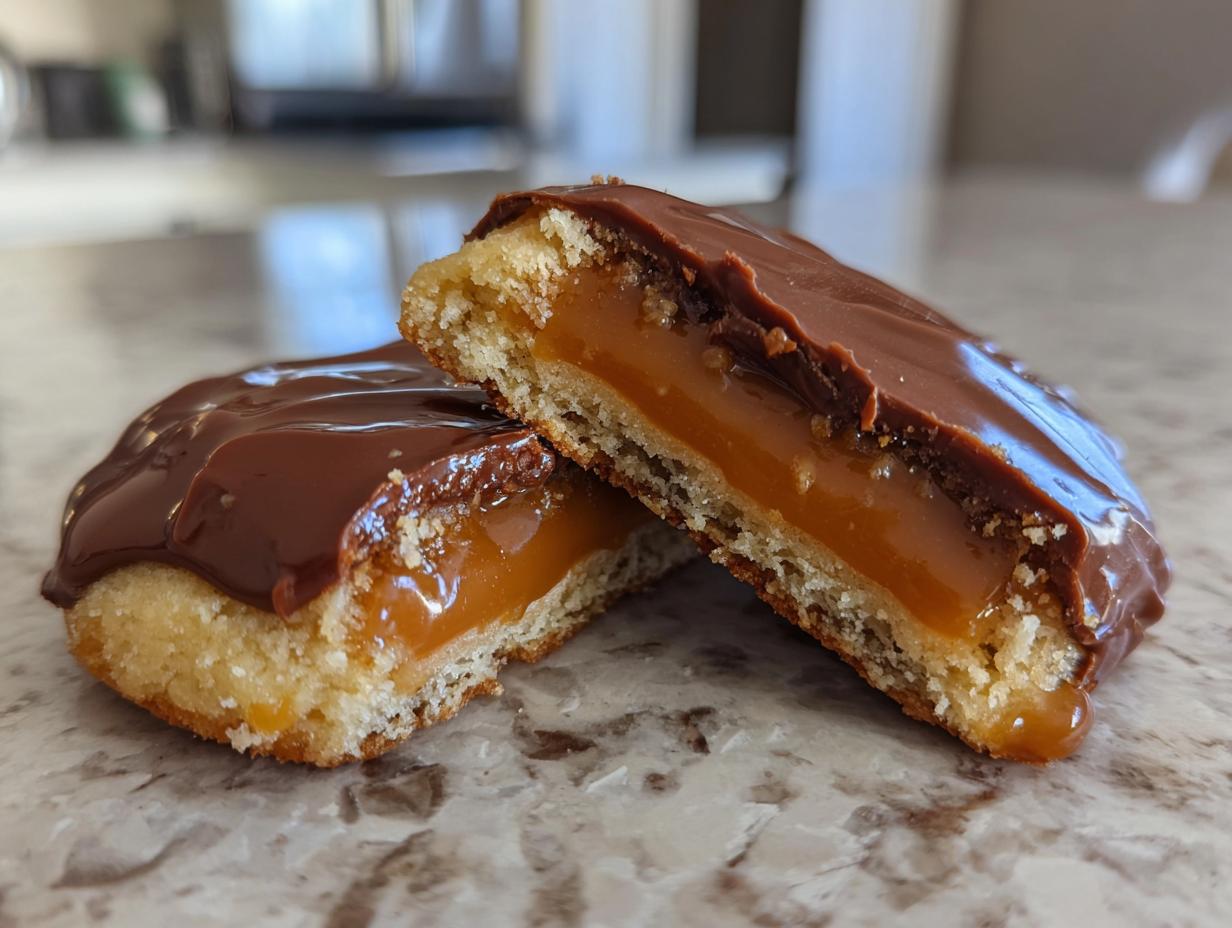
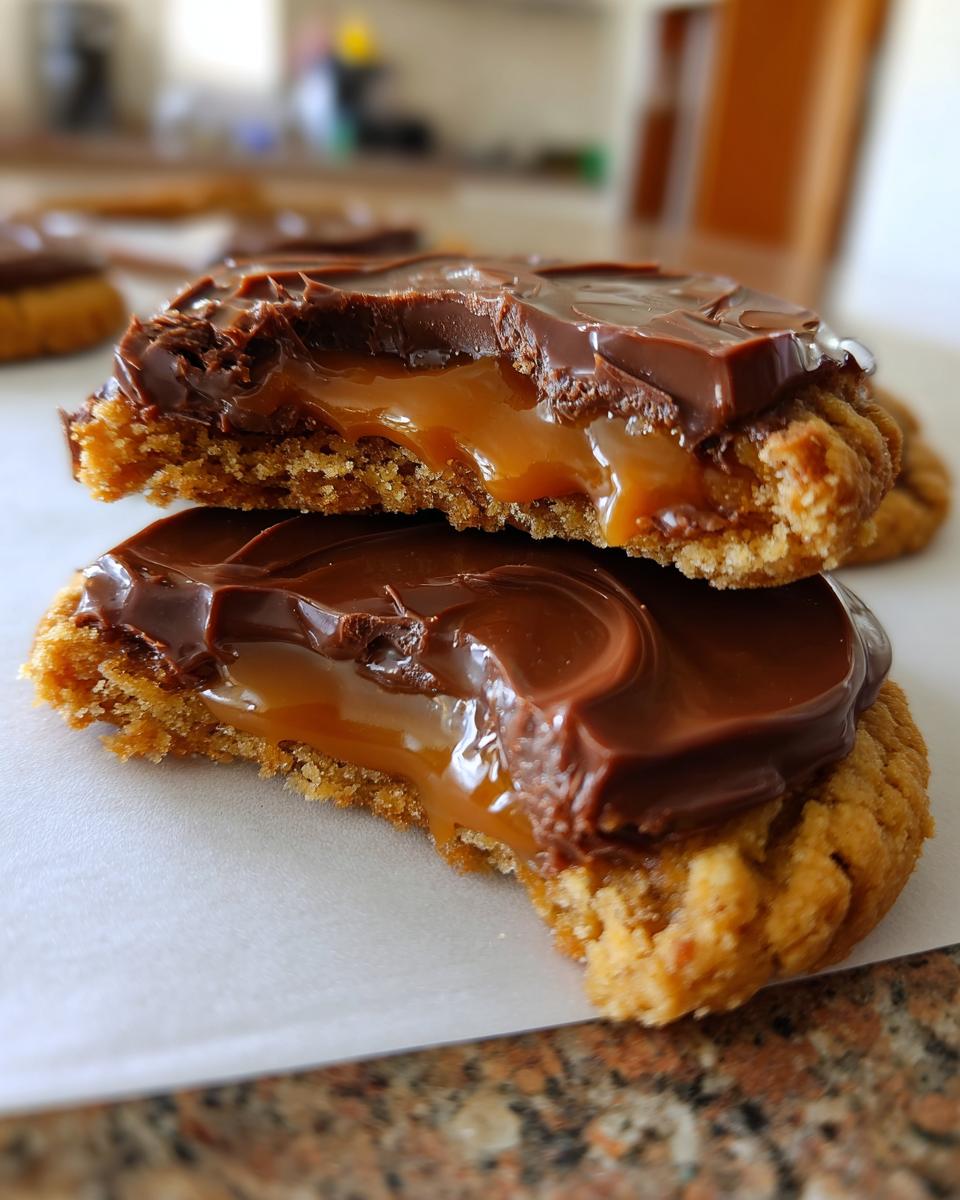
- Three amazing layers—cookie, caramel, and chocolate—for ultimate satisfaction in every bite.
It really doesn’t get much better than this simple combination!
Essential Ingredients for Perfect Twix Cookies
When it comes to these candy bar cookies, the quality of your ingredients really shows, especially that buttery base. I always keep my pantry stocked for simple baking projects like this one. For the full 24 cookies, here’s what you’ll need for that amazing texture and flavor:
- 1 cup unsalted butter, softened (This is key for creaming!)
- 1/2 cup granulated sugar
- 1/4 cup packed light brown sugar
- 1 large egg
- 1 teaspoon vanilla extract
- 2 1/4 cups all-purpose flour
- 1/2 teaspoon baking soda
- 1/4 teaspoon salt
- 1 cup soft caramel candies, unwrapped (or pre-made soft caramel sauce)
- 1/4 cup heavy cream (if using caramel candies)
- 1 1/2 cups milk chocolate chips
- 1 tablespoon coconut oil (optional, for smooth chocolate topping)
If you want to learn more about creating that perfect buttery foundation, check out my guide on butter cookies—it explains why the temperature of that butter matters so much!
Step-by-Step Instructions for Homemade Twix Recipe
Okay, let’s get baking! This homemade Twix recipe is all about layering flavor, but it moves fast. We need to handle the cookie base first before we even think about that gooey topping. Remember, the goal here is soft and chewy, so don’t overmix anything!
Making the Buttery Cookie Base for Twix Cookies
First things first: get that butter softened! Cream the softened butter, granulated sugar, and brown sugar together until it looks pale and fluffy—this creates those vital air pockets in your buttery cookie base recipes. Beat in your egg and vanilla. Then, whisk your dry stuff (flour, soda, salt) separately. Add the dry mix slowly to the wet until *just* combined. Seriously, stop mixing when you barely see streaks of flour left. That’s how you keep them soft.
Layering Caramel and Chocolate on Twix Cookies
While your cookies are cooling completely on the rack—don’t rush this part!—you prepare the middle layer. If you’re using soft caramel candies, you need to melt them down with heavy cream over low heat until everything is silky smooth. If you need a refresher on making a beautiful caramel, I have a cheat sheet for making easy caramel sauce! Once melted, spoon about one teaspoon onto each cookie and let that caramel set for about 15 minutes. Once firm, melt your chocolate chips (I sneak in a tiny bit of coconut oil to make it drizzle perfectly) and drizzle it right over the top. You have to let that chocolate set before storing them!

Tips for Success with Twix Cookies
I want your Twix cookies to be absolutely perfect, so listen up! These little tips are what take them from ‘good’ to ‘can’t-stop-eating-them’ status. My goal is always that perfect balance between a shortbread snap and a chewy center.
First, you have options for that base texture! If you secretly love a firmer, more classic shortbread snap, just pop the dough in the fridge for about 30 minutes before scooping. This is one of those little secrets I learned when testing different batches. If you prefer the soft, gooey texture I aimed for in this recipe, skip the chill time entirely!

Also, concerning the caramel topping—don’t skimp on letting it set! If you try to pour the hot chocolate over sticky caramel, it all just turns into a melted mess, and you lose that beautiful, distinct layer. Patience is a virtue here, I promise. If you’re looking for more insight into keeping cookies perfectly soft and chewy in general, you absolutely have to check out my thoughts on snickerdoodles; the principles are very similar!
Finally, use good quality milk chocolate chips. Since the chocolate is the final flavor note on top, using a decent brand makes a huge difference in that melt factor.
Variations for Your Twix Inspired Desserts
While these layered cookies are my favorite, there are so many fun ways to adapt this idea, especially if you love making these Twix inspired desserts for parties! You can easily turn this into cute little Twix cookie cups by pressing the dough into mini muffin tins before baking and filling the center with caramel and chocolate right after they cool.
Or, if you’re short on time or just feel like cutting things into squares, press the dough into a greased 8×8 pan, bake it, and then layer the caramel and chocolate over the top before cutting it into small chocolate caramel dessert bars once it sets. Both are wonderful ways to use this dough if you’re looking for something besides a drop cookie!
If you’re diving into creative cookie-making, you might also love my strawberry cheesecake cookies—they prove that you can put almost anything delicious on top of a buttery base!
Storing and Reheating Your Chewy Caramel Treats
The worst part about making something this amazing is having to wait for the next day to eat more, right? Luckily, these chewy caramel treats store beautifully! You want to keep these cookies in a single layer, or separated by parchment paper, inside a truly airtight container right on the counter. Don’t put them in the fridge! Room temperature keeps that cookie base tender for up to four days.
If you want to maximize that gooey caramel factor, a quick 10-second zap in the microwave before you eat them is perfection. It just softens that caramel right back up for you!
Frequently Asked Questions About Twix Cookies
I get so many emails after people try these! It’s lovely hearing about everyone enjoying these copycat candy bar cookies. Here are a few common questions I run into when I’m helping folks troubleshoot their baking.
Can I use store-bought caramel sauce in these Twix Cookies?
Oh, absolutely! We all need a shortcut sometimes. If you use store-bought soft caramel sauce, you can skip steps five, which is the part where we melt the candies and cream. Just make sure the sauce you choose is thick enough to hold its shape on the cookie base. If it looks too runny, you might want to let it thicken up slightly before you spoon it on. It’s a great way to make this into an even quicker dessert recipe!
What is the best method for dipping these candy bar cookies in chocolate?
This is where the fun, messy part comes in! I actually prefer to use a regular dinner fork, or sometimes a small wire rack if I’m doing a big batch. Place the caramel-topped cookie on the fork, and drizzle the warm chocolate right over it, or gently dip the top. Then, just tap the side of the fork gently on the edge of the bowl to let all that extra, melty chocolate drip off before placing it on parchment paper. It keeps the chocolate layer nice and thin, just like the real candy bar!
Are these considered among the best cookie recipes for gifting?
In my book, yes, they totally are! They hold up really well at room temperature, and they look incredibly impressive when you arrange them nicely. They travel better than something super soft, thanks to that chocolate coating locking everything in. They are fantastic for cookie swaps or as little thank-you gifts during the holidays. If you need more general ideas for festive treats, I have some great inspiration over on my homemade English muffin recipe page that you can adapt for sweets!
Nutritional Estimate for Twix Cookies
Now, I hate to bring homework into baking, but I always try to have a rough idea of what’s in our treats! Keep in mind these are just estimates based on standard ingredients, so they can swing a little depending on the exact caramel candies you use. But generally, for one of these glorious cookies:
- Calories: 210
- Fat: 12g
- Carbohydrates: 25g
- Protein: 3g
See? Totally worth it for that amazing buttery cookie base and chocolate topping!
Share Your Ultimate Dessert Cookies Experience
I had the best time walking you through making these incredible ultimate dessert cookies. Now it’s your turn! Please grab the ingredients and give this homemade Twix recipe a whirl. If you make them, please come back and leave a star rating below—I read every single review!
I’d also absolutely love to see your creations! Feel free to tag me if you share photos, or drop a comment telling me what you thought of the caramel layer. Don’t forget to explore more of my baking dessert recipes after you’re done, and if you want another fun candy bar twist, you have to see how my friends at Organized Chaos tackled Twix Thumbprint Cookies!
PrintEasy Homemade Soft & Chewy Twix Cookies with Layered Caramel and Chocolate
Make these irresistible Twix Cookies that taste just like the candy bar. This recipe features a buttery cookie base, a layer of gooey caramel, and a smooth chocolate topping. It is a simple baking project perfect for satisfying sweet cravings.
- Prep Time: 20 min
- Cook Time: 11 min
- Total Time: 31 min
- Yield: 24 cookies 1x
- Category: Dessert
- Method: Baking
- Cuisine: American
- Diet: Vegetarian
Ingredients
- 1 cup unsalted butter, softened
- 1/2 cup granulated sugar
- 1/4 cup packed light brown sugar
- 1 large egg
- 1 teaspoon vanilla extract
- 2 1/4 cups all-purpose flour
- 1/2 teaspoon baking soda
- 1/4 teaspoon salt
- 1 cup soft caramel candies, unwrapped (or pre-made soft caramel sauce)
- 1/4 cup heavy cream (if using caramel candies)
- 1 1/2 cups milk chocolate chips
- 1 tablespoon coconut oil (optional, for smooth chocolate topping)
Instructions
- Prepare the cookie base: In a large bowl, cream together the softened butter, granulated sugar, and brown sugar until light and fluffy. Beat in the egg and vanilla extract until combined.
- In a separate bowl, whisk together the flour, baking soda, and salt. Gradually add the dry ingredients to the wet ingredients, mixing until just combined to form a soft dough.
- Shape the dough: Scoop rounded tablespoons of dough and place them 2 inches apart on baking sheets lined with parchment paper. Gently press down slightly on each mound to form a thick cookie shape.
- Bake the cookies: Bake at 350°F (175°C) for 9 to 11 minutes, or until the edges are lightly golden. Let the cookies cool on the baking sheet for 5 minutes before transferring them to a wire rack to cool completely.
- Prepare the caramel layer: If using caramel candies, place them in a saucepan with the heavy cream. Heat over low heat, stirring constantly, until the candies are completely melted and smooth. Remove from heat.
- Assemble the layers: Once the cookies are cool, spoon about 1 teaspoon of the warm caramel mixture onto the center of each cookie, spreading it slightly to cover the top surface. Let the caramel set for about 15 minutes.
- Melt the chocolate: Place the milk chocolate chips and coconut oil (if using) in a microwave-safe bowl. Microwave in 30-second intervals, stirring well after each interval, until the chocolate is smooth and fully melted.
- Top with chocolate: Drizzle or dip the tops of the caramel-covered cookies into the melted chocolate. Allow the chocolate to set completely before serving.
Notes
- For a firmer shortbread base, chill the dough for 30 minutes before scooping and baking.
- If you prefer a thicker caramel layer, use a thicker, pre-made soft caramel sauce instead of melting candies.
- Store finished cookies in an airtight container at room temperature for up to 4 days.
Nutrition
- Serving Size: 1 cookie
- Calories: 210
- Sugar: 18g
- Sodium: 85mg
- Fat: 12g
- Saturated Fat: 7g
- Unsaturated Fat: 5g
- Trans Fat: 0.2g
- Carbohydrates: 25g
- Fiber: 1g
- Protein: 3g
- Cholesterol: 25mg