
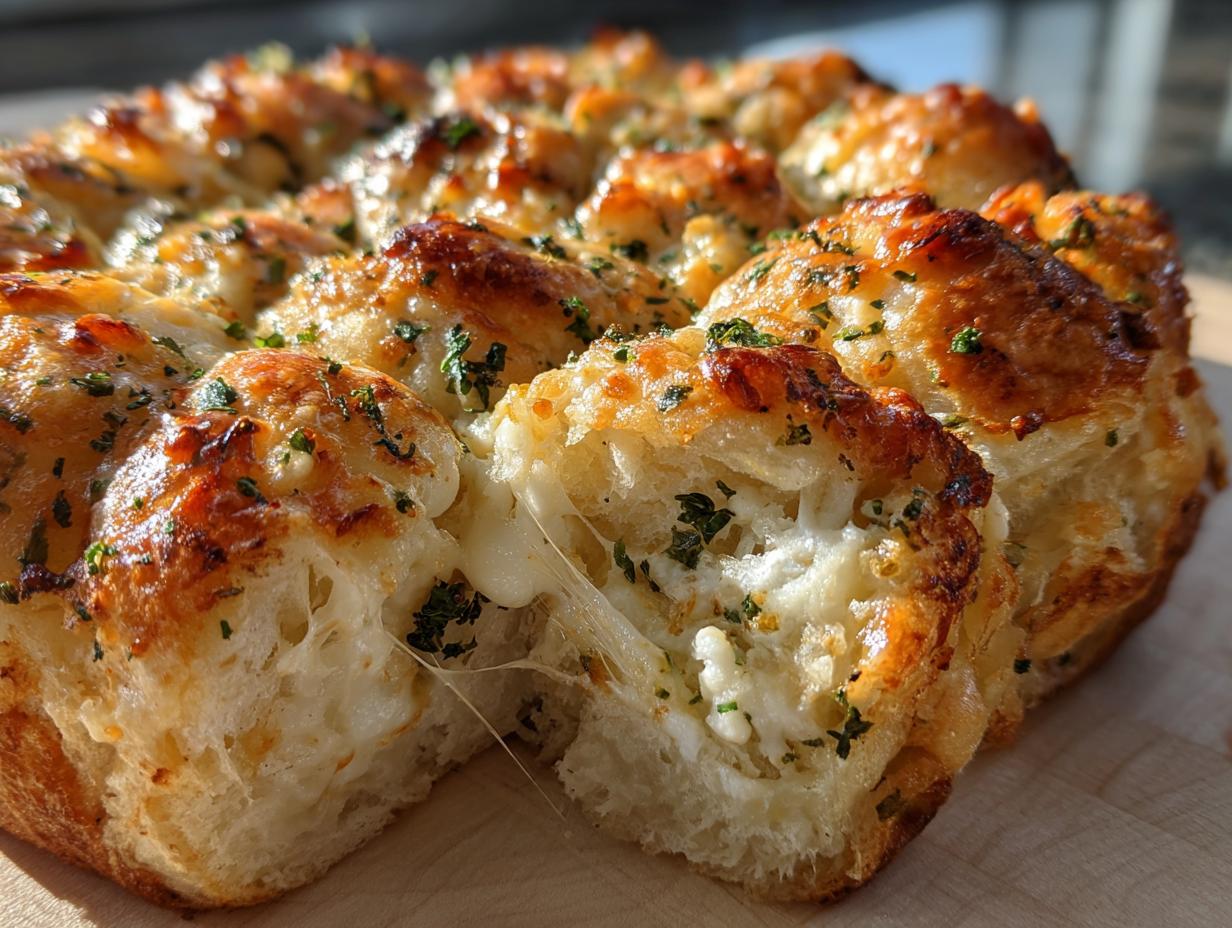
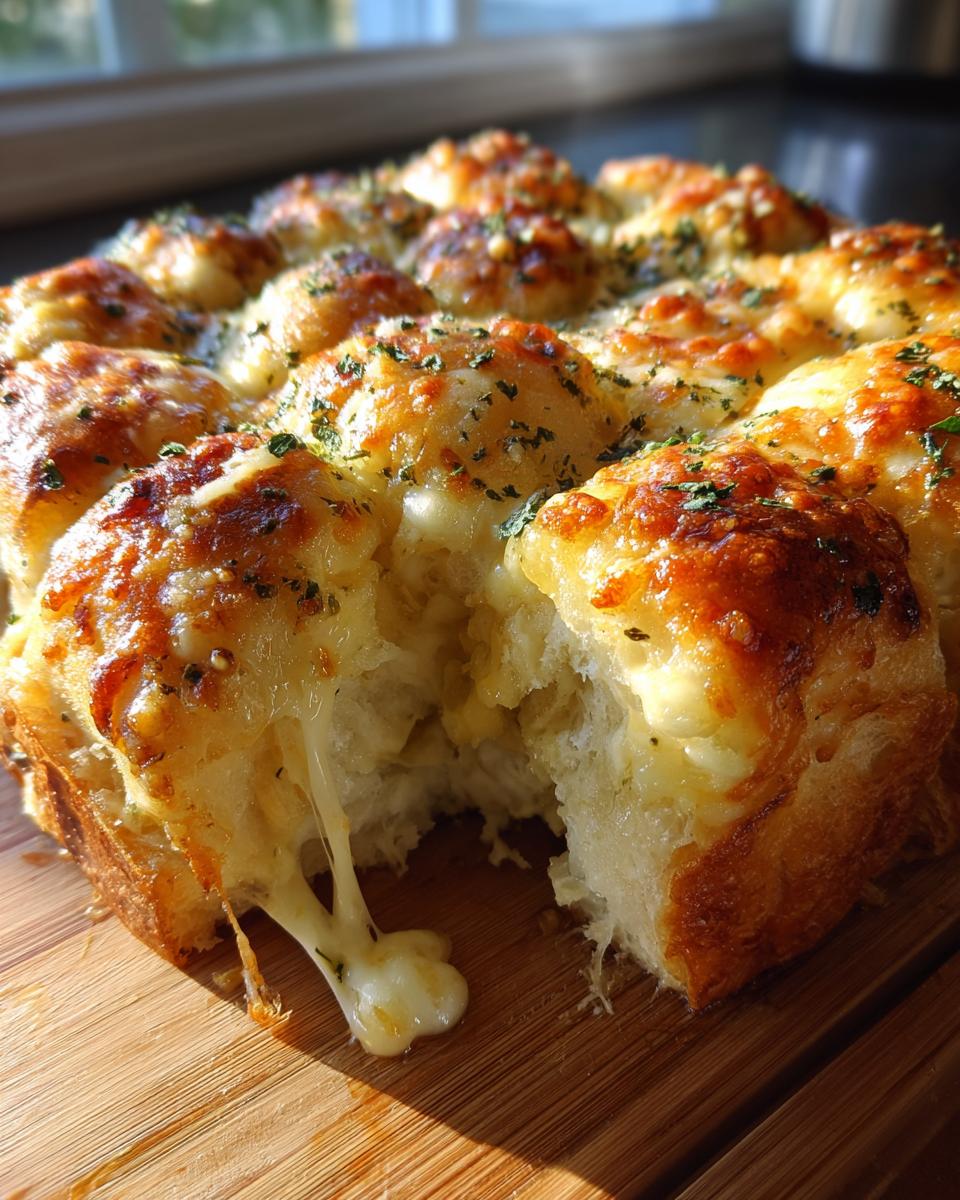
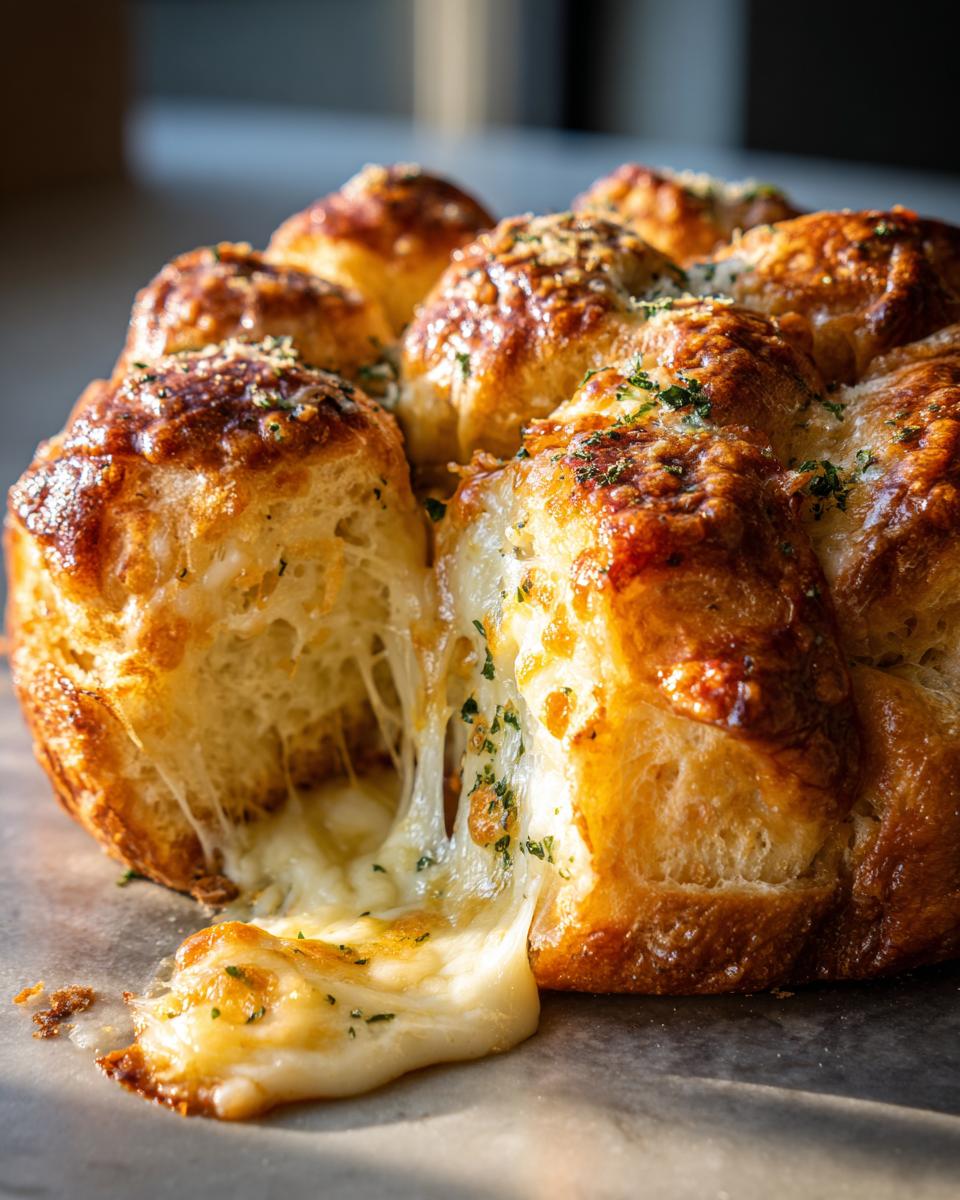
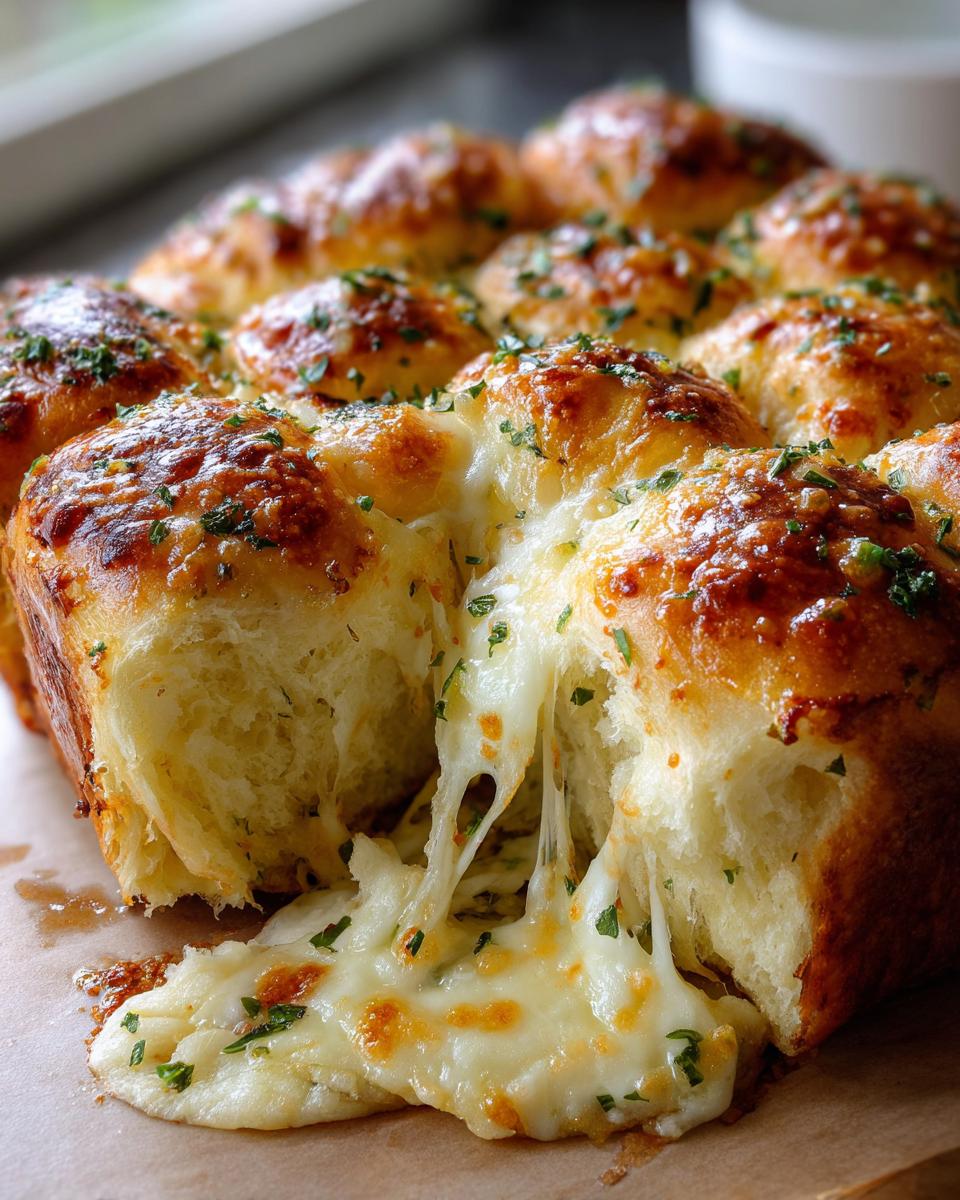
Isn’t it amazing how a bag of sweet rolls can be instantly transformed into something completely different? I’m talking about taking those soft, pillowy, slightly sweet Hawaiian rolls—you know the ones—and turning them into the absolute star of your side dish lineup! Seriously, these Quick & Cheesy Pull-Apart Hawaiian Roll Garlic Bread rolls have saved my weeknight dinners more times than I can count. They are gooey, garlicky, and ready before the main course even finishes simmering. If you need a comfort food side dish that screams ‘delicious’ without any fuss, trust me, this hawaiian roll garlic bread is your new best friend.
- Why This Hawaiian Roll Garlic Bread Recipe Works So Well
- Ingredients for the Quick & Cheesy Hawaiian Roll Garlic Bread
- How to Prepare Your Hawaiian Roll Garlic Bread Step-by-Step
- Tips for Success Making Easy Garlic Bread with Hawaiian Rolls
- Serving Suggestions for Your Hawaiian Roll Garlic Bread
- Storage and Reheating Instructions for Leftover Hawaiian Roll Garlic Bread
- Frequently Asked Questions About Hawaiian Roll Recipes
- Estimated Nutritional Data for Cheesy Hawaiian Roll Garlic Bread
- Share Your Experience Making This Hawaiian Roll Garlic Bread
Why This Hawaiian Roll Garlic Bread Recipe Works So Well
When I switched from regular crusty bread to these sweet rolls, everything changed! That’s what makes this pull apart bread recipe a genuine winner. It’s lightning fast—we’re talking 15 minutes total, which makes it one of the best quick dinner rolls hacks around. But speed isn’t the only secret; it’s all about that texture we get.
The Magic of Pull Apart Bread Recipe Texture
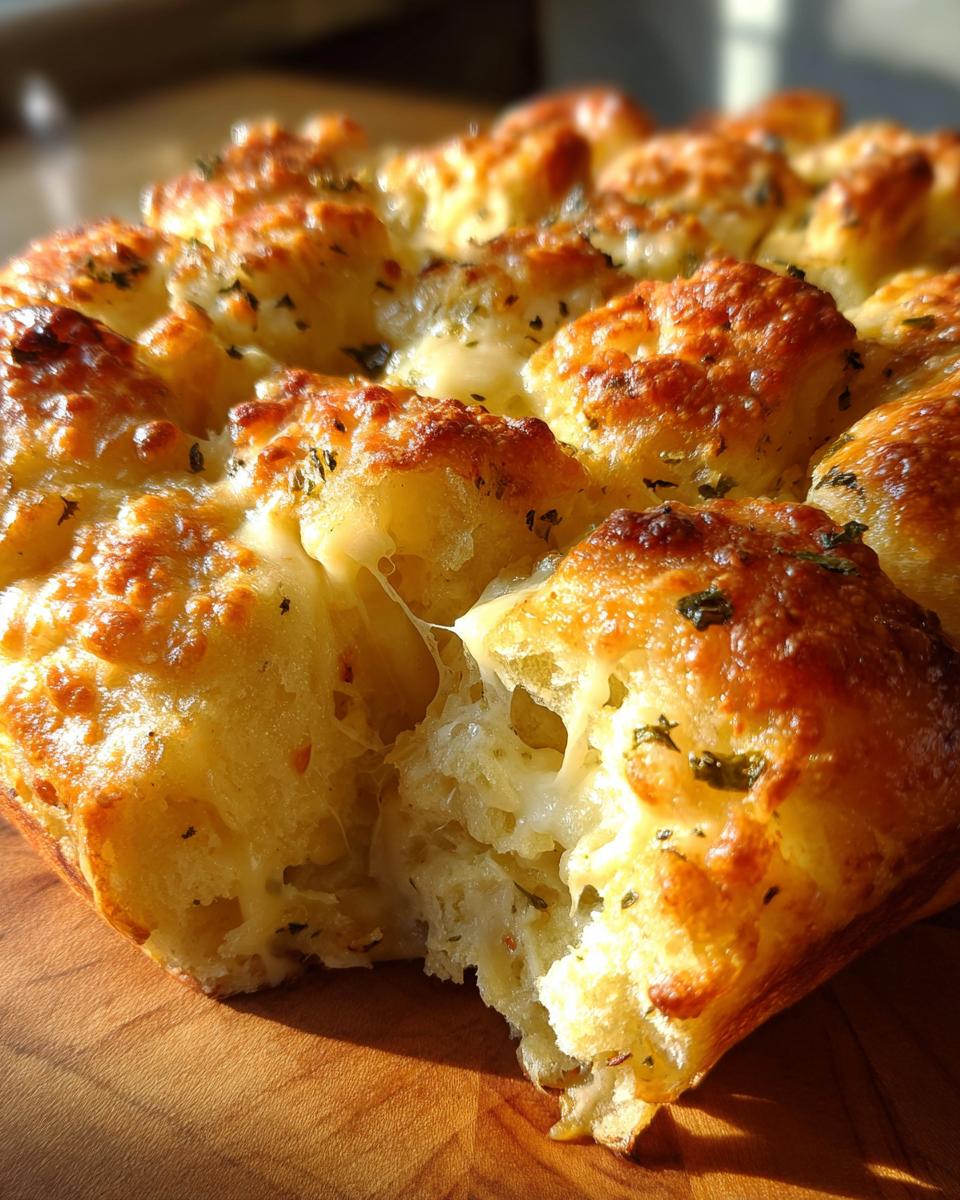
The whole point of this bread is that soft pillowiness! Because Hawaiian rolls are already so tender, they soak up the garlic butter without ever getting soggy. As they bake together, they steam just slightly, resulting in a heavenly, easily shareable texture. You just pull off a warm, cheesy piece—no cutting required!
Achieving Flavor Balance in Your Hawaiian Roll Garlic Bread
This recipe is the definition of sweet and savory bread done right. You get that wonderful, buttery, pungent punch from the garlic and Parmesan, and then BAM! You hit the sweet dough underneath. This flavor contrast is why this recipe works so incredibly well. It’s my favorite King’s Hawaiian roll hack because it leans into the sweetness instead of fighting it.
Ingredients for the Quick & Cheesy Hawaiian Roll Garlic Bread
Okay, this is where the magic starts, and the best part? You probably have most of this sitting in your pantry right now! Since we’re aiming for that perfect balance—especially if you love making Garlic parmesan rolls—I’ve listed everything needed for maximum flavor saturation. Remember, since this is a quick recipe, precision with what you *do* have is important. Measure that butter and make sure your garlic is freshly minced; fresh is always best here!
- 1 (12 count) package Hawaiian sweet rolls
- 1/2 cup unsalted butter, melted
- 4 cloves garlic, minced
- 1/4 cup fresh parsley, chopped
- 1/2 teaspoon salt
- 1/4 teaspoon black pepper
- 1 cup shredded mozzarella cheese
- 1/4 cup grated Parmesan cheese
How to Prepare Your Hawaiian Roll Garlic Bread Step-by-Step
Now for the fun part! This recipe moves so fast once you get started, so have your 9×13 dish ready to go. Remember, we are building an amazing pull apart bread recipe here, so keeping those sweet rolls bundled together is key throughout the whole process. Don’t separate them until serving—that’s non-negotiable! If you want some more great, quick ideas, check out this handy recipe here.
Preparation and Butter Infusion for the Best Hawaiian Roll Garlic Bread
First things first, get that oven heating up to 350 degrees Fahrenheit and lightly grease your baking dish. Next, place the *entire* package of rolls right into that dish. This is the crucial trick for maximum flavor penetration in your hawaiian roll garlic bread: you need to poke holes! Using a skewer or a thin knife, gently pierce deep down into the top and sides of the rolls, trying to get between them. This creates little tunnels for that buttery goodness we mixed up—melted butter, minced garlic, parsley, salt, and pepper. Drizzle it slowly and evenly over the top so it seeps down into those little holes you made.
Baking and Achieving Cheesy Perfection
After you’ve drizzled all that glorious butter mixture, sprinkle your mozzarella and Parmesan cheese generously over the top. Then, cover that whole dish tightly with aluminum foil—this traps the steam and gets those rolls heating through perfectly. Bake it covered for about 10 minutes. *Here’s a little tip I always use: for maximum flavor infusion, let the butter soak into the rolls for about 5 minutes after drizzling before you cover it for baking.* Then, pull off the foil and bake for an additional 5 to 7 minutes until that cheese is bubbly, melted, and starting to get a little golden kiss on top. Serve it immediately while it’s piping hot!
Tips for Success Making Easy Garlic Bread with Hawaiian Rolls
If you want to ensure this batch of Easy garlic bread is the best one yet, I have a couple of tricks up my sleeve from making this for every potluck imaginable. First, remember that little soak time I mentioned? Seriously, resist the urge to rush that step! Letting the butter sit for five minutes after drizzling lets those Hawaiian rolls absorb the flavor before the heat seals everything in. That’s how you get maximum depth in this 15 minute side dish.
Also, don’t be afraid to amp up the savory side if you prefer! A little pinch of dried Italian seasoning mixed right into the garlic butter is a fantastic addition that gives it a slightly more complex, almost pizzeria-style flavor. The structure of these rolls handles extra herbs beautifully, so feel free to experiment a tiny bit once you master the basic recipe!
Serving Suggestions for Your Hawaiian Roll Garlic Bread
Honestly, these rolls are so good they could probably be eaten alone for a snack—and I guarantee I’ve done that more than once when no one was looking! But truly, they shine when paired with the right kind of meal. Since they have that wonderful sweet and savory nature, they cut through richness perfectly. Think about serving them alongside a big bowl of hearty tomato soup or maybe a classic lasagna; they are hands-down one of the best Dinner side recipes I turn to when I’m making Italian.
They are also fantastic for soaking up every last bit of sauce from something like chicken cacciatore or beef stew. The slight sweetness of the roll just complements the deep, savory flavors of those heavier meals. You’ll want to make sure you grab an extra helping for yourself when you’re making this hawaiian roll garlic bread, trust me!
Storage and Reheating Instructions for Leftover Hawaiian Roll Garlic Bread
I hope you manage to have leftovers because that seems like a miracle when these come out of the oven! But if you do, don’t stress about saving them. Just let the rolls cool down completely, and then you absolutely have to store them in an airtight container at room temperature. Keep them in the fridge only if you made them more than a day ahead—the cold can dry them out a little, unfortunately.
When you are ready to enjoy them again, the microwave is your enemy here because it just won’t restore that lovely texture we worked for. Instead, pop them back into a 325-degree oven wrapped tightly in foil for about 8 to 10 minutes. That little bit of moisture trapped by the foil warms everything up gently and brings back that soft, pull-apart quality beautifully.
Frequently Asked Questions About Hawaiian Roll Recipes
I always get questions when something goes viral, and this hawaiian roll garlic bread is no exception! People want to know how to customize it or make sure it doesn’t turn out heavy. I’ve gathered the most common things folks ask when they are ready to bake a batch of these buttery rolls!
Can I use different cheese when making this Hawaiian roll garlic bread?
Oh, absolutely! Mozzarella gives you that perfect, stretchy pull, but feel free to mix it up, especially if you are looking for a sharper flavor. I love dropping in about half a cup of Monterey Jack; it melts like a dream. If you want a little tang, toss in some sharp cheddar, but remember that cheddar browns faster, so keep a close eye when you drop the foil during the last few minutes of baking!
What main dishes pair best with this buttery garlic rolls side?
Since these are such rich Comfort food sides, they pair best with dishes that have liquid or sauces that need soaking up. They are legendary next to a bowl of creamy tomato soup or saucy spaghetti and meatballs. Honestly, anything that requires dipping is perfect. They even work great alongside baked chicken or pot roast—they seriously elevate any simple supper!
How do I make this a true pull apart bread recipe without making it soggy?
That sogginess fear is real, but it all comes down to my favorite step: the poking! You need to poke deep holes, going nearly all the way down into the bottom of the rolls, and then drizzle the butter slowly. The key is that the butter gets distributed enough that every roll gets flavor, but not so much saturation that the bottoms turn wet. If you keep the rolls tight together in the baking dish, they support each other as they bake, which is essential for that perfect pull apart bread recipe texture.
Estimated Nutritional Data for Cheesy Hawaiian Roll Garlic Bread
I always like to give you a little heads-up on what you’re diving into when you make these incredibly tempting rolls! Since these are packed with sweet dough, butter, and cheese, they definitely fall into the delicious indulgence category for a side dish. Please remember these numbers are just estimates based on dividing the total batch by 12 servings, so values can shift slightly based on your exact ingredients!
- Serving Size: 1 roll
- Calories: 180
- Total Fat: 11g
- Total Carbohydrates: 16g
- Protein: 5g
Share Your Experience Making This Hawaiian Roll Garlic Bread
Now that you have baked the best side dish ever—or at least, the easiest and cheesiest—I really want to hear about it! This is your moment to join our little cooking community here at DelishCraze. Did you stick to the cheesy mozzarella, or did you manage to sneak in some smoked Gouda like I sometimes do? Don’t be shy!
Please take a second and leave a rating for this Quick & Cheesy Pull-Apart Hawaiian Roll Garlic Bread right below this. Five stars is always the goal, but honest feedback helps everyone else cook better too! If you tried a variation, like maybe adding some fresh chives or trying a different brand of rolls, drop all the details in the comments section. I read every single one, I promise!
And hey, if these rolls look stunning on your dinner table—and knowing you, they certainly will—snap a picture! Tag me on social media. Seeing your finished buttery garlic rolls makes my whole week and helps inspire what I bake next. Happy cooking, my friend, and I can’t wait to see what you create!
PrintQuick & Cheesy Pull-Apart Hawaiian Roll Garlic Bread
Make this easy, cheesy pull-apart garlic bread using sweet Hawaiian rolls. It is a crowd-pleasing side dish ready in under 20 minutes.
- Prep Time: 10 min
- Cook Time: 17 min
- Total Time: 27 min
- Yield: 12 servings 1x
- Category: Side Dish
- Method: Baking
- Cuisine: American
- Diet: Vegetarian
Ingredients
- 1 (12 count) package Hawaiian sweet rolls
- 1/2 cup unsalted butter, melted
- 4 cloves garlic, minced
- 1/4 cup fresh parsley, chopped
- 1/2 teaspoon salt
- 1/4 teaspoon black pepper
- 1 cup shredded mozzarella cheese
- 1/4 cup grated Parmesan cheese
Instructions
- Preheat your oven to 350 degrees Fahrenheit. Lightly grease a 9×13 inch baking dish.
- Keep the Hawaiian rolls connected in their original packaging or place them tightly together in the prepared baking dish. Do not separate the rolls.
- In a small bowl, combine the melted butter, minced garlic, chopped parsley, salt, and pepper. Mix well to create the garlic butter.
- Use a skewer or a sharp knife to poke holes deeply into the top and sides of the rolls, going down between the rolls where possible. This allows the butter mixture to soak in.
- Slowly drizzle the garlic butter mixture evenly over the top of the rolls, ensuring the butter seeps into the poked holes.
- Sprinkle the shredded mozzarella cheese and grated Parmesan cheese evenly over the top of the rolls.
- Cover the baking dish tightly with aluminum foil.
- Bake for 10 minutes covered.
- Remove the foil and bake for an additional 5 to 7 minutes, or until the cheese is melted, bubbly, and lightly golden brown.
- Serve the bread immediately while warm and pull-apart style.
Notes
- For maximum flavor infusion, let the butter soak into the rolls for 5 minutes before baking covered.
- You can add a pinch of dried Italian seasoning to the butter mixture for extra depth.
- This bread pairs well with pasta dishes or soup.
Nutrition
- Serving Size: 1 roll
- Calories: 180
- Sugar: 7
- Sodium: 320
- Fat: 11
- Saturated Fat: 6
- Unsaturated Fat: 5
- Trans Fat: 0
- Carbohydrates: 16
- Fiber: 1
- Protein: 5
- Cholesterol: 25