
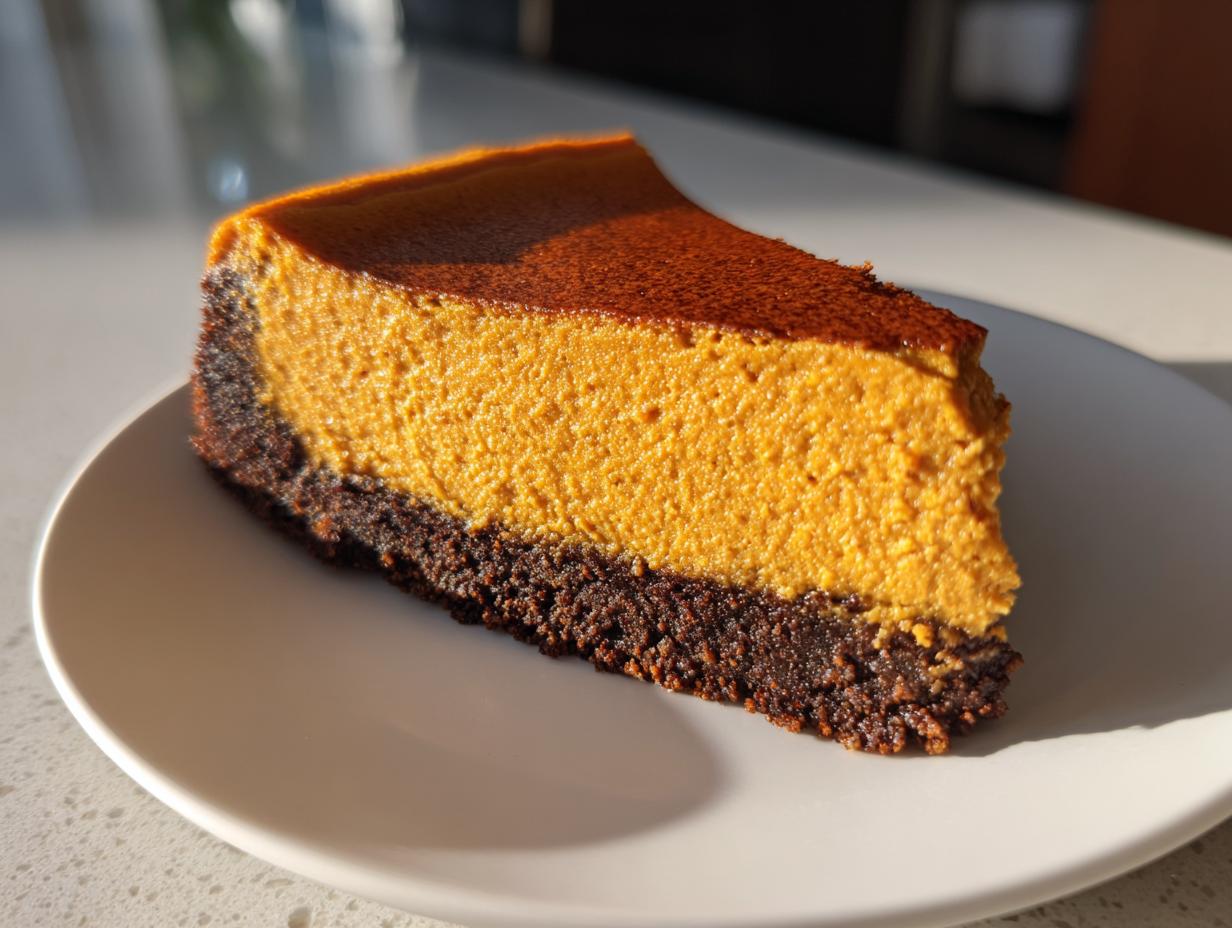
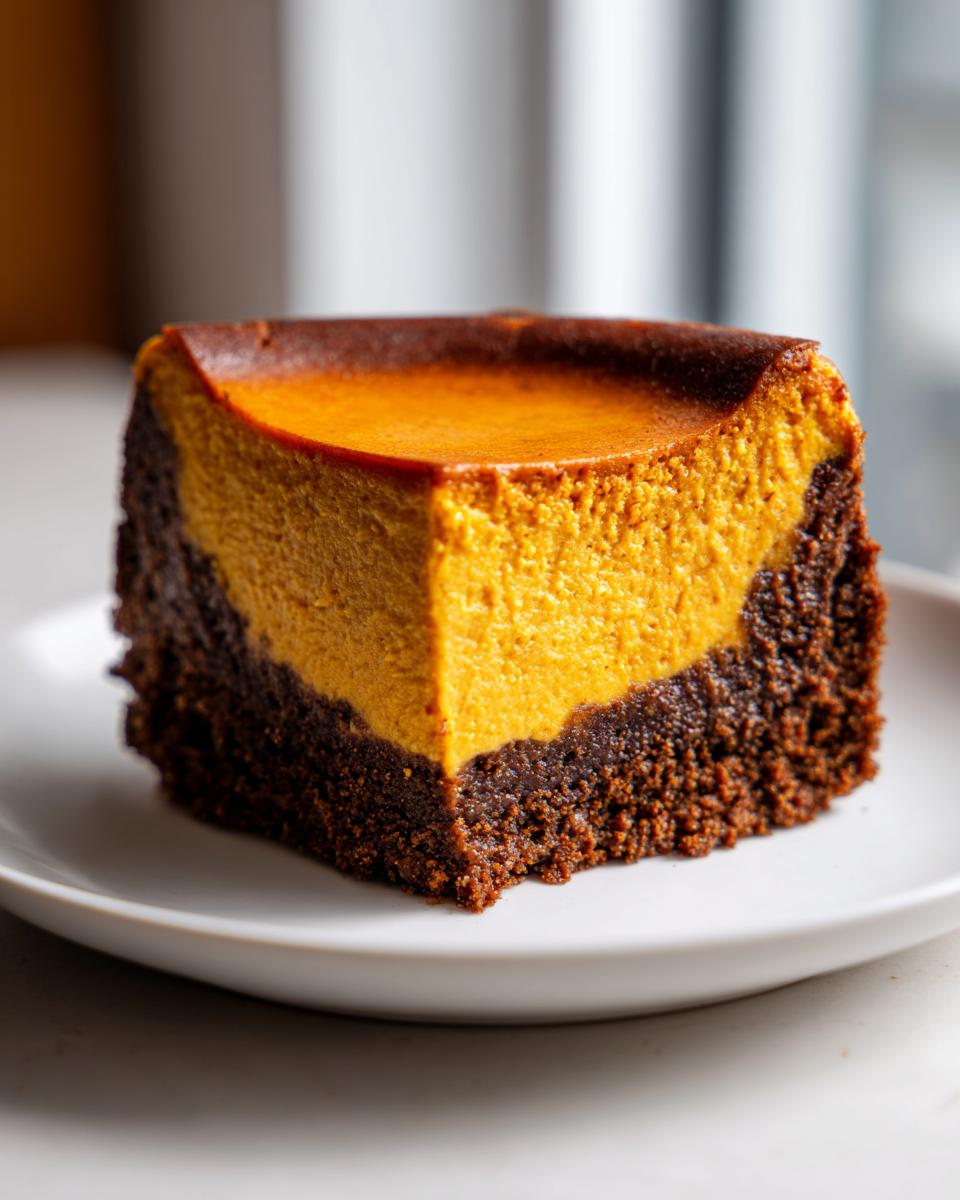
Oh, the scent of autumn! Nothing signals the season is truly here quite like that first warm, spicy whiff that pulls you straight into comfort and cozy nights. If you ask me, Olivia, the absolute pinnacle of fall baking isn’t pie—it’s diving spoon-first into the best pumpkin cheesecake you’ve ever imagined. That’s why I’m sharing my *Creamy Baked Pumpkin Cheesecake with Gingersnap Crust*. We worked hard to get this texture just right; it’s rich, incredibly smooth, and that spicy crust? It just sings against the filling. This dessert? It is non-negotiable for any gathering from October through Thanksgiving. You simply can’t have a fall celebration without it!
When things get busy leading up to the holidays, I rely on desserts that look spectacular but rely on simple, classic techniques. This recipe delivers that rich flavor without an entire afternoon of fuss. If you love deep, spiced autumn flavors, wait until you try pairing this with some of my homemade pumpkin butter! Trust me, you’ll find yourself wanting to whip up a batch just because it’s Tuesday!
- Why This Creamy Baked Pumpkin Cheesecake is the Best Ever
- Gathering Ingredients for Your Pumpkin Cheesecake
- Step-by-Step Instructions for Perfect Pumpkin Cheesecake
- Tips for Success Making Your Pumpkin Cheesecake
- Serving Suggestions for Your Autumn Comfort Food
- Storage and Make Ahead Holiday Desserts Tips for Pumpkin Cheesecake
- Frequently Asked Questions About Pumpkin Cheesecake
- Nutritional Estimates for This Rich Pumpkin Flavor Treat
- Share Your Homemade Pumpkin Desserts Creation
Why This Creamy Baked Pumpkin Cheesecake is the Best Ever
I searched long and hard for what I am now confidently calling the best ever pumpkin cheesecake recipe. What sets this one apart from all the others I tried? It’s the combination of that luscious, smooth filling and the unexpected snap from the crust. We use gingersnap cookies, which add such a wonderful, warm undertone that just screams autumn comfort food. It truly feels elevated, but honestly, it’s one of the easiest showstoppers for Thanksgiving. If you love rich texture, you might want to check out my protein cheesecake ideas for a lighter option later, but for pure indulgence, this is it!
Perfect Texture Without Cracks: Our Secret to Amazing Pumpkin Cheesecake
The biggest fear with any baked cheesecake is the dreaded crack, right? Well, don’t you worry about that anymore! My number one tip for achieving that gorgeously smooth, creamy pumpkin dessert texture is using the water bath—the steam keeps everything gentle. But the real trick is patience during the cool down. We bake it, then turn the oven off and let it hang out inside for a full hour before it even sees the counter. That slow journey to room temperature is what guarantees a crack-free, velvety top every single time. It’s worth the extra hour, I promise!
Gathering Ingredients for Your Pumpkin Cheesecake
Okay, so you’ve seen how crucial the technique is for this pumpkin cheesecake, but that’s only half the battle! You need the right players on your team, so to speak. I always lay everything out before I even think about turning on the mixer—it keeps things calm and organized, which is exactly what a creamy dessert needs. We are definitely going for that rich seasonal vibe, and the ingredients reflect that perfectly. Before you start, just make sure your cream cheese and eggs have been sitting out for a little while so they aren’t fridge-cold; that helps everything blend beautifully! You can browse my favorite pumpkin cheese ball for another appetizer idea while you’re gathering your supplies!
For the Gingersnap Crust
Forget the standard graham cracker crust for a moment! We are rocking the gingersnaps here, and honestly, it makes such a difference because you get that extra hit of warm spice right from the base. Here’s what you’ll need to press into your pan:
- 1 1/2 cups gingersnap cookie crumbs
- 1/4 cup granulated sugar (for crust)
- 6 tablespoons unsalted butter, melted
Mixing these three together creates that perfect sturdy foundation that complements the filling so nicely.
For the Spiced Cheesecake Filling
This is where the magic happens! Remember, we want that deep, beautiful seasonal flavor, and that comes straight from the spices. Double-check your pantry to make sure you grabbed actual pumpkin puree and not that pre-mixed pumpkin pie filling—they behave totally differently when baking!
- 3 (8 ounce) packages cream cheese, softened
- 1 1/2 cups granulated sugar (for filling)
- 1 (15 ounce) can pumpkin puree (not pumpkin pie filling!)
- 1 teaspoon vanilla extract
- 1 teaspoon ground cinnamon
- 1/2 teaspoon ground ginger
- 1/4 teaspoon ground nutmeg
- 1/4 teaspoon ground cloves (This gives you that deep spiced cheesecake filling!)
- 4 large eggs
Step-by-Step Instructions for Perfect Pumpkin Cheesecake
Alright, let’s get this amazing pumpkin cheesecake into the oven! This is where the real fun begins, but we need to respect the timing. Think of this process less like mixing a cake and more like building a very delicate, delicious fortress. We are going to move through three critical stages: getting that crust ready, mixing the filling without adding too much air, and then ensuring a gentle bake. Make sure your oven is at 325 degrees F before you start wrapping that pan. If you’ve ever felt frustrated making a classic cheesecake, follow these steps exactly, especially around the cooling, and you’ll see amazing results. For inspiration on other layered desserts, take a peek at my sugar cookie cheesecake ideas for later!
Preparing the Crust and Water Bath for Your Pumpkin Cheesecake
First things first: you need to wrap that 9-inch springform pan super tightly with heavy-duty foil—like, twice. This is non-negotiable because this pan is going into a big bath of boiling water! Once it’s wrapped up snug as a bug, mix your gingersnap crumbs with the crust sugar and that melted butter until it looks like wet sand. Firmly press that mixture into the bottom of the pan. Pop that crust into the 325-degree oven for just 8 minutes to set it, then pull it out to cool a tiny bit while you focus on that filling. Now, get your roasting pan ready and have some genuinely boiling water on standby!
Mixing the Rich Pumpkin Flavor Treats Filling
This is where we keep things calm. Get that softened cream cheese whipped with the 1 1/2 cups of sugar until it’s utterly smooth—I mean, zero lumps allowed! Scrape the sides down, don’t forget! Next, gently stream in that pumpkin puree, vanilla, and those wonderful warm spices until they are just married together. Don’t mix these rich pumpkin flavor treats too much! The crucial part comes now: add the eggs one at a time, mixing only on the *lowest* speed until the yellow yolk just disappears. If you whip these eggs hard, you’ll introduce air and *poof*—hello, crack! Keep the speed low, and stop mixing the second they incorporate.
Baking and Slow Cooling the Holiday Cheesecake Baking
Gently pour your filling over that cooled gingersnap crust, and then carefully set the whole thing into the roasting pan. Now, pour that hot water into the outer roasting pan until it comes about halfway up the sides of your cheesecake pan—that steam power is what makes this a perfect Thanksgiving cheesecake! Bake it for about 60 to 75 minutes. You’re looking for the edges to look set firm, but the center two inches should still have a slight, nervous wobble when you gently nudge the pan. When it’s done, turn the oven OFF, crack the door open just a tiny bit, and leave that beauty inside for a full hour to slowly say goodbye to the heat. This slow transition is key! You can check out this other great way to bake while you think about that chilling time.
Tips for Success Making Your Pumpkin Cheesecake
Making an amazing, truly creamy pumpkin cheesecake doesn’t rely on fancy equipment, just consistency and a couple of key habits I’ve learned over the years. If you want to nail any of my easy pumpkin recipes, the prep work is everything. I know it’s tempting to rush, but trust me on these insider tricks—they turn good results into *great* results!
First, always—and I mean *always*—make sure your cream cheese and your eggs are fully at room temperature before you start beating anything. Cold ingredients fight each other in the bowl, which leads to lumps, and nobody wants lumpy dessert! Also, if you happen to be out of gingersnaps (though I highly recommend them!), you can absolutely substitute with graham crackers for your crust. It’s a classic route that still tastes wonderful, though you lose that sharp little spice kick.
For serving, a simple dusting of powdered sugar works fine, but if you want a little extra something, dollop a bit of lightly whipped cream on top! It’s a wonderful little cooling contrast to the rich filling. For future reference on another amazing fall bake, you can see what my friend Lauren suggests over at her place. And for a healthy snack afterward, why not try my no-bake protein balls?
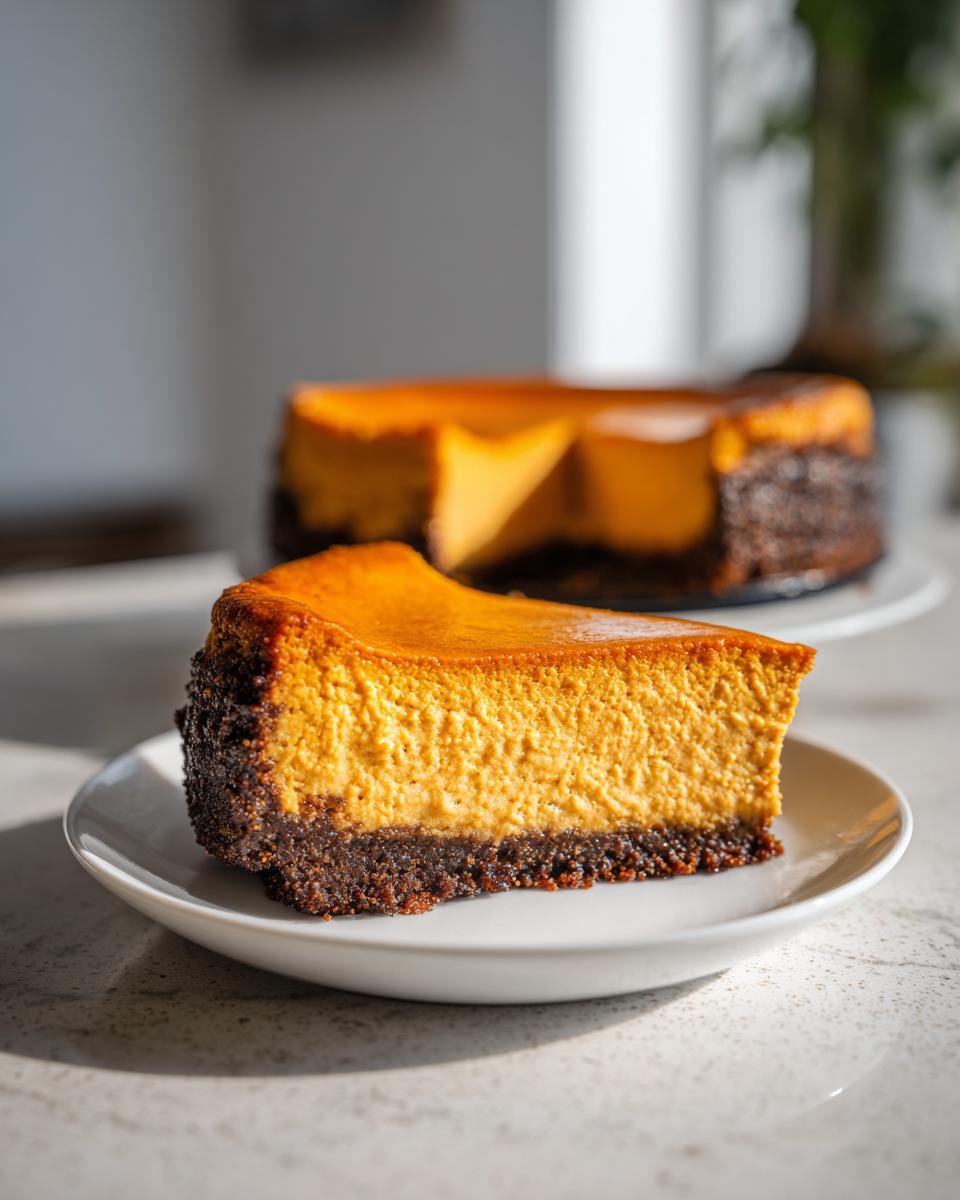
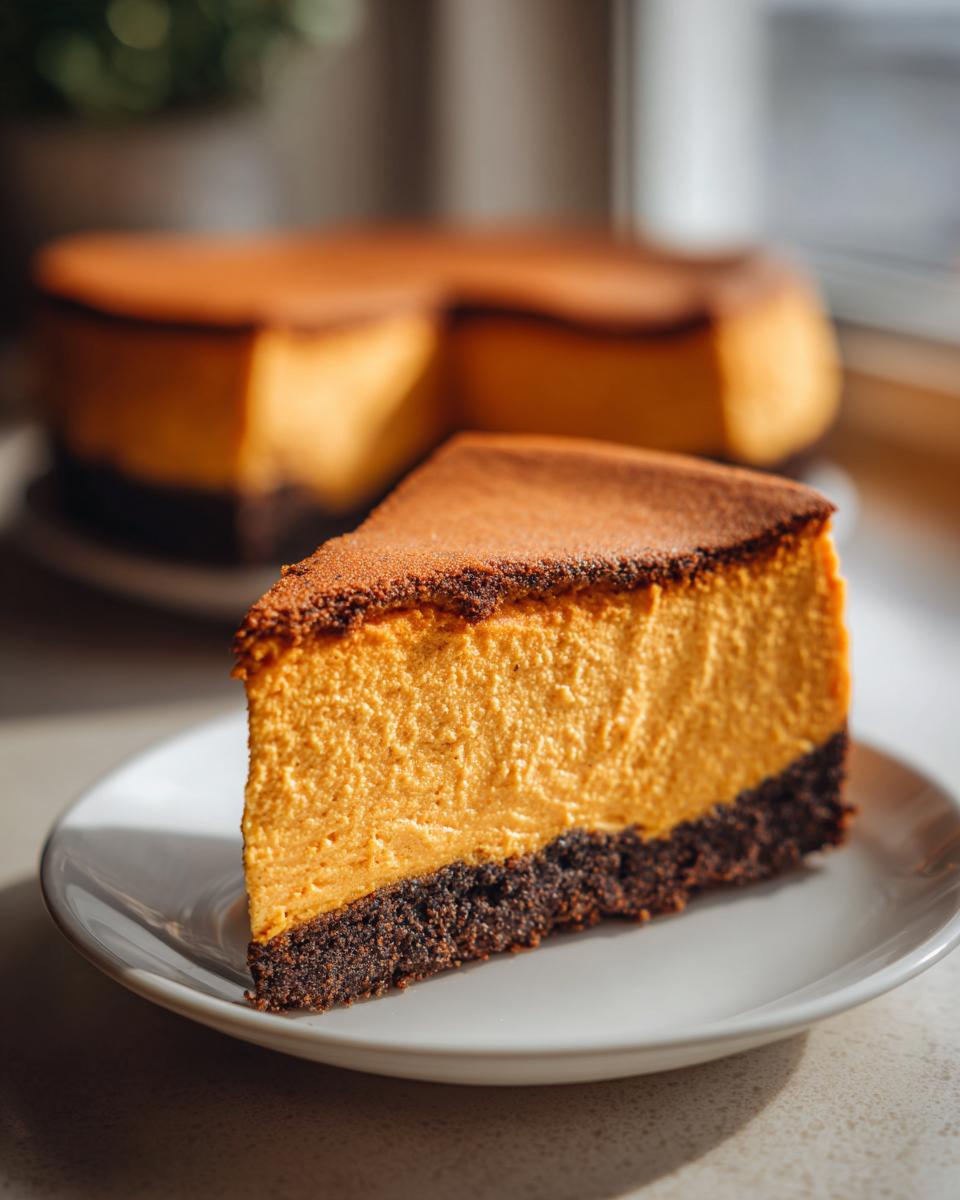
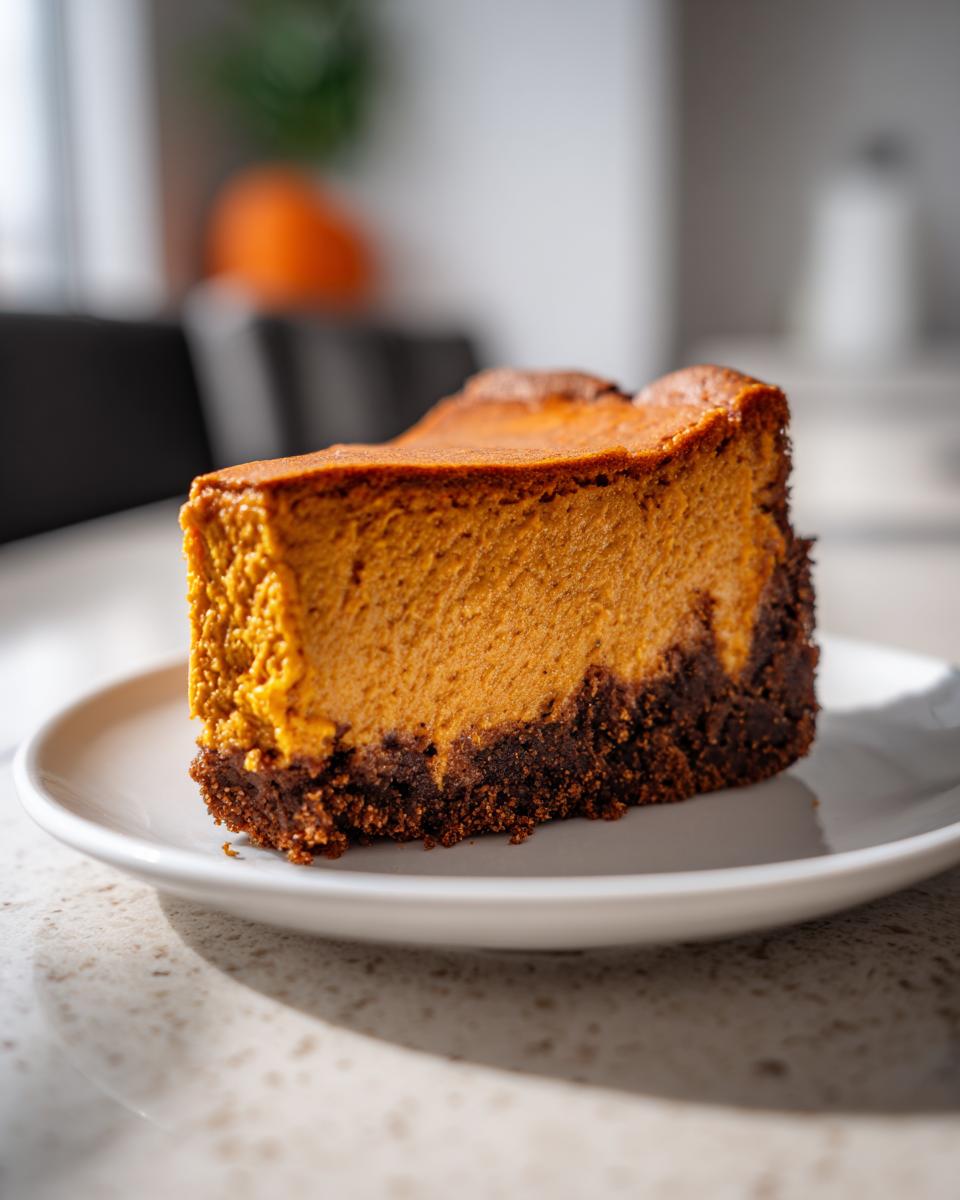
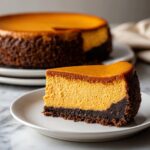
Serving Suggestions for Your Autumn Comfort Food
When you finally pull that perfect slice of pumpkin cheesecake out of the fridge, you want it dressed for success! I love keeping it simple because the filling and the gingersnap crust really do all the heavy lifting. For me, the absolute best way to serve this is with a generous swirl of lightly sweetened homemade whipped cream on top. That fluffy white topping contrasts so beautifully with the deep orange color!
If you are feeling particularly decadent, a drizzle of warm caramel elevates this into pure holiday territory. This is the perfect fall dessert recipe to enjoy after a long day. Pair a slice with a hot mug of my big batch hot cocoa or a warm mug of spiced apple cider. Pure bliss, I tell you!
Storage and Make Ahead Holiday Desserts Tips for Pumpkin Cheesecake
One of the reasons I adore making this pumpkin cheesecake is that it’s one of the best make ahead holiday desserts you can find! Seriously, you *have* to chill it for at least six hours, but honestly, it tastes even better the next day once all those beautiful spices have really settled in. That means you can bake it completely the day before your big event, and you won’t have to stress about dessert when everyone is arriving!
When you store it, make sure you cover the springform pan loosely with plastic wrap—you don’t want it touching the surface, just protecting it from any stray smells in the fridge. If it’s already thawed out of the springform ring, use an airtight container. And if you have leftovers (which, let’s be real, sometimes happens), cover the cut slices tightly; they keep beautifully in the refrigerator for about four days. If you need to keep it longer, wrapping slices individually and popping them in the freezer works great too! For quick dessert ideas later, thinking about how good this is makes me want to whip up a batch of my homemade chocolate pudding!
If you want more tips on making things ahead for a party, check out what Angelina recommends for her simple approach over at her site. It’s always fun to see how others approach holiday cheesecake baking!
Frequently Asked Questions About Pumpkin Cheesecake
I know you might have some burning questions before you dive into making what I promise is the most divine pumpkin cheesecake you’ll ever taste! Baking is all about confidence, and knowing the answers to these common snags really sets you up for success. We want that gorgeous, creamy result to shine through! I’ve gathered the most asked questions about making sure this seasonal treat turns out perfect for your table.
Can I make a No Bake Pumpkin Cheesecake Fall version instead?
That’s a great question, especially if your oven is booked solid with turkey or stuffing! This particular recipe—the one with the rich, dense texture—absolutely requires baking with that essential water bath. If you were hoping for a quick, chill-set dessert, you’d want to look for a recipe specifically labeled as a no-bake version, which typically uses gelatin or more whipped cream folded in. This recipe is designed for that deep, baked flavor profile that makes it such a classic holiday cheesecake baking centerpiece.
What is the best way to achieve a Pumpkin Pie Dessert Hybrid flavor?
I love this idea! If you’re craving that perfect marriage between a slice of pie and a dense cheesecake—the true pumpkin pie dessert hybrid—it’s actually quite easy to do here! You have a couple of options. You could very gently dollop some canned pumpkin pie filling (the pre-spiced kind!) onto the cheesecake batter once it’s in the pan, and then use a knife to gently swirl it just once or twice. Alternatively, if you want that pie profile even stronger, just add a tiny extra pinch of cinnamon and nutmeg to my filling mixture. It ramps up that warm, familiar pie spice wonderfully!
If you’re serving up something big for your gatherings, you might also want to check out this wonderful creamy butternut squash soup recipe, which has that same comforting autumn feel!
Nutritional Estimates for This Rich Pumpkin Flavor Treat
Now, I know most of us aren’t making this pumpkin cheesecake because we are strictly counting macros—it’s an indulgence, after all! But just so you have an idea of what you’re enjoying when you sit down for that slice of heaven, here are some general estimates.
Please keep in mind these are just guidelines based on the ingredients listed above, since the portion size is one slice. When you’re enjoying this amazing rich pumpkin flavor treat, just savor every bite! For another delicious savory appetizer, you might want to try my marinated cheese appetizer. Here’s a quick breakdown:
- Calories: About 450
- Fat: Roughly 28g
- Carbohydrates: Around 42g
- Protein: About 7g
- Sugar: Approximately 35g
It’s wonderfully decadent because of that cream cheese and butter, but so worth it for a cozy night!
Share Your Homemade Pumpkin Desserts Creation
I am so eager to see your gorgeous orange masterpieces! Really, sharing food with people you love is the best part of cooking. Once you’ve had your fill of this spectacular pumpkin cheesecake, please take a moment to leave a little star rating right below the recipe card—it helps me know what you loved about it. And if you took a picture of your creamy slice, tag me on social media! I always love seeing how everyone makes this recipe their own. It brings me such joy to know I helped you bring some autumn warmth to your table!
If you want inspiration for another wonderful fall bake, check out how to make my stuffed baked apples! And if you’re still looking for more swirl ideas, see what my friend over at Yum Row is doing with their swirl recipe!
PrintCreamy Baked Pumpkin Cheesecake with Gingersnap Crust
Create a rich, creamy pumpkin cheesecake featuring a spiced gingersnap crust. This recipe provides clear steps for a smooth texture, perfect for Thanksgiving or cozy fall evenings.
- Prep Time: 25 min
- Cook Time: 75 min
- Total Time: 100 min
- Yield: 12 servings 1x
- Category: Dessert
- Method: Baking
- Cuisine: American
- Diet: Vegetarian
Ingredients
- 1 1/2 cups gingersnap cookie crumbs
- 1/4 cup granulated sugar (for crust)
- 6 tablespoons unsalted butter, melted
- 3 (8 ounce) packages cream cheese, softened
- 1 1/2 cups granulated sugar (for filling)
- 1 (15 ounce) can pumpkin puree (not pumpkin pie filling)
- 1 teaspoon vanilla extract
- 1 teaspoon ground cinnamon
- 1/2 teaspoon ground ginger
- 1/4 teaspoon ground nutmeg
- 1/4 teaspoon ground cloves
- 4 large eggs
Instructions
- Preheat your oven to 325 degrees F. Wrap the outside of a 9-inch springform pan tightly with heavy-duty aluminum foil to prepare for a water bath.
- Make the crust: Combine gingersnap crumbs and 1/4 cup sugar in a bowl. Pour in melted butter and mix until the crumbs are evenly moistened. Press the mixture firmly into the bottom of the prepared springform pan. Bake the crust for 8 minutes. Remove from the oven and let it cool slightly.
- Prepare the water bath: Place the foil-wrapped springform pan inside a larger roasting pan. Boil water to use for the bath later.
- Make the filling: In a large bowl, use an electric mixer to beat the softened cream cheese and 1 1/2 cups sugar until smooth and creamy. Scrape down the sides of the bowl as needed.
- Beat in the pumpkin puree, vanilla extract, cinnamon, ginger, nutmeg, and cloves until just combined. Do not overmix.
- Add the eggs one at a time, mixing on low speed after each addition until the yolk disappears into the batter. Mix only until incorporated.
- Pour the filling over the cooled gingersnap crust.
- Carefully pour the boiling water into the roasting pan until the water reaches about halfway up the sides of the springform pan. This steam bath helps prevent cracks.
- Bake for 60 to 75 minutes. The edges should look set, but the center 2 inches should still jiggle slightly when the pan is gently nudged.
- Turn off the oven, crack the oven door open slightly, and let the cheesecake cool inside the oven for 1 hour. This slow cooling prevents cracking.
- Remove the cheesecake from the water bath and roasting pan. Let it cool completely on a wire rack.
- Once cool, cover the pan loosely with plastic wrap and refrigerate for at least 6 hours, or preferably overnight, before serving. Remove the springform ring before slicing.
Notes
- For the creamiest texture, bring your cream cheese and eggs to room temperature before you start mixing.
- If you do not have gingersnaps, you can substitute with graham crackers for the crust.
- To serve, top with a dollop of lightly sweetened whipped cream or a drizzle of caramel sauce.
Nutrition
- Serving Size: 1 slice
- Calories: 450
- Sugar: 35
- Sodium: 300
- Fat: 28
- Saturated Fat: 17
- Unsaturated Fat: 11
- Trans Fat: 0.5
- Carbohydrates: 42
- Fiber: 1
- Protein: 7
- Cholesterol: 110