
Oh, my friends, when the air turns crisp and the leaves start showing off, you know my kitchen has to lean into those deep, cozy fall flavors! Nothing screams autumn indulgence quite like biting into something perfectly spiced, sweet, and utterly rich. That’s precisely why I couldn’t wait to share my ultimate showstopper: the caramel apple cheesecake. Seriously, it has the creamiest filling you’ve ever dreamed of, swirled with tender cinnamon apples and dripping with sticky caramel. It might sound fancy, but trust me, my whole philosophy here on DelishCraze is about transforming those incredible, classic desserts into something very approachable. We’re going to make pure magic together, even if you’re a total beginner!
- Why This Caramel Apple Cheesecake Recipe is a Must-Make
- Gathering Ingredients for Your Caramel Apple Cheesecake Recipe
- Step-by-Step Instructions for the Best Apple Desserts: Making Caramel Apple Cheesecake
- Tips for Success with Your Caramel Apple Cheesecake
- Variations: From Caramel Apple Cheesecake Bars to Pie Fusion
- Serving Suggestions for Your Seasonal Cheesecake Treats
- Storage and Reheating Instructions for Caramel Apple Cheesecake
- Frequently Asked Questions About Making Caramel Apple Cheesecake
- Share Your Decadent Apple Dessert Creations
Why This Caramel Apple Cheesecake Recipe is a Must-Make
I promise you, this isn’t just another weeknight dessert. This is the centerpiece you bring out when you want jaws to drop. It’s perfect for Thanksgiving or any big autumn get-together you’ve got planned!
- It delivers that unbelievably silky, smooth texture that chews like a dream, not like rubber.
- The balance of tart apple, brown sugar spice, and rich dairy is just spot-on delicious.
Perfectly Creamy Texture Every Time
The secret to keeping that top flawlessly smooth and crack-free is something I never skip: the water bath! Wrapping that springform pan tightly and setting it into a pan of hot water while it bakes creates gentle, humid heat. It’s like baking in a tiny cloud, preventing the cheesecake from setting too fast around the edges, which is what usually causes those ugly cracks.
The Ultimate Caramel Apple Cheesecake Flavor Profile
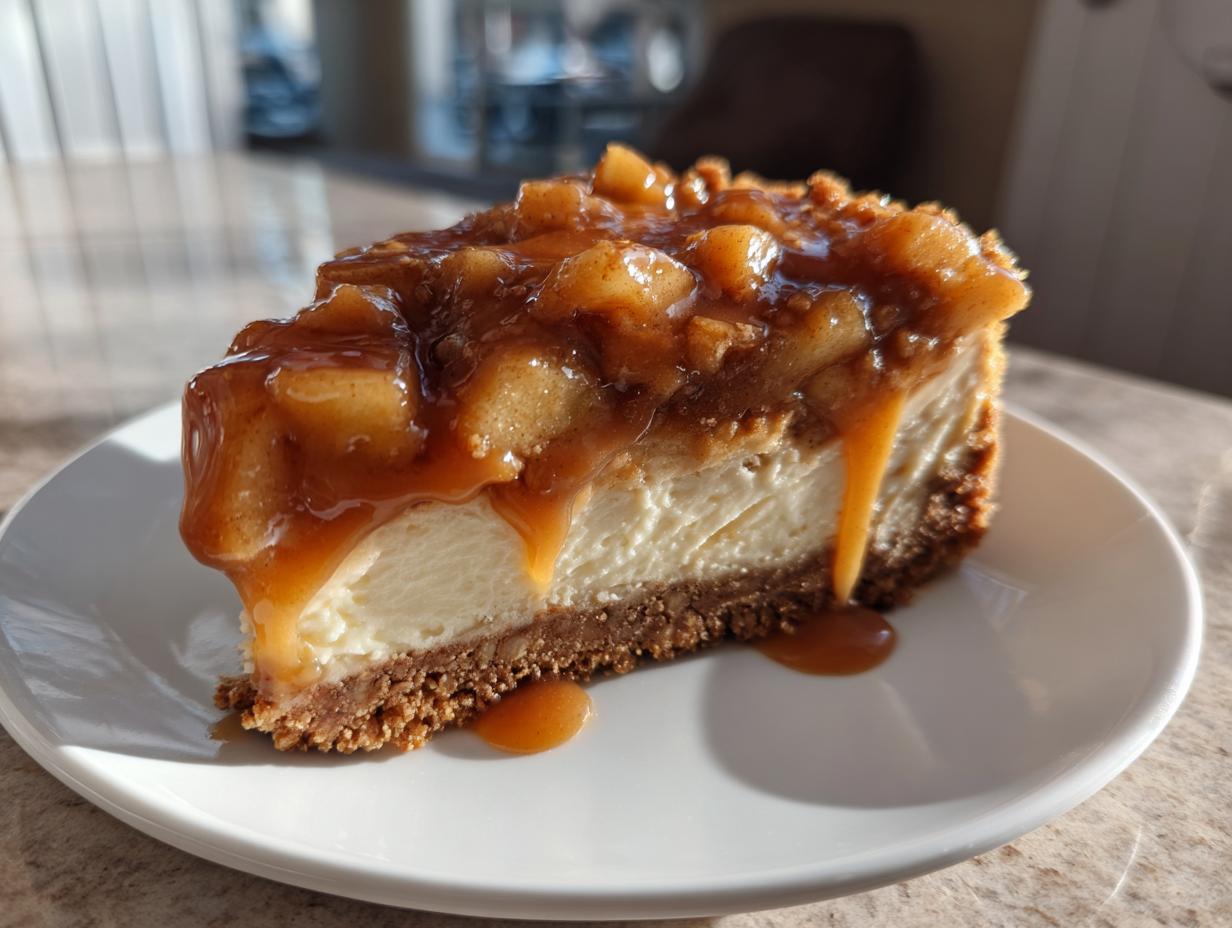
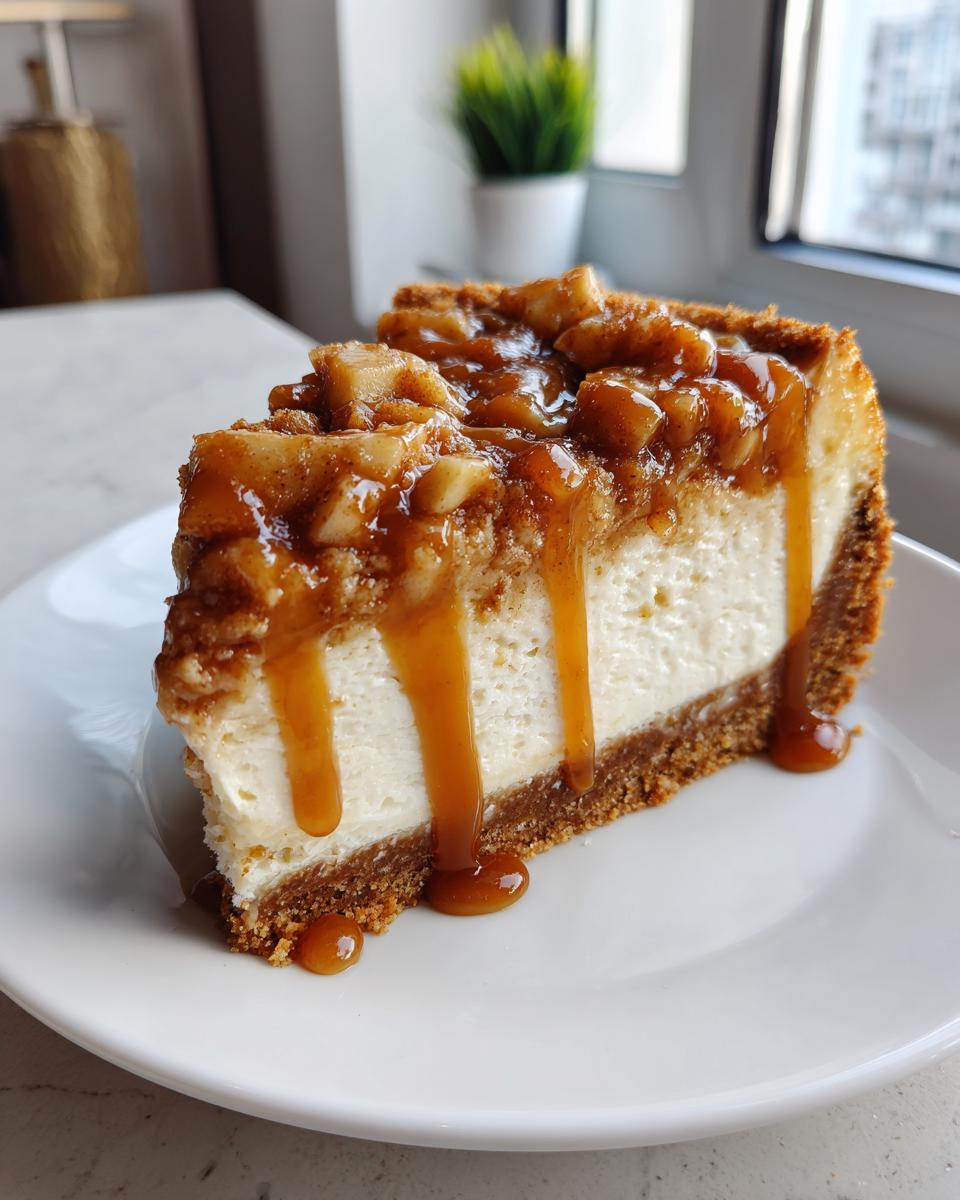
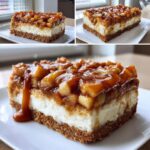
What makes this Caramel Apple Cheesecake my reigning champion? It’s the whole experience! You get that buttery snap from the graham cracker crust, followed by the cool, tangy cream cheese filling. Then BAM—you hit the warm, cinnamon-spiced apples, all wrapped up with that final drizzle of rich caramel sauce. It’s everything comforting about fall in one perfect slice.
Gathering Ingredients for Your Caramel Apple Cheesecake Recipe
Okay, let’s get organized! When we’re dealing with a dessert this impressive, we need to make sure we have everything ready before we even think about turning on the oven. You can’t fake the flavor here, so stick to the measurements exactly, especially for the filling. I always pull out anything that needs to be room temperature the morning I plan to bake—it makes such a huge difference in getting that smooth, beautiful batter. Don’t make substitutions yet; we talk variations later. First, let’s nail the foundation!
For the Graham Cracker Crust Cheesecake Base
This is that buttery, crunchy base that holds everything together. It needs to bake for a bit first, so treat it right!
- 1 1/2 cups graham cracker crumbs (go ahead and crush them fresh if you have whole crackers!)
- 1/4 cup granulated sugar (this sweetens the crust just a touch)
- 6 tablespoons unsalted butter, melted (Remember, melted for the crust, softened for the filling!)
For the Spiced Apple Topping
These are those lovely spiced chunks that melt right into the cheesecake. For the best texture, I always recommend Granny Smith or Honeycrisp—something that holds up while cooking and has a nice tartness to cut the sweetness.
- 4 medium apples (like Granny Smith or Honeycrisp), peeled, cored, and diced
- 1/4 cup brown sugar (dark is best for that deep molasses flavor)
- 1 teaspoon ground cinnamon
- 1 tablespoon lemon juice (this keeps the apples from browning too fast!)
For the Creamy Cheesecake Filling
Here is where room temperature is your best friend. Seriously, if your cream cheese or eggs are cold, you will get lumps, and lumps are the enemy of a perfect, creamy apple cheesecake. Trust me on this one!
- 3 (8 ounce) packages cream cheese, softened (make sure they are totally soft!)
- 1 1/2 cups granulated sugar (for the filling sweetness)
- 1 teaspoon vanilla extract
- 1/4 teaspoon salt
- 3 large eggs (also at room temperature!)
And finally, don’t forget the finishing touches you’ll need after it cools. Grab your favorite store-bought caramel sauce, or, if you’re feeling extra ambitious, whip up some homemade caramel sauce dessert to drizzle over the top!
Step-by-Step Instructions for the Best Apple Desserts: Making Caramel Apple Cheesecake
Alright, time to roll up our sleeves! This is where we bring all those lovely ingredients together. Don’t let the water bath scare you; it’s the key to an amazing, crack-free finish when making your caramel apple cheesecake. We need to work in layers here—crust first, then apples, then filling, and we layer that apple mess right in the middle. It’s all about building texture!
Preparing the Crust and Spiced Apple Topping
First things first, get your oven humming at 325 degrees Fahrenheit! Wrap that 9-inch springform pan—and I mean tightly—with heavy-duty foil. We don’t want any sneaky water leaking in later, so use a double layer if you’re nervous. Now, mix your crust ingredients and press that mixture firmly into the bottom of the pan. Bake it for just 10 minutes to set it, then set it aside to cool a little bit.
While the crust is baking, get those apples going! Toss your diced apples with the brown sugar, cinnamon, and lemon juice in a saucepan. Cook them over medium heat for about 8 to 10 minutes. You want them tender enough to eat easily, but don’t let them turn into mush! They should still hold their shape when you pull them out. Once they’re done, take them off the heat and let them cool down while you tackle the filling.
Mixing the Cheesecake Filling Without Overmixing
This is a critical moment, folks. Take your softened cream cheese and beat it with the filling sugar, vanilla, and salt until it looks perfectly smooth—like silk! Now, here is my big tip: add the eggs one at a time. Don’t dump them all in! You want to mix just until you see the yolk disappear before adding the next one. Overmixing after the eggs go in incorporates too much air, and that’s a recipe for cracks when it cools down later. Keep it gentle!
Assembling and Baking the Caramel Apple Cheesecake in a Water Bath
Time to layer! Pour about half of your creamy filling over that cooled crust. Then, spoon half of that gorgeous, spiced apple topping evenly over the cream cheese. Pour the rest of the filling on top, and finally, scatter the remaining apples over that top layer. Place this whole assembly into a larger roasting pan.
Now for the magic: carefully pour hot water into the roasting pan until it comes about halfway up the sides of your springform pan. This water bath creates the perfect environment for your Caramel Apple Cheesecake. Bake it for 60 to 75 minutes. You’ll know it’s ready when the edges look set, but the center still has that little, gentle wobble—that slight jiggle means it’s going to set up beautifully once it chills.
Cooling and Chilling for Ultimate Caramel Apple Cheesecake Texture
Resist the urge to yank it out when the timer goes off! To guarantee the best texture for your caramel apple cheesecake, let the heat mellow out slowly. Turn the oven off, crack the door open a tiny bit, and let it hang out in there for a full hour. This slow transition stops temperature shock, which prevents cracks. After the hour, carefully take it out of the water bath, remove the foil, and let it cool completely on a wire rack. Then, cover it up and stick it in the fridge for at least six hours, but honestly, overnight is always better. The chilling is where the true magic happens for a dense, satisfying slice!
Speaking of that amazing gooey topping, if you decide to make your own caramel instead of using store-bought, you absolutely have to check out my recipe for homemade caramel sauce dessert—it elevates this whole thing!
Tips for Success with Your Caramel Apple Cheesecake
I’ve made this recipe more times than I can count, usually because someone begged me to bring it to a party! Over the years, I’ve picked up a few tricks that make the difference between a good fall cheesecake and an absolutely show-stopping one. These little extra steps are what build confidence in the kitchen, transforming a tricky bake into something you can whip up with your eyes closed!
Ingredient Temperature Matters for Creamy Cheesecake
Listen, if you take away only one piece of advice from me, let it be this: you must have room temperature ingredients, especially the cream cheese and the eggs! If your cream cheese is cold and lumpy when you start beating it, your filling will never, ever smooth out. It’ll look okay at first, but once it bakes, those cold spots turn into dense, unappealing bits. I usually set my blocks of cream cheese out on the counter alongside my eggs about two hours before I plan to mix the filling. That way, everything incorporates beautifully right from the start, preventing those frustrating lumps.
Achieving the Perfect Gooey Caramel Apple Topping
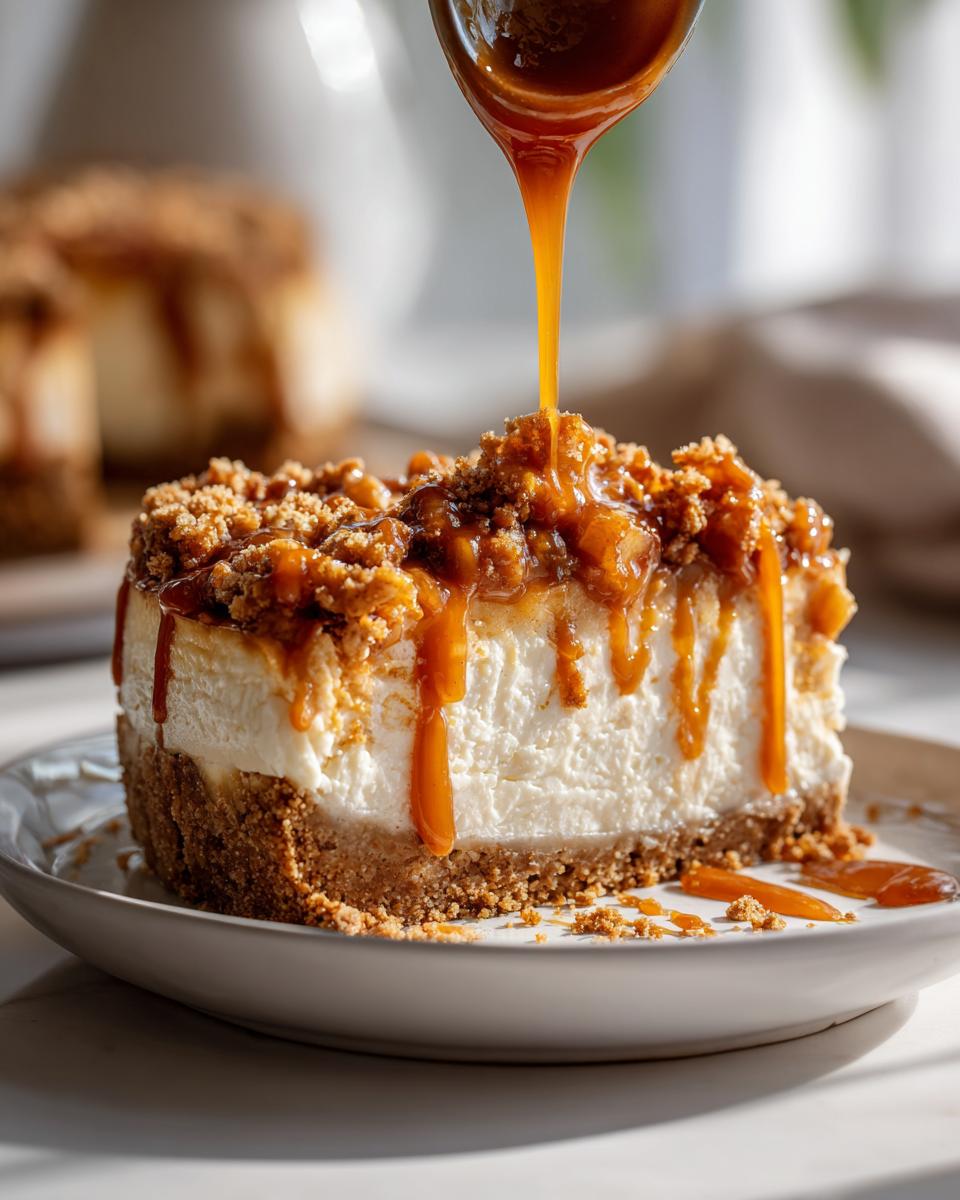
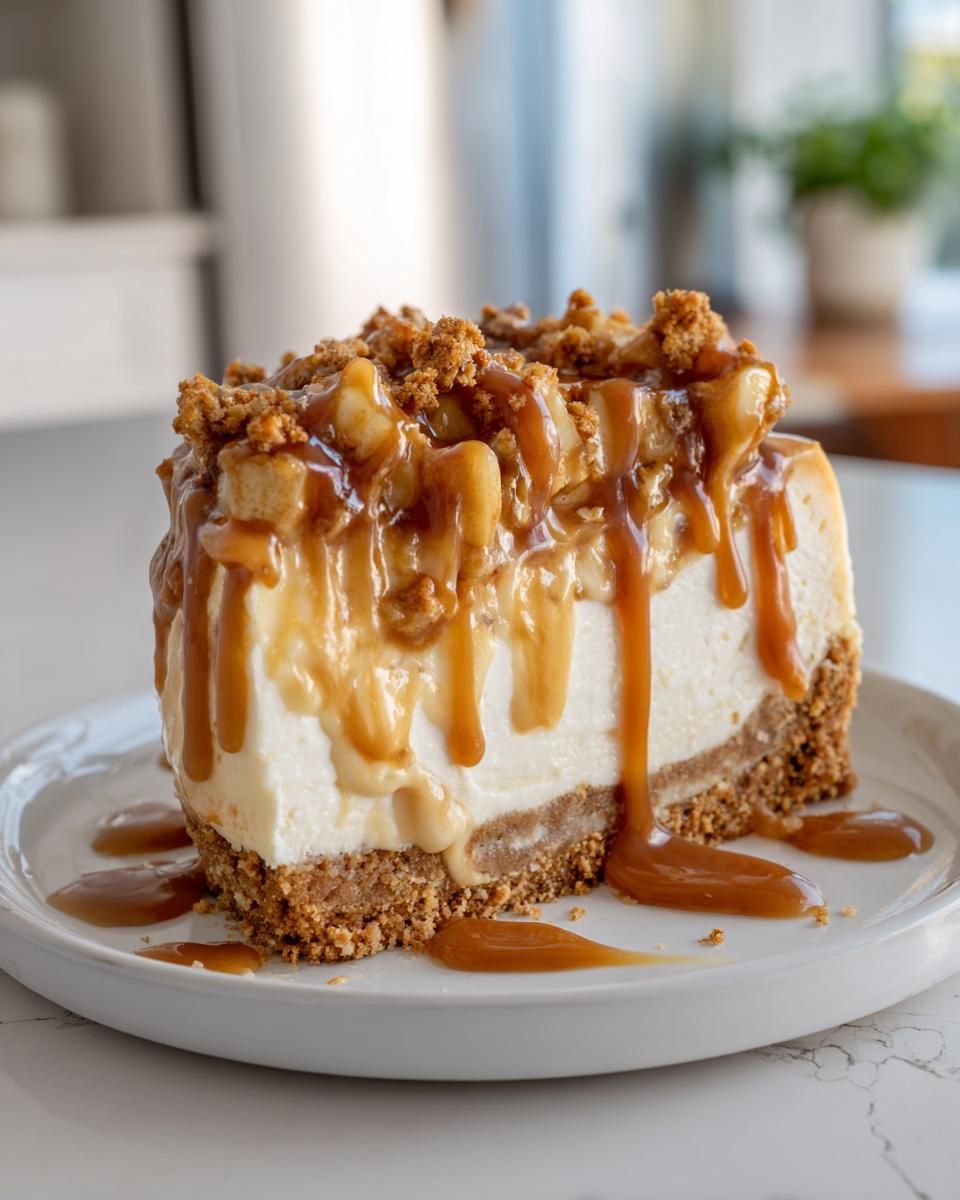
The amazing thing about this dessert is that it’s topped with that gorgeous caramel drizzle. If you’re using a fantastic store-bought caramel sauce, here’s a little secret—don’t drizzle it cold. Cold caramel can be thick, almost sticky, and it might yank or tear the top layer of your perfectly baked cheesecake when you pull the spoon away. For the best visual effect and the easiest pour, gently warm your caramel sauce in a small saucepan over low heat for just a minute or two until it flows easily off a spoon. If you’re making it from scratch, remember that slowing down the cooling process before you drizzle makes it much more luxurious and less stiff!

Variations: From Caramel Apple Cheesecake Bars to Pie Fusion
I love that this recipe is so flexible! While my heart belongs to the classic round caramel apple cheesecake, I completely understand the appeal of something a little more portable or something that tastes a tiny bit more like a traditional pie. You absolutely can take this decadent foundation and turn it into something different for your gathering!
Making Easy Caramel Apple Bars
If you’re baking for a crowd or just want easier slicing, bars are the way to go. You can easily transition this to a giant sheet by pouring the batter into a greased 9×13 inch pan—I always line it with parchment paper first, letting the ends hang over the sides like little handles, which makes lifting it out a breeze. Since the pan is wider, you’ll bake it for less time, usually closer to 45 or 50 minutes. It keeps that awesome creamy texture but turns it into the perfect ‘grab-and-go’ treat!
Exploring Apple Pie Cheesecake Fusion
To really lean into that apple pie cheesecake fusion idea, you have a couple of fun options. First, swap out the graham cracker crust for a shortbread crust—that buttery crumb really mimics a pie base. Second, when you are preparing the apple topping, instead of skipping the crumble ideas, try making a simple streusel topping using flour, brown sugar, and cold butter. Sprinkle that right on top before baking! It gives you that fantastic crusty texture contrast against the smooth cheesecake filling.
If you want to try making that classic crust from scratch, check out my recipe for a classic flaky pie crust—you can adapt that concept for the base here!
And for those who love the bar format, you can see some great steps for making those easily portable treats over at Treasure of the Barrel!
Serving Suggestions for Your Seasonal Cheesecake Treats
Once this beauty has chilled and set up perfectly in the fridge, the fun part—the presentation—begins! This is truly one of those best apple desserts that looks stunning all on its own, but a few little extras really push it into that show-stopping holiday category. Think texture, temperature, and a little bit of cozy warmth.
For a simple, elegant look that emphasizes the caramel, a light dusting of powdered sugar works wonders right before you cut into it. It gives you that lovely contrast against the dark caramel drizzle. If you’ve used the salted caramel note, this really helps it pop!
But if you want something truly comforting, especially if you’re planning this as a Thanksgiving apple dessert, never underestimate the power of ice cream or fresh cream. A generous scoop of high-quality vanilla bean ice cream melting slightly against the cool, dense cheesecake is pure bliss. If you prefer to keep it warm-weather appropriate, a dollop of freshly whipped cream is perfect.
Speaking of warmth, if you happen to have made your own caramels using my soft, chewy homemade caramel recipe, you can chop up one or two of those and sprinkle the little chunks on top just before serving. It adds amazing pools of chewiness! This truly elevates any seasonal cheesecake treat.
No matter how you serve it—straight out of the fridge or slightly warmed (don’t warm the whole thing, just a slice at a time!)—this cheesecake delivers that unmistakable flavor of autumn we all crave.
Storage and Reheating Instructions for Caramel Apple Cheesecake
Now, I know how hard you worked on this glorious caramel apple cheesecake, and the last thing you want is to ruin the texture while storing it! Good news: cheesecake keeps really well, but like most delicate desserts, it definitely prefers the fridge.
Once totally chilled—and remember, that’s at least six hours—you need to cover it tightly. I usually use plastic wrap first, pressing the wrap gently onto the exposed top to prevent any air contact, and then I might wrap the whole thing loosely in foil. This double protection stops it from drying out or absorbing weird smells from the leftovers in the fridge. Stored this way, your magnificent caramel apple cheesecake should stay perfectly fresh and creamy for about 4 to 5 days. It’s honestly still fantastic on Day 4!
Now, about reheating? Well, we don’t really reheat cheesecake—it’s not like a casserole! Cheesecake texture relies on that dense, chilled structure. If you try to warm up a slice, you risk it getting melty and soft, especially if your caramel topping has already started to soak in a bit. That’s why I always recommend serving it chilled straight from the refrigerator.
If you find the slice you cut is just too cold for your liking—maybe you want the apples to taste a little warmer—you can give *just the slice* a 10 to 15-minute rest on the counter before serving. That slight tempering will soften the edges without compromising that amazing creamy filling. If you used a very thick, homemade caramel sauce, this slight warming can make that drizzle perfect! But absolutely no microwaving allowed; that turns cheesecake into sad, foamy disaster very quickly.
Frequently Asked Questions About Making Caramel Apple Cheesecake
I know sometimes the details can trip us up, especially with a slightly more involved Caramel Apple Cheesecake Recipe like this one. You might worry about turning that beautiful filling into scrambled eggs, or maybe you’re just trying to plan your holiday menu! Don’t sweat it; I’ve answered the most common things I hear about making this beautiful Holiday Cheesecake Dessert.
Can I skip the water bath when making this Caramel Apple Cheesecake Recipe?
You technically *can*, but honestly, I would really, really advise against it if you want that spectacular, smooth, creamy texture we worked so hard for. Skipping the water bath exposes the cheesecake to direct, dry heat in the oven. The risk is that the edges cook too fast and firm up while the center is still liquid, leading to cracks and a slightly grainy edge. If you absolutely must skip it, you need to bake it at a much lower temperature, like 300°F, and keep a close eye on it. For tips on baking cheesecake without one, I wrote a whole guide on making a New York style cheesecake that skips the water bath, but for this recipe, the water bath is your security blanket!
How far ahead can I prepare this Holiday Cheesecake Dessert?
This is one of my favorite aspects of this dessert—it’s a fantastic make-ahead! Since the chilling time is so long (at least six hours, ideally overnight), it really helps your holiday schedule. You can assemble and bake the entire cheesecake up to two days in advance. Once it’s fully chilled, cover it well and keep it in the fridge. The only thing I strongly recommend waiting until serving time is that beautiful caramel drizzle on top, along with any whipped cream. That ensures your caramel looks glossy and fresh!
If you need more troubleshooting, I often reference tips from other great bakers, like the folks over at Just So Tasty when it comes to caramel apple flavors! Check out their take for more inspiration on those delicious caramelized apples!
Share Your Decadent Apple Dessert Creations
I’ve shared all my secrets now—from the water bath technique to using room-temperature eggs—so I really, really want to see what you whip up!
Baking is meant to be shared, and there’s nothing that makes me happier than seeing photos of your successes, especially with something as gorgeous as this caramel apple cheesecake. Did you go heavy on the salted caramel drizzle? Did you manage to get a perfectly smooth edge? Tell me everything!
I always encourage everyone who tries one of our centerpiece recipes to leave a star rating right near the top of the page. Your feedback helps other bakers feel confident stepping into their kitchens to create their own beautiful baking dessert recipes. It means the world to me when you take a second to rate it!
If you snap a picture of your finished cheesecake—maybe sitting on your Thanksgiving table or just enjoying a quiet moment with a cup of coffee—please tag me on social media! I love following along and cheering you on. Go ahead, make a dent in those fall baking ideas, you absolutely deserve this decadent treat!
PrintCreamy Caramel Apple Cheesecake with Graham Cracker Crust
Make this showstopper fall dessert featuring a buttery graham cracker crust, a smooth cream cheese filling, warm cinnamon apples, and a rich caramel drizzle. This recipe creates a decadent, comforting treat perfect for holidays or cozy nights.
- Prep Time: 30 min
- Cook Time: 75 min
- Total Time: 105 min
- Yield: 12 servings 1x
- Category: Dessert
- Method: Baking
- Cuisine: American
- Diet: Vegetarian
Ingredients
- 1 1/2 cups graham cracker crumbs
- 1/4 cup granulated sugar (for crust)
- 6 tablespoons unsalted butter, melted
- 3 (8 ounce) packages cream cheese, softened
- 1 1/2 cups granulated sugar (for filling)
- 1 teaspoon vanilla extract
- 1/4 teaspoon salt
- 3 large eggs
- 4 medium apples (like Granny Smith or Honeycrisp), peeled, cored, and diced
- 1/4 cup brown sugar
- 1 teaspoon ground cinnamon
- 1 tablespoon lemon juice
- 1/2 cup caramel sauce (store-bought or homemade)
Instructions
- Preheat your oven to 325 degrees Fahrenheit. Wrap the outside of a 9-inch springform pan tightly with heavy-duty aluminum foil to prepare for a water bath.
- Prepare the crust: Combine graham cracker crumbs, 1/4 cup sugar, and melted butter. Press the mixture firmly into the bottom of the prepared springform pan. Bake for 10 minutes. Remove and let cool slightly.
- Prepare the apple topping: In a medium saucepan, combine diced apples, brown sugar, cinnamon, and lemon juice. Cook over medium heat, stirring occasionally, until the apples are tender but still hold their shape, about 8 to 10 minutes. Remove from heat and set aside.
- Prepare the cheesecake filling: In a large bowl, beat the softened cream cheese with 1 1/2 cups sugar, vanilla extract, and salt until smooth. Beat in the eggs one at a time, mixing just until combined after each addition. Do not overmix.
- Assemble the cheesecake: Pour half of the cream cheese filling over the cooled crust. Spoon half of the cooked apple mixture evenly over the filling. Pour the remaining filling over the apples. Top with the remaining apple mixture.
- Bake the cheesecake using a water bath: Place the foil-wrapped springform pan into a larger roasting pan. Carefully pour hot water into the roasting pan until it reaches halfway up the sides of the springform pan. Bake for 60 to 75 minutes, or until the edges are set and the center has a slight jiggle.
- Cool the cheesecake: Turn off the oven, crack the door open slightly, and let the cheesecake cool inside the oven for 1 hour. Remove the cheesecake from the water bath and foil. Let it cool completely on a wire rack.
- Chill: Refrigerate the cheesecake for at least 6 hours, or preferably overnight, before serving.
- Serve: Before serving, drizzle generously with caramel sauce. You can add whipped cream if desired.
Notes
- For the smoothest texture, ensure your cream cheese and eggs are at room temperature before mixing.
- If you prefer a thicker caramel topping, gently warm the caramel sauce before drizzling.
- To make this a Salted Caramel Apple Cheesecake, sprinkle a tiny pinch of flaky sea salt over the caramel drizzle just before serving.
Nutrition
- Serving Size: 1 slice
- Calories: 450
- Sugar: 35g
- Sodium: 250mg
- Fat: 28g
- Saturated Fat: 17g
- Unsaturated Fat: 11g
- Trans Fat: 0.5g
- Carbohydrates: 45g
- Fiber: 2g
- Protein: 7g
- Cholesterol: 100mg